Port forwarding with your Bell router is a little different then other types of routers but still very familiar and simple. To enable internet access to your DVR unit, you will need to create "port rules" within your router. What these rules do is instead of your firewall completely blocking all traffic trying to access your DVR from an outside network, these port rules tell your firewall that certain types of traffic are allowed to have access.
The port rules refer to port numbers within your DVR. The two ports we are concerned with are port 8080 for HTTP and port 37777 for TCP. The default of your HTTP port in the DVR is 80; this however is a very commonly used port. For this demonstration the port number we will use is 8080. Make sure to change the corresponding port in your DVR's networking section or this process of port forwarding will not work.
Step 1: Access your router
The first step to enabling port forwarding is accessing your router. You do this by bringing up your internet browser and in the address bar typing in the default gateway of your network. This is your router's IP address. If you do not know your network information you can follow this guide here: https://www.cctvcameraworld.com/port-forwarding-for-dvr-and-nvr/
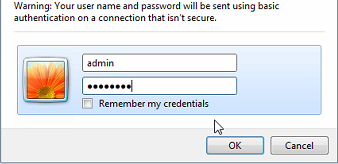
You will be prompted for your login credentials. If you do not know your login information you can either look up the manufacturer defaults online, or call your internet service provider and ask.
For most routers, the default IP address is either 192.168.1.1 or 10.1.10.1. As a note, your DVR's IP address must fit whatever scheme your router has to be accessible. If your router's IP address is 192.168.1.1, then your DVR's IP address must be something like 192.168.1.10 or 192.168.1.108. You can change this in the DVR's networking section.
Step 2: Find the port forwarding section of your router
Once you have accessed your router you must then you must find the section where rules are made. For this router type you select the Settings tab at the top. The Firewall tab under that. Finally you select Application Support. To get to the port forwarding section.

Step 3: Create Port Rules
For these port rules we have decided to use port 8080 for HTTP and port 37777 for TCP. Make sure these port numbers are listed in your DVR's networking section. Select the option Add a new user defined application under the application list to make your first new port rule.
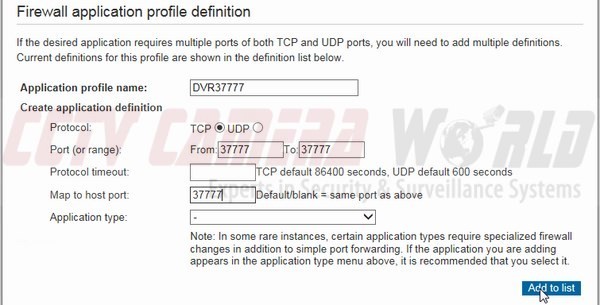
The next menu will show a few different things. Fill out the blank areas like so:
a) Application name: Name the port rule something that is easy to remember. Something like "DVR8080."
b) Port (or range): For here for both "From" and "To" you must put the port number associated with the port rule. For this put 8080.
c) Map to host port: This must also be the associated port number 8080.

Everything else is non essential to creating this port rule. Click add to list once this information is filled out. After this, repeat these steps and create a new rule for port 37777. Wherever you placed 8080 before you will now place 37777.
Step 4) Add the rules to the DVR
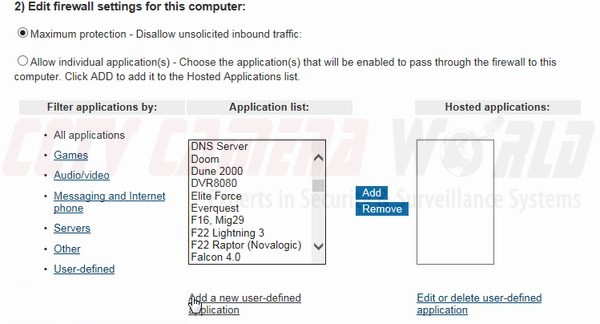
Now that your rules are created, you must pick the device the rules apply to. For this you should be back at the port forwarding menu with the "application list." Under the section "Select a computer" you must choose the device that the rules need to be applied to, the DVR. Normally this will be another name, but for this example the DVR was listed in the router as "unknown9002A98E943A." Select the DVR in your router.

Next under the section "Edit firewall settings for this computer", you must select the option "Allow individual applications ..." to tell your router that you now want to let select internet traffic through instead of blocking everything.

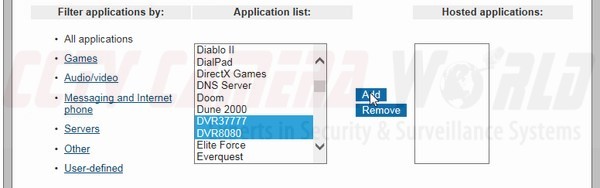
Now that the DVR is selected as the recipient device, you can now go under the "Application List" and add the port rules to the DVR. Go in the list and find the two port rules you just created. Highlight them and then click "add." These rules should now be added to your DVR.
Step 5) Check for open ports
After adding these new port rules it's always a good idea to check the status of your ports using a port scanning service such as "GRC Scan." You can use these scan services to check if your ports are open.
Go to GRC.com and at in the bar you want to type in the numbers of the ports you want to check "8080 and 37777." Type them in with a comma between them. The click "user specified custom port probe." The next page will show your results.

Here you will see the status of your ports to the left of the specified ports. "Open" means the ports were created properly and they are ready for internet traffic. "Closed" means the rules were created improperly and you will have to go back and figure out what went wrong. "Stealth" means that for whatever reason, the ports are being blocked. In this case you must call your internet service provider to figure out why the ports are being blocked.

If your ports are open then you should be ready to access your DVR remotely.