In order to view your surveillance system remotely there are a few things that have to be configured on your network. First, you will have to create port forwarding rules in your router in order for the data that's put out by your DVR/NVR to pass through the firewall within the router on your network. Second, optionally you may need to set up DDNS in order to have a constant pointer to the network your surveillance system is connected to. If you have a static IP address provided to you by your ISP this step is unnecessary. If you do not have a static IP, when the lease on the IP address assigned to your modem runs out it will renew. When the lease renews you could end up with the same IP address, or a new IP address. It's more likely that you'll end up with a new one. When you point back to that network using the now old IP address you will not be able to connect to your surveillance system because you are now pointing to another network or no network at all.
If you've already read Port Forwarding for your Security DVR and NVR then you already have the information needed from your DVR/NVR. Let's get started.
Configuring the Router
Step 1: Access Your Router
Enter the address of your router into your browsers URL bar. The default address is:
192.168.0.1
Here you may have to enter credentials to log into the device to make changes. According to Actiontec's website:
"Most Actiontec Modems and Routers DO NOT have a default login. The exceptions are the Actiontec Modems and Routers made and branded for a specific Internet Service Providers (ISP). Some ISP's require a default username and password. These Modems and Routers have a sticker on the bottom of the device with the default Username and Password printed on them."
Check the bottom of the device for your default username and password, otherwise try leaving the fields blank. If that doesn't work you can try admin//admin or admin//password. If you cannot log into the device and it was provided by your ISP, contact them for more help logging in. Fortunately, this device did not require any login.
Step2: Navigate to Port Forwarding
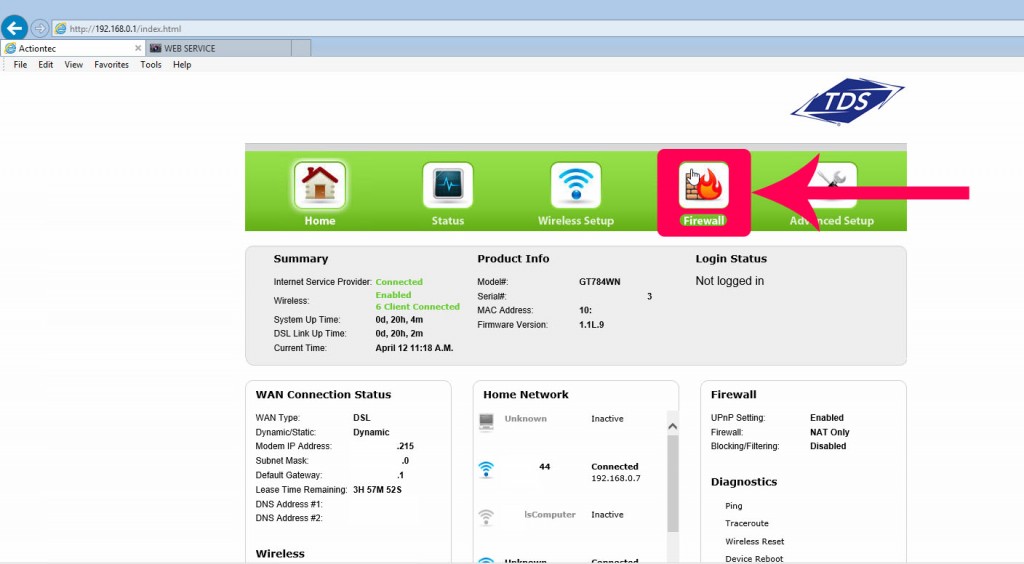
After logging into your router, you should be placed at a page that looks like this. Select Firewall on the top right.

Now select Port Forwarding on the left-hand side in the menu. This will place you on the correct page to place the rules.
Step 3: Create the Rules
Now that we're in the right spot it's time to create our port forwarding rules so the DVR/NVR can send the camera feed to the outside world.
Here you will create a rule for each of the ports that you want to be opened so that network traffic can pass through freely to the device over these ports.

- Start by selecting the device from the drop-down box (outlined in orange) or enter the IP address in the box below.
- Enter the value for the port you want to forward to the DVR/NVR into both the starting and ending port text boxes (outlined in green).
- Select the protocol using the drop-down box(outlined in blue).
- Click "Apply" (indicated by the arrow).
- Repeat these steps for the additional ports using their port number and protocol.
Default IP address: 192.168.1.108
Default Data Port: 37777
Default HTTP Port: 80
Default UDP Port: 37778
The rules are now in place. You should see them below Applied Port Forwarding Rules (outlined in purple). Let's move on to the next step.
Check Your Work
Always double check your work when you're finished in order to be sure the ports are open.
- Go to https://www.grc.com/shieldsup
- Click on the button labeled "Proceed"
- Enter the port numbers separated by a comma in the text field
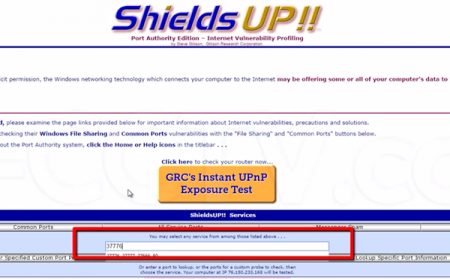
- Click on "User Specified Custom Port Probe"
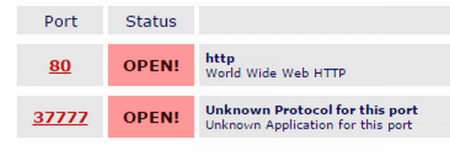
They should display as "OPEN!". If it doesn't display this way for these two ports, go back and take a look at the rules. If you still can't figure it out, contact your ISP for support.
In order to view your cameras remotely, you'll need to have a constant pointer from the outside world back to your home network. Unless you pay for a static IP address you'll need a way to point to the network when your IP changes after the lease is up. What we use is DDNS. For instructions on configuring DDNS on your own follow this link: Configuring DDNS for Remote DVR Viewing
If you have finished port forwarding and DDNS and need help accessing your DVR/NVR click HERE for a helpful guide.