In order for your security system to be accessible from your phone or computer, you must make port forwarding rules in your home router to allow traffic from the internet. You must first make a physical connection between your security DVR and your router with a network cable. These "port rules" tell your router to allow certain internet traffic into your network, and where this traffic should go. To create port rules, you need to know which port numbers in your DVR are assigned to it's TCP and HTTP ports within your DVR's networking section. You can find this information in the networking menu of your DVR. The default port numbers are 80 for HTTP and 37777 for TCP. You can use whatever port numbers you'd like, but make sure to change the corresponding port numbers within your DVR to match.
Although the default port number within your DVR is 80 for the HTTP port, 80 happens to be a very commonly used or blocked port. Therefore, if this port number or 37777 happen to be used be something else on your network, or blocked by your ISP, then you can use another port number in it's place. Just make sure you change the corresponding port number in your DVR's networking section for the appropriate service. (HTTP or TCP)
Using the port numbers 80 and 37777 we will make the two port rules within the router. We have laid out the steps to configuring port forwarding with a Comcast router.
Step 1) Access your router
The first step to configuring port forwarding is accessing your router via your internet browser. To do this you have to know what your "default gateway"(router's ip address) is on your network. If you do not know your network information you can follow this guide: https://www.cctvcameraworld.com/port-forwarding-for-dvr-and-nvr/
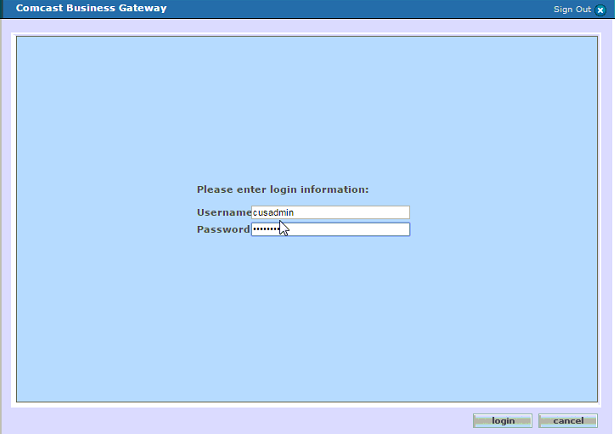
Once you know your default gateway, type the address directly into your internet browser bar. This will bring up the login screen of your DVR. From here, type in the login credentials for the router. If you do not know your login information, you can ask your internet service provider (ISP) or you can look online for the defaults.
Step 2) Find the port forward section
The next step after gaining access is to find the appropriate section for port forwarding. On the left tab there is different menu options for different sections of the router. You must choose "firewall" from the left menu, and then choose "port configuration" from the top menu bar after that. This will bring up the appropriate section of the router that you will make the rules in.

Step 3) Create the port rules
Once you are in this section of the router, you will see the already created port rules. You can choose to edit an existing rule or "add new." Click add new to begin to add a new rule. You will see several boxes to fill out for your new port rule. Our first port rule with be for port number 80. First, there is "Application Name." Here, insert a name that reflects the rule you are creating like "DVR80." Under "port range" there are two options for "public" and "private." In all of these boxes, put the port number 80. "Protocol" should be set to "both" and lastly, under "IP Address", place the ip address of your DVR, found in your DVR's networking section. To finish the rule, hit "apply."
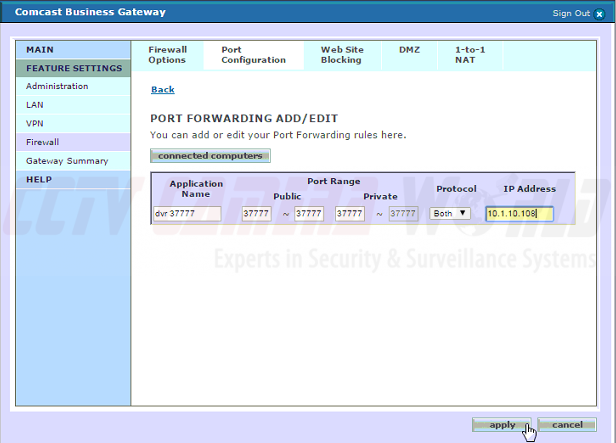
Now you should have one port rule for port 80. Go through these steps again and create a new port rule for port number 37777. The steps are the same but anywhere you previously placed 80 you now use 37777.
Step 4) Scan the Ports
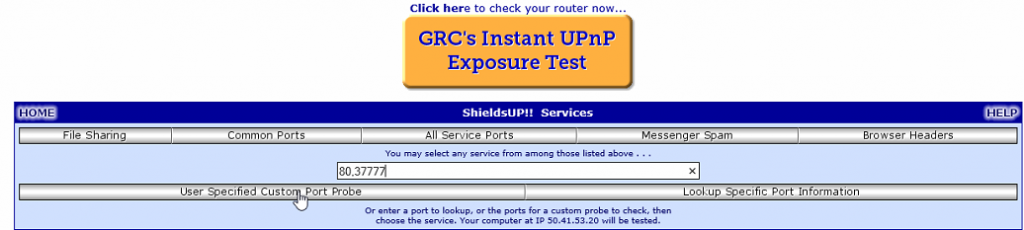
Now that you have created the rules in your router, you should be ready to access your DVR through the internet. To check to make sure your rules were created appropriately, you want to check the status of the ports and make sure they are open for traffic. To do this, you use a service like GRC.com. You must you a computer that is on the same network as the DVR.
Click proceed to begin. When the page loads, you will then type the two port numbers in the search bar separated by a comma such as "80, 37777." Click "User Specified Custom Port Probe" to check for open ports on your router.
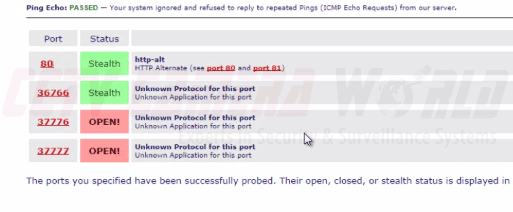
Look only at the status next to each port after the scan is complete If the status next to the ports is "Open", then the port rules should be applied correctly and you are done. If they say "Closed" then the rules were not created properly or there is some other issue happening. If they say "Stealth" however, this points to an issue with your internet service provider (ISP). Your ISP is blocking these or all ports from being used for whatever reason and you will have to contact them to resolve this issue. (Image is just demonstrating different statuses)