
Port forwarding with your router is a process of making "port rules" within your router that point internet traffic to your DVR. This in turn makes your DVR accessible and viewable from online for offsite viewing. In this guide we are demonstrating the port forwarding process on the AT&T Motorola NVG510 router. When you are out of the office or away on vacation you will then be able to view your security cameras without having to be in front of the DVR.
To complete this process you will need to have a few key pieces of information handy. You will need to know your Default Gateway (router's IP address) as well the login credentials for your router. You will also need to know your DVR's IP address and the port numbers assigned to its HTTP Port and TCP Port. All this information is easily found within the DVR's Network menu as well as on your home network. If you need help finding this information, follow this guide on Finding your DVR IP address and ports.
If you have purchased from CCTV Camera World, normally your DVR's default IP address is 192.168.1.108 and the default HTTP port and TCP port are 80 and 37777, respectively. If there are no conflicts on your network with these ports already being used and you wish to use these port numbers please go ahead. If 80 or 37777 are already being used by another service on your network and you need to use another port number you can, just make sure to change the appropriate port number in your DVR's Network menu to reflect that change. You can also change the IP address to suit your local network.
In this guide, our DVR's IP address is 192.168.1.178 and the port numbers we will be using are port 81 for HTTP traffic and port 37780 for TCP traffic that is required for the DVR to serve video remotely.
Step 1: Access your router
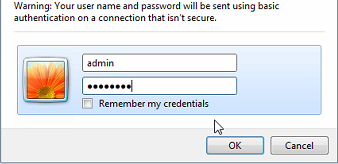
The first step is to access your router to make the necessary port rules. To do this you type the Default Gateway (aka router IP address) directly into your internet browser address bar.
![]()
You will be prompted for your admin credentials. If you do not know your login information you can either look up the manufacturer defaults online, or call your internet service provider for help with these credentials.
For most routers, the default IP address is 192.168.1.1 or 10.1.10.1. If your router is something along the lines of 10.1.10.1 then your DVR's IP address must be changed to fit this scheme. Change it to something like 10.1.10.5 or 10.1.10.108. In our case we changed it to 192.168.1.178 since the default ip address was already being used by another device. Once you are logged into your router you can continue to the next step.
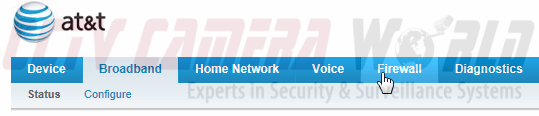
Step 2: Find the Port Forwarding section
You need to find the appropriate section within your router to enter the port rules. First at the top of the page there will be several tabs to select. For the Motorola NVG510 router, you need to select the option "Firewall."
Now also at the top of the page there will be more options that are shown. Click "NAT/Gaming."
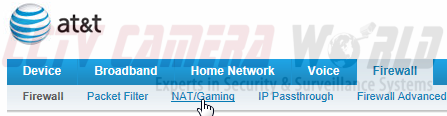
Now midway down the page under "Manage Custom Services" there will be a button for "Custom Services." Click here to bring up the next menu.
Under the "Custom Services" section is where you will enter the Port Rules that you will need for port forwarding.
Step 3: Create Port Rules
For these port rules we have decided to use the port numbers 81 and 37780. By default, the port numbers assigned to HTTP and TCP in your DVR are 80 and 37777, respectively. If you have not changed anything in the DVR's network menu and there are no conflicts with other services on your network, use 80 and 37777 instead.
For this Motorola router, each port rule is called a "Service Entry." You will create two Service Entries as follows:
a) Service Name: The first field is labeled "Service Name." Here you will name your new service / port rule. Make it something easy to find and remember like "Video81" or "DVR81."
b) Global Port Range: There are two input fields for Global Port Range. For both, put the port number you are making the rule for. In this case, put 81.
c) Base Host Port: Also for this selection put the same port number as in the step above, that is 81.
d) Protocol: Click the drop down menu and choose "TCP" for this selection as HTTP ports are TCP. If you are following this guide for a device not purchased from CCTV Camera World, please consult the manufacturer which protocol type is required.
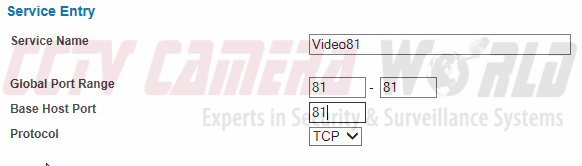
e) Once this information is filled out, click "Add" to finalize this rule.
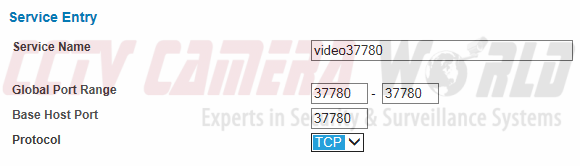
Go through these steps again and make your second port rule, in this case for port 37780 which is a TCP port. Please see below for an example of how your entry should look like.
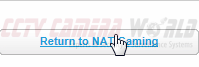
Click "Return to NAT Gaming" to go get back to the previous menu.
Once both rules have been made, go on to the next step to point these rules to your DVR.
Step 4: Point the Port Rules to your DVR
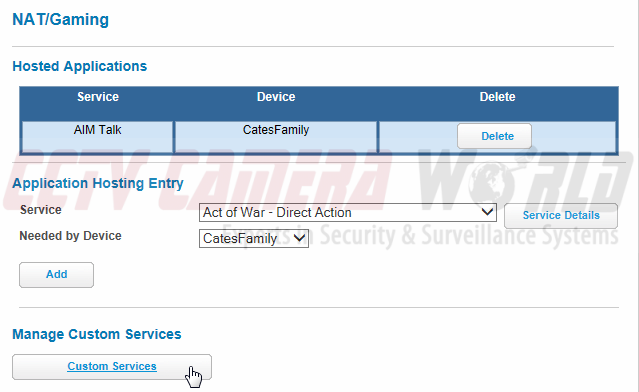
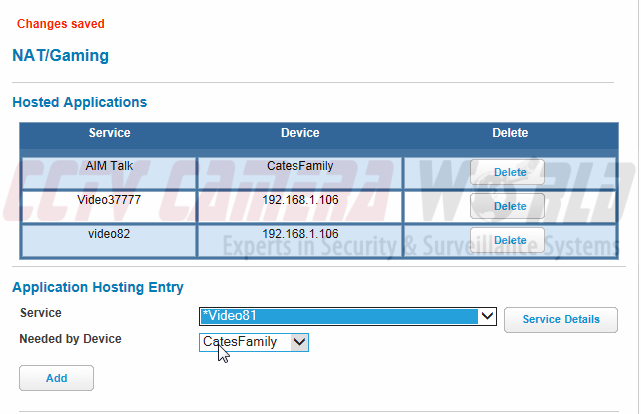
In Step 3, you created the port rules for the relevant ports needed. For this AT&T Motorola router they are pointed to the DVR on the internal network using the "Application Hosting Entry" section found in "NAT/Gaming."
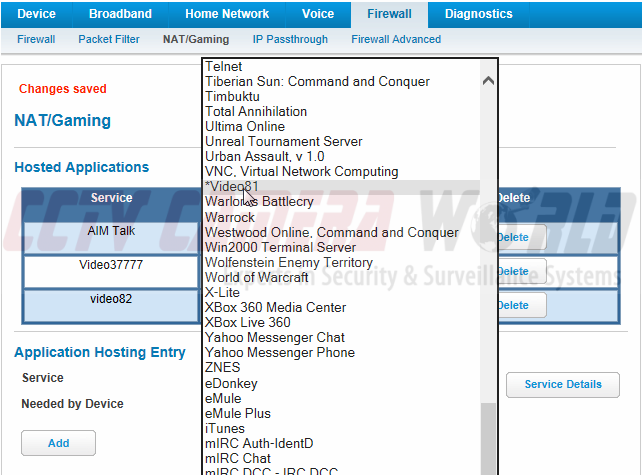
a) Select the first rule under the "Service" drop down bar.
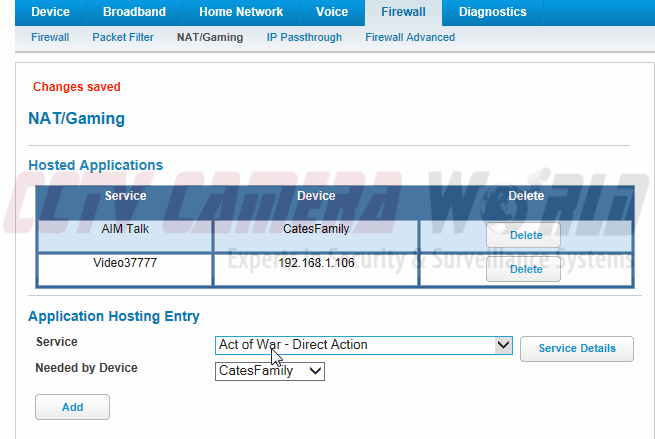
There will be a long list of different services. Select the one that you created in Step 3, in our case it is "Video81."
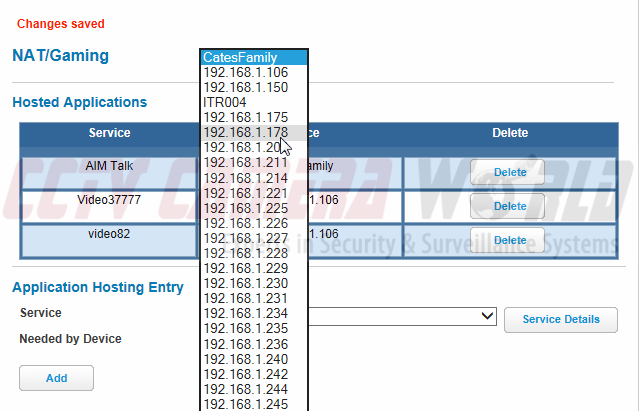
b) Then under "Needed by device" there will be another drop down menu.
Here you will look for your DVR's IP address. Find the appropriate DVR IP and select it. In our case it is 192.168.1.178. Note: if you do not see your DVR's IP address make sure there is a network cable connected from the DVR to your router.
c) Once you have both fields selected, hit "Add" to finalize this rule.
Repeat the same process with the other port rule you made. Once you have completed this you will see the port rule and associated device IP in the menu under "Hosted Applications."

In our router we created 4 rules, 2 each for each of our 2 DVRs.
Step 5: Confirm your Ports are Open
Once you make these port rules and add them to "Hosted Applications" it is a good idea to scan the ports to make sure they are open for internet traffic. To do this there are several sites that will scan your ports. We suggest using GRC for this: https://www.grc.com/x/ne.dll?bh0bkyd2
Click Proceed to begin, and wait for the next page to load. When the page reloads, you will then type just the two port numbers in the input bar separated by a comma such as "81, 37780" not "port 81, port 37780." See below for an example.

Click on the button called "User Specified Custom Port Probe" to check whether the ports you entered are open on your router.
Look only at the status next to each port after the scan is complete. If the status next to the port numbers is "Open", then the port rules should be applied correctly and you are done.
![]()
![]()
If they say "Closed" then the rules were not created properly or there is some other issue happening. If they say "Stealth," this points to an issue with your internet service provider (ISP). Your ISP is blocking these or all ports from being used for whatever reason and you will have to contact them to resolve this issue.
If your ports are open and everything was configured correctly you should be ready to connect to your DVR. If you do not know how to connect to your DVR through the internet, follow the steps at the end of our DVR Port Forwarding Guide located here.