


Dummies Guide to Watching a Security Camera System From the Internet
If you are not tech-savvy and want to easily monitor your security camera system from the internet, this guide is for you. Once you have your cameras connected to your recorder and you can watch your cameras using a monitor connected to the recorder, then follow this guide on how to remotely view the system without any recurring fees. This Dummies' Guide method does not require any advanced technical knowledge or computer networking expertise.
Contents
- Before you get started
- Step 1) Connect your Recorder to your Main Internet Router
- Step 2) Enable DHCP On Your Security Camera Recorder
- Step 3) Download and Install the Remote Viewing App
- Step 4) Enable P2P for Easy Remote Viewing
- Step 5) Connect your recorder to your Smartphone
- Step 6) Connect your recorder to your the PC or Mac software
- Step 7) Share Access - If a DMSS Account was made
- Troubleshooting Remote Viewing Issues
Before you get started
Before you follow the guide below, make sure the following is true:
- You are currently at the location of the recorder.
- You have a monitor connected to the security video recorder using the VGA or HDMI port.
- You can see the cameras in the grid on the monitor.
- You have a hard-wired broadband internet connection to the location of the recorder.
- Understand that the P2P remote connection does not work through mesh networks such as Orbi, Google WiFi, or EERO. The recorder requires a direct connection to the main router.
The user is responsible for following this guide completely and thoroughly. Any attempts to skip the steps outlined below will only result in failure of the connection process. We advise customers to rewatch the videos and make sure they are not missing a step.
Make sure you are using a known good networking cable and that your network firewall or ISP is not blocking the recorder from connecting to the P2P server. If for some reason the recorder is unable to connect to the P2P services that means you have misconfigured network settings or your network environment is blocking the recorder. You would then need paid networking services as per our terms and conditions. Networking services are affordable and can be purchased here.
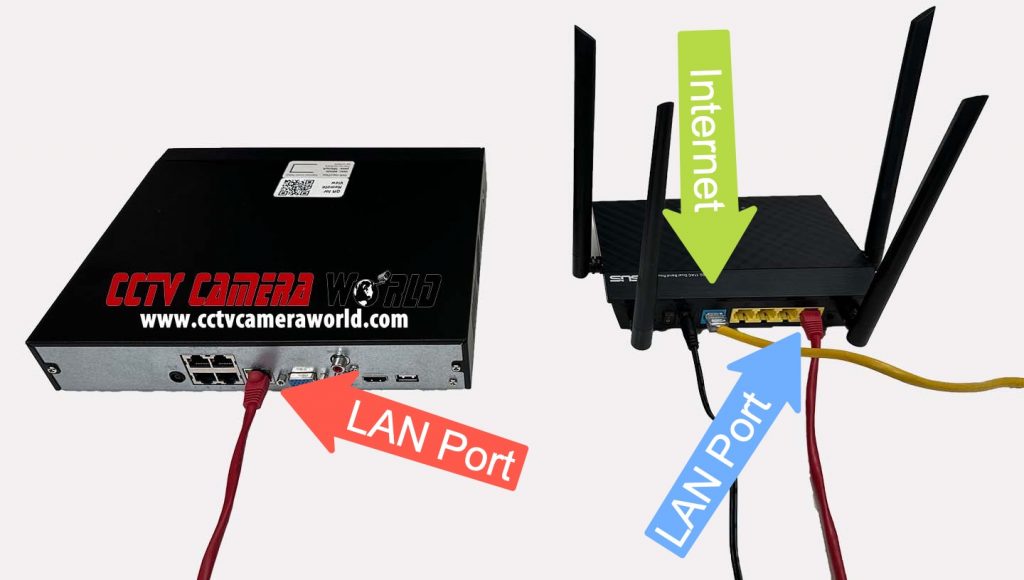
Step 1) Connect your Recorder to your Main Internet Router
When you get internet from your service provider, they usually give you a modem that has a router built in. You will want to find the similarly colored group of four ports that are for your local Ethernet devices. They will usually be yellow, but they may be another color. Connect an Ethernet cable from the back of your recorder to one of the local network ports. This connection gives your recorder access to the internet, so you can watch it at home or while you're away.
Step 2) Enable DHCP On Your Security Camera Recorder
Although this step is already done for you when you order a recorder from us, it's important to understand how to enable DHCP in case you accidentally change the setting. DHCP (Dynamic Host Configuration Protocol) is a computer networking protocol that automatically gives local IP addresses to devices that are connected to a router. Therefore, you do not need to know how to set an IP address because DHCP will do it for you.
Step 3) Download and Install the Remote Viewing App
Now that you have an "Online" P2P status, your security camera recorder is ready to be connected to a smartphone or our remote viewing PC software. You can find links to the app below by tapping or clicking on the images. If you're looking to connect the recorder to your PC or Mac, please follow our Camera Monitoring Software guide to download and install the software.
Step 4) Enable P2P for Easy Remote Viewing
We enable P2P services before we ship any of our recorders; you will need to visit the P2P menu page in the Network settings to confirm that the status says "Online." You cannot proceed beyond this step unless the status is "Online." This step is shown in the Step 5 video below.
If your status is "Offline," that means an internet connection is not being provided to your recorder. You will have to figure out what's wrong with your network on your own, or you can use the link below to buy help with your networking. Please refrain from calling us for networking assistance, as it will not be provided. You will need to either contact your ISP or the manufacturer of your router if you're looking for free networking assistance at this point. We have some free troubleshooting tips at the bottom of the guide.
Step 5) Connect your recorder to your Smartphone
After you have the app installed on your phone or computer, it is time to add the system to the app. You can do this by scanning the QR code that is found on the top of the recorder or by using the QR code on the P2P page where you checked the status.
Note: Please DO NOT create an account when first opening the app or adding your DVR or NVR. Setting up an account will complicate adding the system to multiple phones and will require manual access sharing for each additional phone or tablet. Without an account, you can freely add the system to as many devices as needed.

Step 6) Connect your recorder to your the PC or Mac software
Last but not least, you can also add the recorder to the PC or Mac software by using the P2P serial number. The P2P method makes it much easier to add for remote viewing without needing complicated networking.

Step 7) Share Access - If a DMSS Account was made
If you created an account in the app during setup, your system is bound to that account. In this case, sharing access requires using the app’s built-in sharing tools rather than adding the system directly to another phone. The system remains tied to the original account, and access is delegated to other users with specific permissions. Anyone you want to share access with will need to create their own account in the DMSS app and receive permissions from you.
The tutorial video below shows how to share access from an account-bound system, including selecting individual cameras or the entire recorder and assigning privileges for shared access.

Troubleshooting Remote Viewing Issues
Problem 1: P2P setting stays "Offline" and you're unable to get it to say "Online"
Reason 1: You will want to make sure the following have been done and are true:
a. Make sure the recorder is connected directly to the main router on your network with a known good network cable. That would be the router provided to you by your ISP. A good network cable would have activity lights blinking on the network port on the back of the recorder and on your router.
b. Make sure you are not connecting the recorder to a wireless extender such as an Orbi, Eero, Google WiFi, or some other mesh network device that creates a subnet different your main network. Connect the recorder directly to the router or modem from your Internet Service Provider.
c. You have successfully enabled DHCP. If the recorder does not receive a new IP address right away, restart it by pressing the software reboot button in the upper right corner of the screen, flip the power switch in the back off and then back on if there is one, or unplug and reconnect the recorder to power.
d. There are proper DNS settings enabled. By default, if you set your recorder to DHCP, it should automatically grab DNS settings. If it does not, we recommend manually setting the DNS 1 server to 8.8.8.8 and the DNS 2 server to 8.8.4.4, aka the primary and secondary DNS servers.
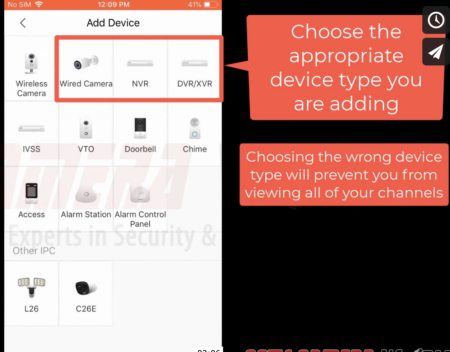
Problem 2: You see only one camera from a DVR or NVR when trying to watch video from the app
Reason 2: The device was not added correctly. When adding the device after scanning the P2P Serial Number, you must select the correct device type. For DVRs and XVRs, choose the DVR/XVR option. For NVRs, choose NVR. See the snapshot from the video below showing where to choose the appropriate device type.
Still only seeing one or 4 cameras? After you have successfully added the NVR or DVR with the correct device type and you still only see one or 4 cameras, you will need to learn how to use the app. If the app is connected, that means it has access to all of the cameras connected to the system. Click the following link to learn more about how to use the Live View and Playback functions of the app to cycle through channels or change the grid screen options to view more channels: iPhone iPad App for Remote Viewing Your Security Cameras guide.
Problem 3: Remote Viewing doesn't work while away from your WiFi and you have an Antivirus app on your phone
Reason 3: The antivirus is blocking the phone from accessing the remote viewing service. Make sure you add an exception for the app within the settings of your anti-virus software so the app can freely communicate over the internet. Without internet access, the app will always fail to access your system remotely.
Problem 4: You need to share access, or you're transferring ownership of the system but can't
Solution 4: Sharing access or transferring ownership should normally be as simple as having the other person download the app and add the system to their phone. However, many customers accidentally create an account in the app and unknowingly bind their system to that account. Once a system is bound, it becomes difficult to share access or add the system to a new phone until the binding is removed.
The tutorial video below shows how to unbind and delete a system from a DMSS account, and how to log out of the account, so the recorder can be added freely to another device or user.
