

Connect Alarm Sensors to Your PoE NVR Security Camera System
Motion and intelligent detection are helpful features in most security camera systems, but they aren’t always the most reliable way to detect events. Changes in lighting, random objects, and animals can still cause unwanted recordings even with the most advanced algorithms out there. That’s where alarm inputs come in.
Alarm inputs allow you to connect physical devices like motion sensors, door contacts, or buttons directly to your NVR. We’ve even had customers use light switches to manually start and stop recording for various purposes. When these devices are activated, they send a signal to the recorder to start recording, alert you, or even activate other actions, like moving a PTZ camera.
This article explains how to connect and configure alarm inputs on a professional NVR. We'll discuss sensor types, wiring, and how to set up your system to record when the sensor or trigger is tripped. Alarm-based recording, regardless of your location, provides you with greater control and superior accuracy compared to software detection alone.
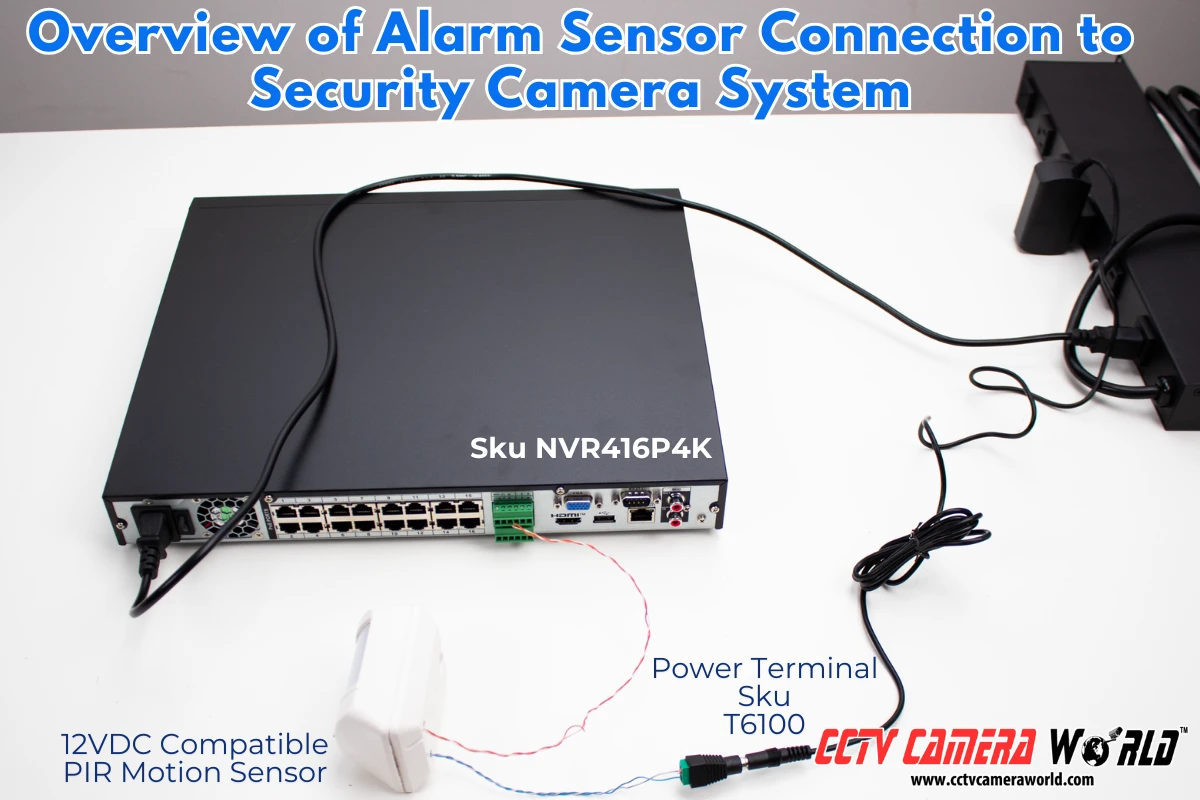
Table of Contents
- What Are Alarm Inputs and How Do They Work?
- Devices You Can Connect to Alarm Inputs (and Where to Use Them)
- Wiring and Connecting the Alarm Device
- Configuring the NVR to Record on Alarm Input
- Testing and Verifying Your Setup
- Troubleshooting and FAQs for Alarm Inputs on NVRs
What Are Alarm Inputs and How Do They Work?
Alarm inputs are connectors found on most professional NVR systems. They allow you to wire external devices with circuitry, like motion sensors, magnetic door contacts, or switches, directly into your recorder. When they are triggered, it sends a low-voltage electrical signal into the alarm input, which tells the NVR to record, send an email, or push an alert to the remote viewing app.
Alarm input connections typically require two wires: one for the signal and another for grounding. The circuit can be either “normally open” (NO) or “normally closed” (NC), depending on the sensor, as explained in the next section. The NVR software continuously monitors these ports and reacts to any changes in the circuit state. When a connected sensor is triggered (for example, a door opens or a button is pressed), the recorder can be configured to:
- Begin recording on selected channels
- Trigger the NVR’s internal beeper
- Display an on-screen message
- Send an email alert or mobile push notification
- Move a PTZ camera to a preset position
- Activate an external output or Active Deterrence camera (e.g., strobe or siren)
Many modern NVRs offer at least 4 alarm inputs, while larger models may support 8, 16, or more.
Unlike software-based motion detection, alarm inputs are highly accurate. They respond to physical events, making them ideal for reliability in high-traffic environments, automating tasks, or triggering recordings during specific steps in manufacturing and shipping processes.
Devices You Can Connect to Alarm Inputs (and Where to Use Them)
By connecting the right type of physical alarm device to your recorder, you can build a more intelligent surveillance system that only records when it matters. We created the table below to outline common alarm input devices, their functions, and typical uses.
| Device Type | What It Does | Where to Use It | Why It’s Good |
| PIR Motion Sensor | Detects body heat and movement using passive infrared | Outdoor walkways, driveways, wide hallways, parking lots | Only triggers when heat is detected, usually from a human or vehicle. |
| IR Beam Tripwire | Sends an alert when the infrared beam is interrupted | Loading docks, warehouse and office entrances, garage doors | Physical tripwire that outperforms digital tripwire detection |
| Magnetic Door/Window Contact | Triggers when two magnets are separated (e.g., door opens) | Storefront entries, backdoors, secure gates or cabinets | Does not rely on an algorithm to detect an object entering the door |
| Tilt or Vibration Sensor | Detects shaking or physical movement | File cabinets, server racks, roll-up doors, heavy machinery | Can detect entry to secured storage, which cameras cannot do |
| Glass Break/Shock Sensor | Responds to the sound or vibration of breaking glass | Storefronts, glass doors, large office windows | Guarantees recording is triggered in the event of a break-in |
| Panic Button | Manually triggers alarm or recording when pressed | Retail counters, offices, desks, security stations | Guarantees recording if authorities are alerted to the button |
| Manual Switch or Light Switch | User-controlled start/stop for recording | Workstations, packaging areas, manufacturing lines | Flexibility to record business processes or in specific situations |
All these sensors use a simple two-wire dry contact circuit, making them easy to integrate with most NVRs. With the right setup, you can reduce false alerts, log real activity, and trigger recordings only when they matter most.
Wiring and Connecting the Alarm Device
Wiring an alarm input device to your NVR is a straightforward process, even if you’re not an electrician. Follow these simple steps to get your alarm device hooked up.
Step 1: Locate the Alarm Input Terminals
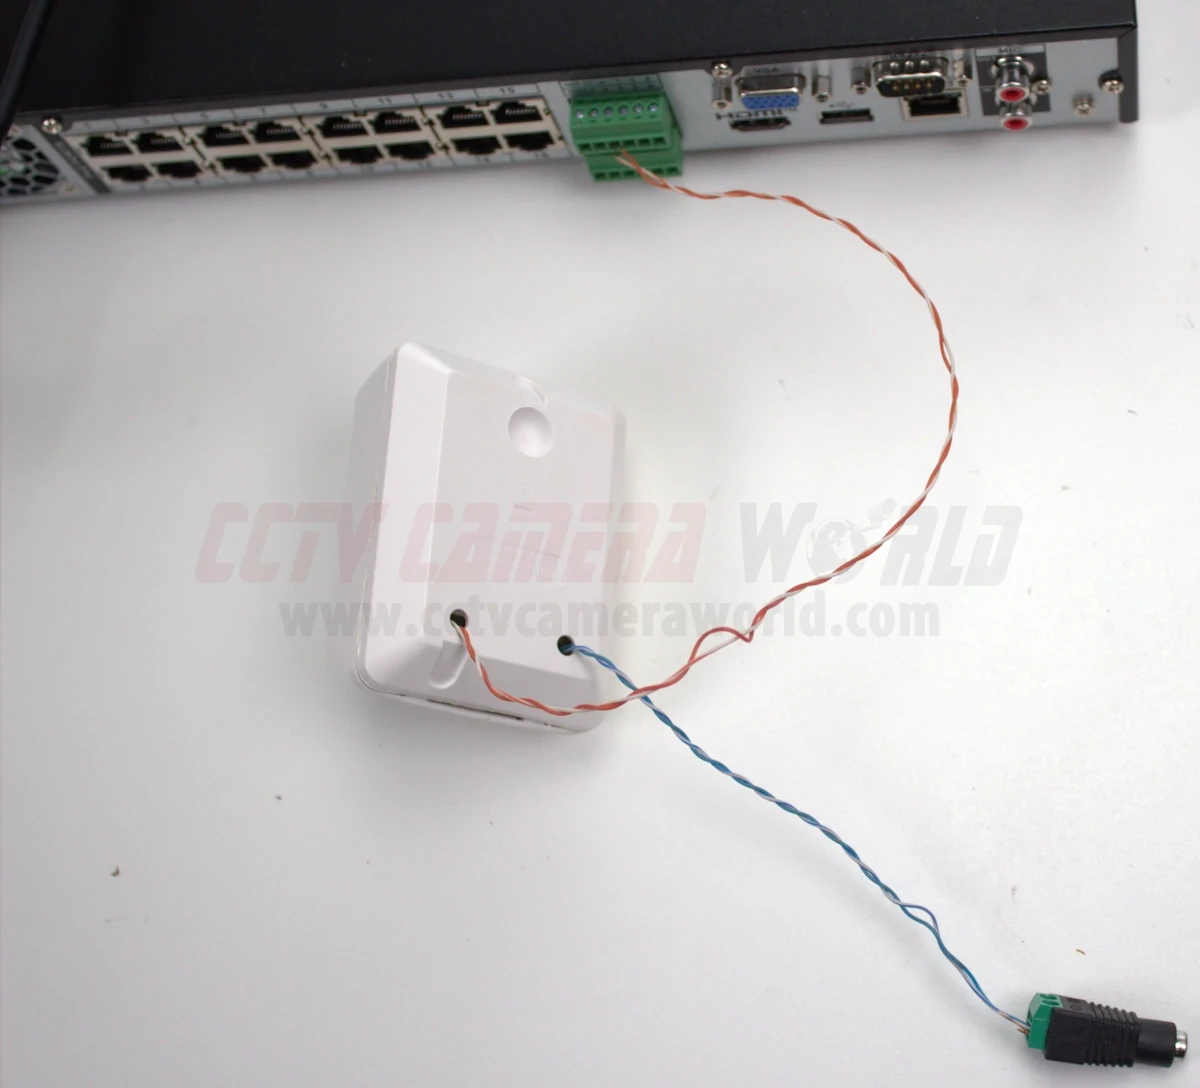
Look at the back of your NVR for a row of labeled connectors called an alarm block. These may be built-in push-tab terminals or a removable block with screw-down connections. You’ll usually see a green block with numbers like 1, 2, 3, etc., for the alarm inputs, and a terminal marked G or GND for ground.
If you’re unsure which is which, look for a label printed near the ports or reach out to our support department with your order number and a photo of your alarm block.
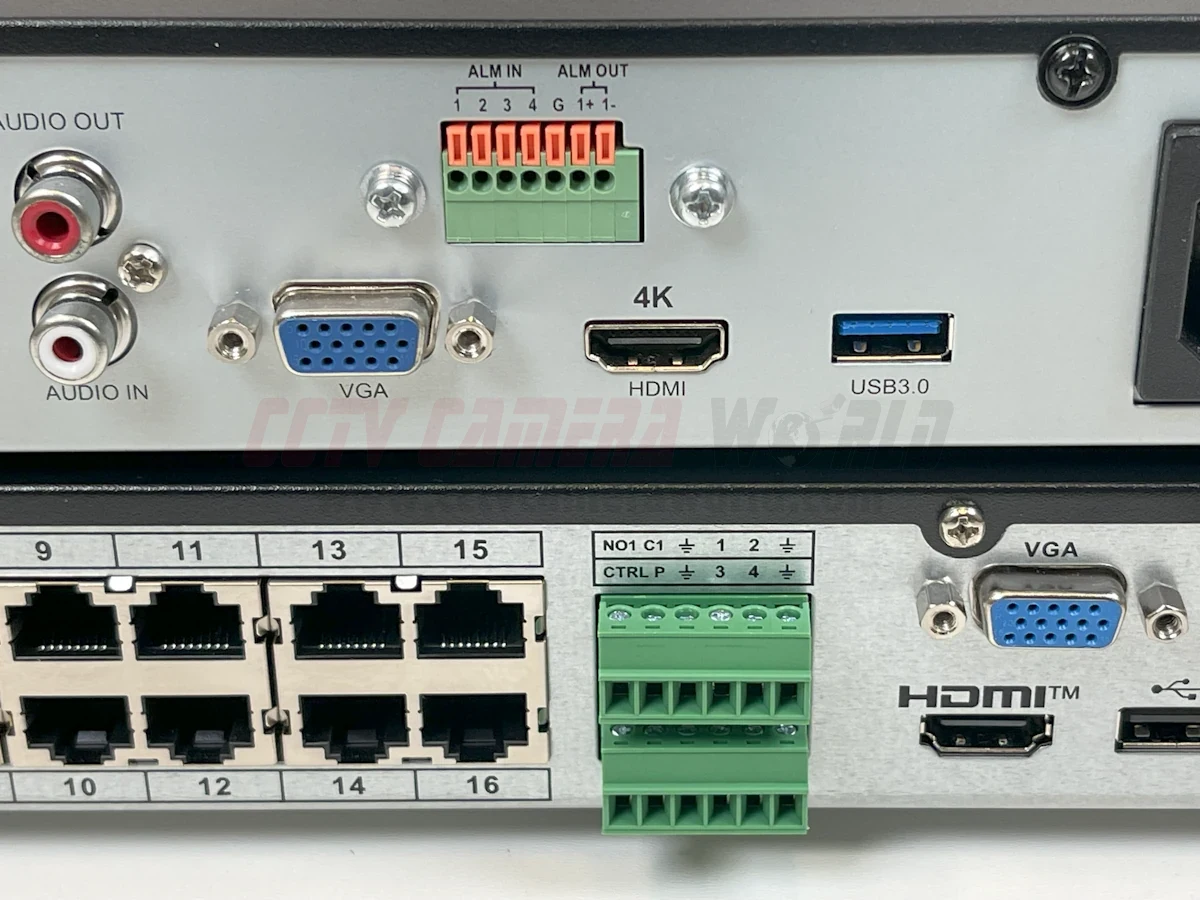
Step 2: Wire the Sensor to the NVR
Most alarm sensor devices use two wires: one wire goes to the numbered input you want to use (e.g., Input 1), and the other wire goes to the closest ground (GND) terminal. For simple contact-based sensors, polarity usually doesn’t matter, as they work by opening or closing a circuit. However, to avoid damaging the NVR, and if your sensor does have polarity markings (e.g., "+" and "-"), follow the instructions that came with it. It’s common to use the solid or red wire as positive and the striped or black wire as ground, but always double-check your sensor’s requirements and stay consistent when adding more devices.
Tip: If you're using twisted pair cables like CAT5e, remove and use one pair for the positive and ground, leaving the other pairs unused or available for other purposes.
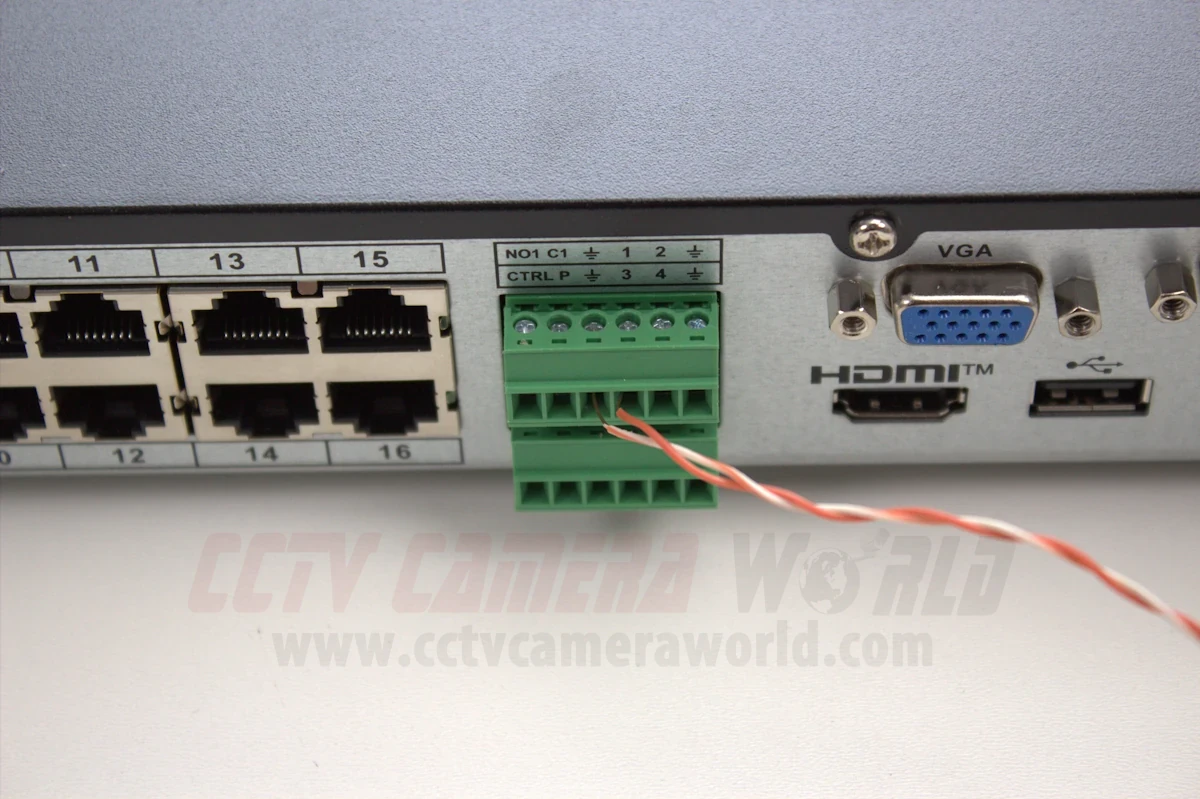
Step 3: Secure the Wiring
For push-tab connectors, press the tab down, insert the wire, and release to lock it in.
For screw-down terminals, loosen the screw, insert the bare wire, then tighten it securely. After the wire is secured, give it a light tug to make sure it won’t slip out.
Tip: Avoid running alarm wires next to power lines or fluorescent lighting, as they can cause interference, false triggers, or damage the NVR.
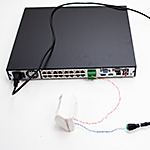
Step 4: Power the Sensor (If Required)
Some sensors, like PIRs or beam detectors, need power to operate. These devices typically run on 12V DC and have two additional wires for power, separate from the alarm input circuit. Use a regulated 12V DC wall adapter, or connect the power wires to a central 12VDC power box when using multiple sensors.

Important: The NVR’s alarm input terminals do not supply power. They only detect the change in the sensor’s circuit. Some NVRs have power relays, but to avoid damaging your recorder, we strongly recommend powering sensors and sirens separately.
Once the sensor is wired and powered, you're ready to move on to configuring your NVR to recognize and respond to the alarm input.
Configuring the NVR to Record on Alarm Input
After wiring the sensor to the NVR, the next step is to enable alarm input settings. This usually involves ticking a checkbox for the alarm input channel, assigning trigger actions, and adjusting the recording schedule.
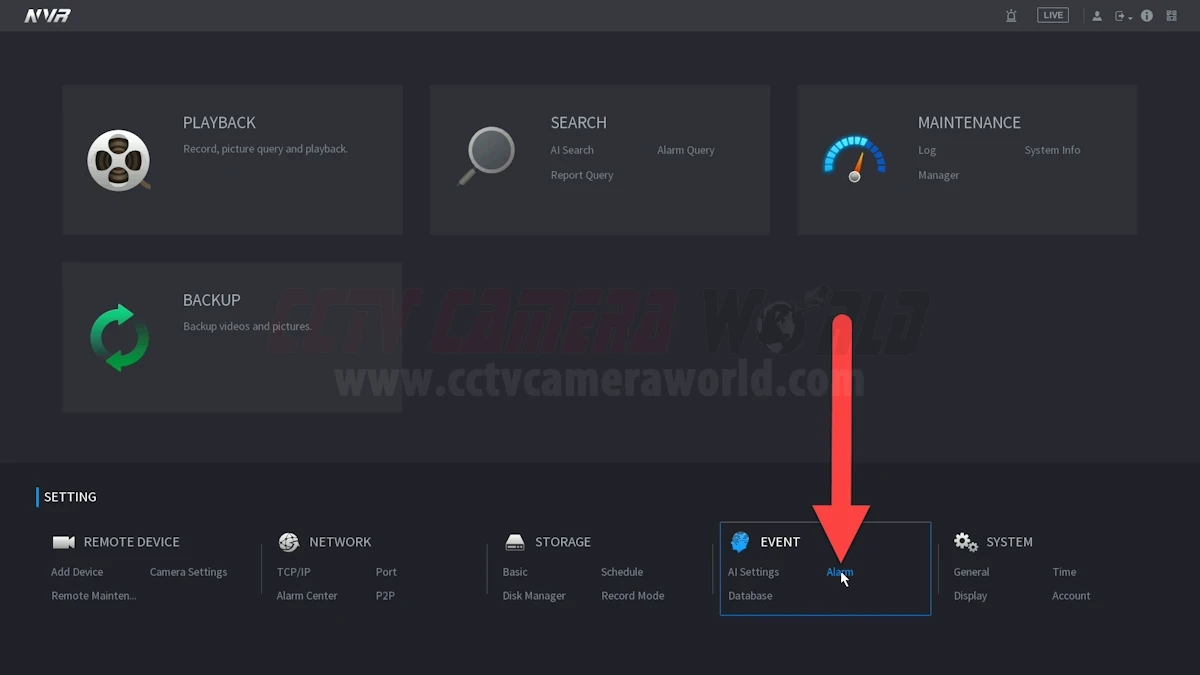
Step 1: Log In and Access Alarm Settings
Start by logging in to your NVR. Open the main menu and look for the section labeled "Alarm," "Event," or "Alarm Settings"; the exact name and menu location may vary depending on your NVR model. Once inside, select the Alarm Input or Alarm-In Port submenu.
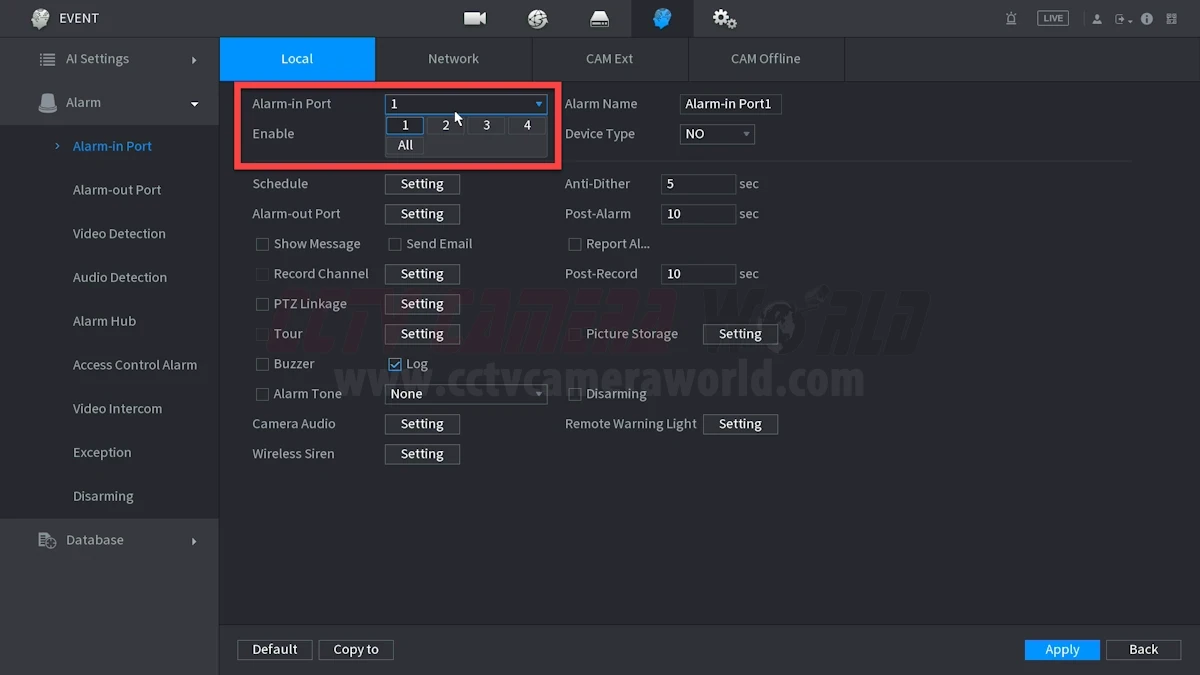
Step 2: Enable the Alarm Input
Use the drop-down menu to find the numbered alarm input that matches your wiring. Enable or check the box to activate it.
Normally Closed or Normally Open
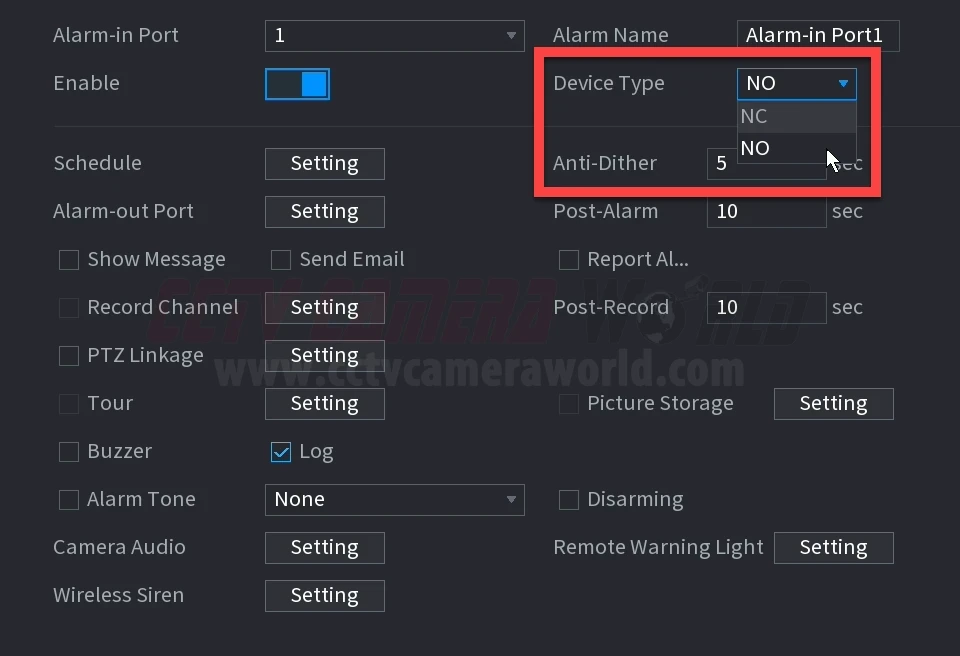
Most NVRs let you choose whether the sensor is Normally Open (NO) or Normally Closed (NC). Although this terminology can be confusing, it should be interpreted literally:
- A Normally Open (NO) circuit is one that stays open and only triggers an event when the sensor’s contacts meet.
- A Normally Closed (NC) circuit stays connected and triggers an event when the contacts are separated.
Set this option according to your sensor’s behavior. For example, if it's a door that should remain closed and you want recordings or alerts when it opens, set it to Normally Closed.
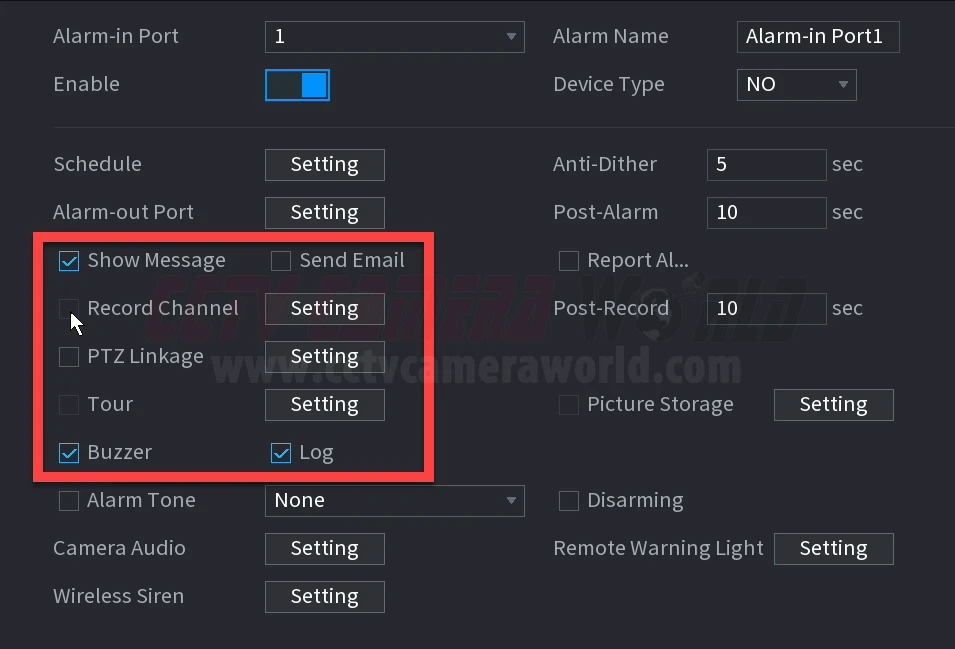
Trigger Actions
Then, select the action(s) you want the NVR to take when this input is triggered. Start with the Record Channel, Show Message, and Buzzer options for testing. After you confirm it’s working, continue to add extra actions as needed. These include:
- Show Message – Display a notification on the local screen
- Send Email – Send an alert email
- Record Channel – Start recording from one or more cameras
- PTZ Linkage – Move a connected PTZ camera to a preset
- Tour – Switch the NVR live view grid to a predefined camera sequence
- Buzzer – Sound the internal beeper
- Log – Log the event in the system alarm logs
- Alarm Tone – Trigger a pre-recorded audio file
- Alarm Out – Activate an external output like a siren or strobe
- Picture Storage – Capture a snapshot based on the NVR’s settings
Step 3: Adjust Scheduling and Timing Options (Optional but Recommended)
Your NVR may include timing options like Anti-Dither, Post-Alarm, and Post-Record. These control how long the NVR waits or stays active before and after a trigger:
- Anti-Dither: Adds a short delay between activations to prevent rapid retriggering (e.g., door opening and closing quickly)
- Post-Alarm: Keeps the system in the “alarm” state for a set number of seconds
- Post-Record: Extends the video recording time after the alarm ends
Start with default short values (5–10 seconds) and adjust through trial and error based on your environment and needs.

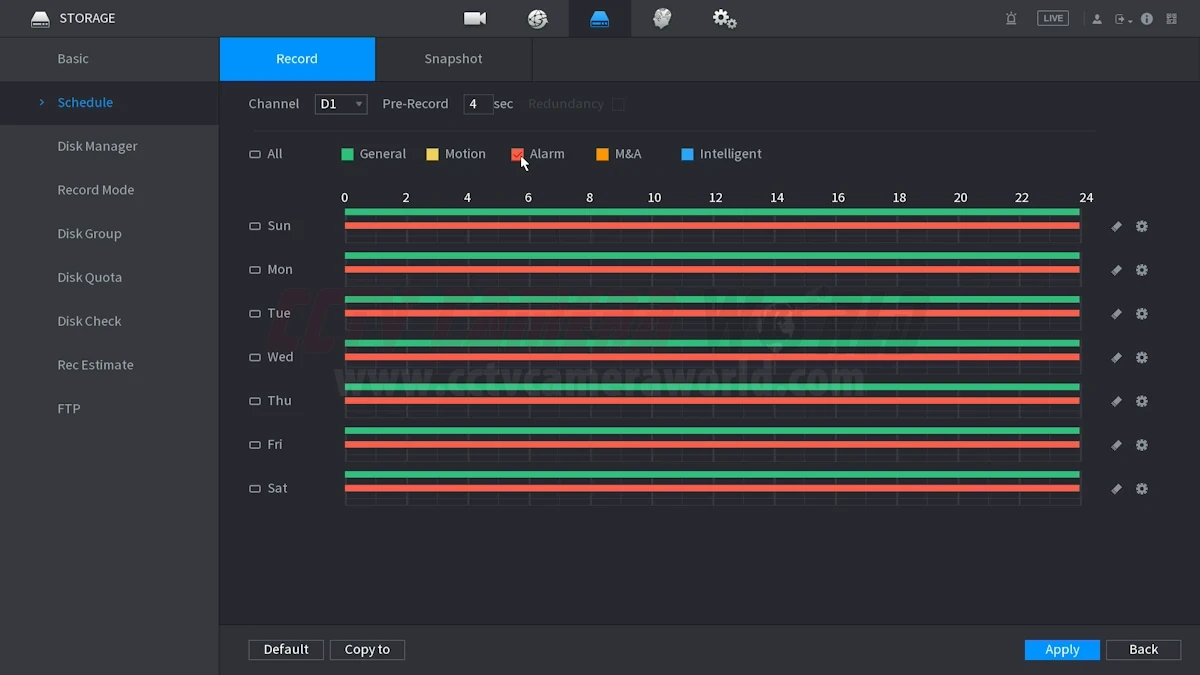
Step 4: Set an Alarm Recording Schedule
Go to the Storage or Record section in your NVR’s settings and locate the Schedule tab. Change the recording mode for the desired channels from General or Motion to Alarm. If you're already using 24/7 recording, alarm triggers can still act as useful markers in playback.
You can choose to:
- Record only when the alarm is triggered
- Combine alarm and motion detection
- Layer alarm recording on top of continuous recording as shown in the image
Once saved, your NVR is now armed and ready to respond to physical triggers through its alarm inputs.
Testing and Verifying Your Setup
After configuring your alarm input settings, it’s important to test everything before assuming it works. These steps will ensure that your sensor is wired correctly, the NVR is responding as expected, and your recording and selected actions are working.
Step 1: Use Simple Test Triggers
Turn on the buzzer/beeper or “Show Message” options to assist with trial and error. These features are great for confirming that the NVR is receiving input when the sensor is activated, especially if you're not ready to test recording or notifications yet.
Open or close the door, press the button, or trip the sensor. Watch the screen for a popup message or listen for the beep. These simple triggers provide immediate feedback and help verify wiring and settings before moving on to more advanced actions like email alerts or PTZ linkage.
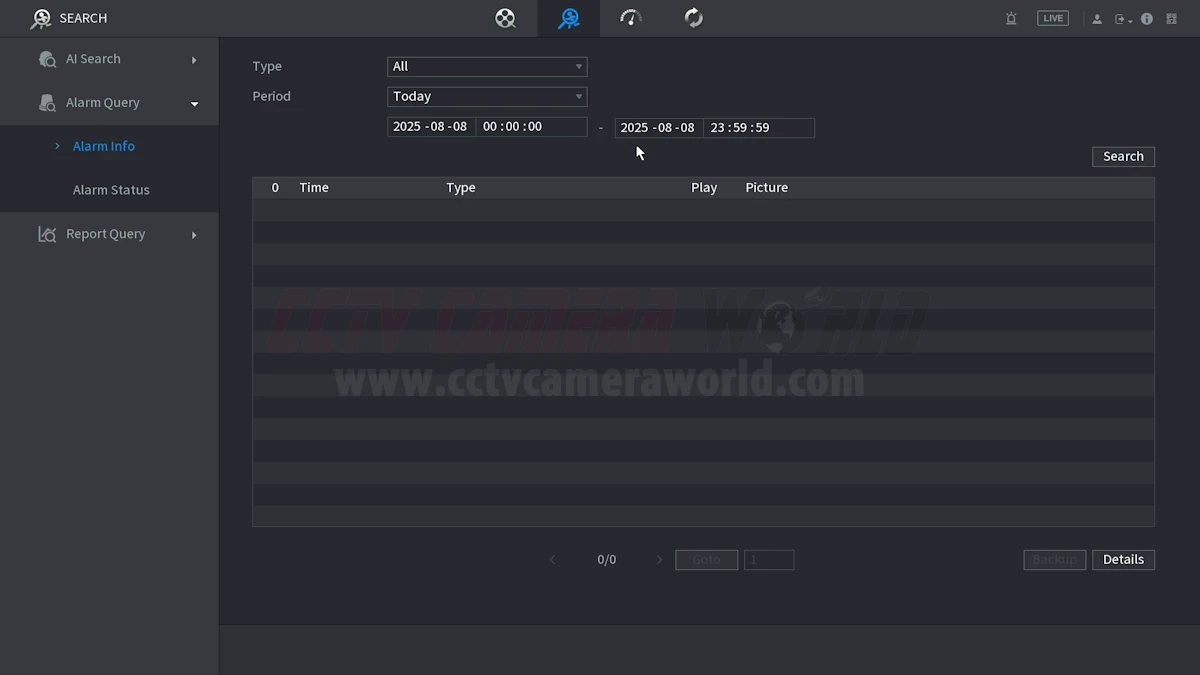
Step 2: Check the Alarm Info Log
Most NVRs include an Alarm Info or Event Log menu. These typically show a timestamped list of recent alarm input events, including start and end times, and often include a button to quickly review recordings. Use the logs to confirm that the trigger is being detected and logged correctly.
If no log entries are there after triggering the sensor, double-check your wiring, sensor polarity, and whether the alarm input is enabled in the settings.
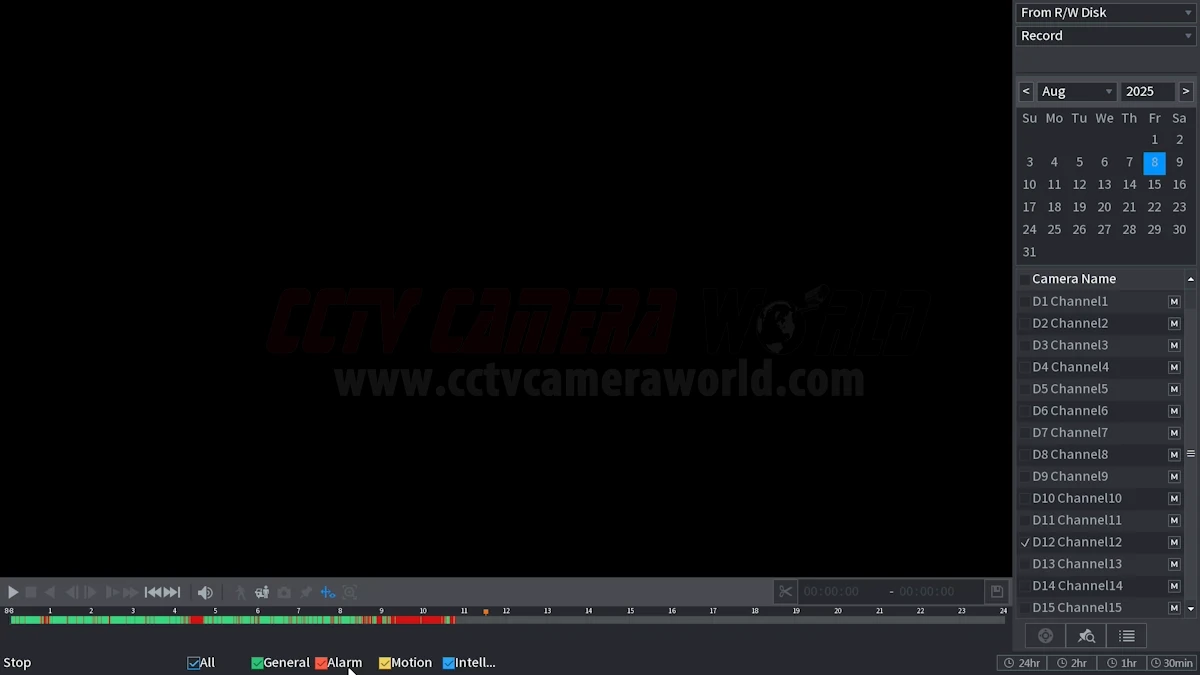
Step 3: Review the Timeline in Playback
Go to the Playback screen, select the camera that should have recorded, and check the timeline. Most systems use color coding to show recording types. The Avalonix Premium Series, for example, displays alarm-triggered recordings in red. Play the footage back around when you activated the sensor and confirm that recording starts at or just before the trigger. If no footage was recorded, review your recording schedule settings. The channel may still be set to General or Motion-only instead of Alarm.
Step 4: Confirm Snapshots and Notifications if Needed
If you've enabled email or snapshot storage, now’s the time to also test those features. Trigger the alarm and check your inbox or mobile app for an alert if you’ve set up push notifications. Make sure snapshots are being saved based on your NVR’s snapshot settings. If alerts aren’t working, double-check that your email SMTP settings work or push notification permissions on your phone; these are managed separately from the alarm input settings.
Once you’ve confirmed that the NVR is receiving, logging, and reacting to alarm inputs properly, your system is ready, and alarm-activated recording will give you one more layer of peace of mind.
Troubleshooting and FAQs for Alarm Inputs on NVRs
Why isn’t my alarm input triggering a recording?
Check that the alarm input is enabled in the NVR settings and the Record Channel option has the correct channel enabled. Make sure the recording schedule for that channel includes “Alarm” as a recording type. Also test the alarm trigger using the NVR’s Buzzer option.
How do I know if my alarm sensor is wired correctly?
You can test wiring by enabling simple triggers like the NVR’s buzzer or “Show Message” option. Activate the sensor and listen for the beep or watch for the popup message. If nothing happens, confirm that the wires are secure, the correct input has been enabled, and mode setting (NO or NC) matches the sensor’s circuit type.
What does Normally Open (NO) or Normally Closed (NC) mean, and which should I use?
A Normally Open circuit stays open until the sensor is activated, at which point the circuit connects and sends a signal. A Normally Closed circuit is the opposite; it stays closed until it’s activated and connects the circuit.
For a mental shortcut, think about it like a door or window; if they should be open, then use normally open; if they should be closed all the time, then use normally closed. For example, a door contact that should remain closed usually needs to be set to NC, so opening it breaks the circuit and triggers an event.
For a mental shortcut, think about it like a door or window; if they should be open, then use normally open; if they should be closed all the time, then use normally closed. For example, a door contact that should remain closed usually needs to be set to NC, so opening it breaks the circuit and triggers an event.
Why are my alarm-triggered events delayed or duplicated?
Adjust your Anti-Dither and Post-Alarm settings. Anti-Dither prevents multiple triggers in quick succession, while Post-Alarm determines how long the NVR stays in the alarm state after activation. If events are too frequent, increase Anti-Dither. If they cut off too soon, increase Post-Alarm and Post-Record durations.
Can I record multiple cameras with a single alarm input?
Yes. In the alarm input configuration, select multiple channels in the “Record Channel” option for the input. With this, one sensor can trigger recordings from several cameras at once.
My email or push notifications aren’t working. What should I check?
First, confirm that email or push alerts are enabled for the alarm input in the NVR settings. Then verify the email SMTP settings work and subscribe to the alarm in the mobile app. These are configured separately from the alarm input settings screen. Furthermore, make sure the NVR has an internet connection and is remotely viewable.
Does the NVR power the alarm sensor?
In most cases, no. The alarm input is just a detection circuit, although some do have power relays; those are usually reserved for alarm output devices such as lights or sirens. If your sensor requires power (like a PIR motion detector), use a separate regulated 12V DC power supply or a central distribution box.
How can I quickly review all alarm-triggered events?
Use the Alarm Info or Event Log menu to see a timestamped list of triggers. Most NVRs also mark alarm-triggered recordings in a different color in the Playback timeline (e.g., red for the Premium Series). This helps you jump straight to events without scrubbing through hours of footage.
Can I use both motion detection and alarm inputs together?
Yes. You can combine motion and alarm triggers in the schedule for a channel. This is useful if you want to capture events from either type of trigger without relying on only one method.