
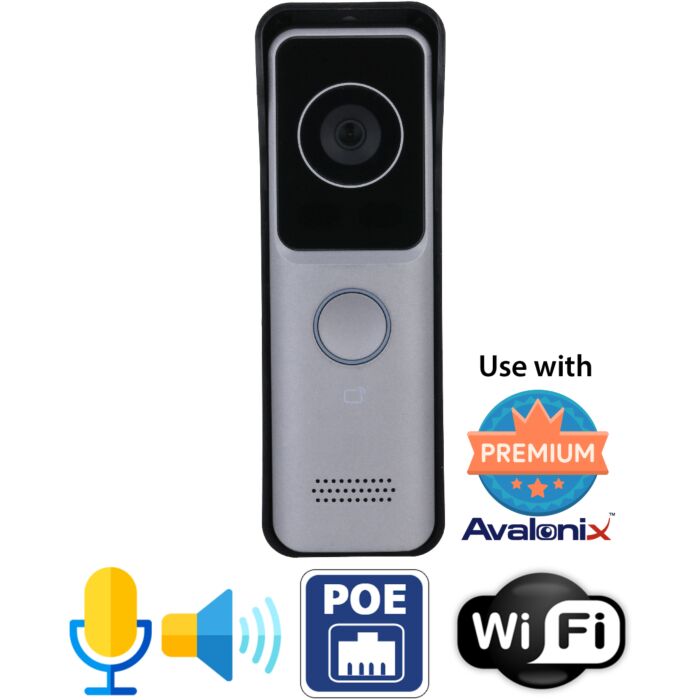

WiFi Doorbell Camera with PoE
Special Price
$299.99
Regular Price
$399.99
In stock
SKU
IC1080PW
- WiFi Doorbell Camera
- Two-way audio
- 110° View
- 16ft night vision
- For use under a porch
- Wall mount
- 12VDC or PoE
The IC1080PW WiFi Doorbell Camera with PoE is a professional video doorbell for homes and small businesses that are tired of unreliable, cloud-only consumer products. It combines 2.4 GHz WiFi, PoE networking, two-way audio, and professional recording options so you can treat your doorbell like a real IP camera and intercom, not just a gadget.
This doorbell camera is part of our Avalonix lineup and works seamlessly with our Premium Series NVRs and free remote viewing app. You can see and talk to visitors from your phone, record video 24/7 on an NVR, and even store clips on the built-in microSD card. There are no required monthly cloud fees.
Key features of the IC1080PW WiFi Doorbell Camera with PoE
- 2MP CMOS image sensor with 720p resolution video at 30 frames per second
- 110 degree horizontal angle of view to cover most porches and entryways
- Built-in microphone and speaker for clear two-way audio
- Day and night IR cut filter with IR illumination up to 16 feet during a call
- H.264 and H.265 video compression with dual streams for recording and remote viewing
- Built-in microSD slot supporting up to 256GB for local edge storage
- Works with Avalonix Premium Series NVRs for 24/7 recording and playback
- PoE (802.3af/at) support plus 12 to 33 VDC power input flexibility
- 2.4 GHz WiFi (802.11 b/g/n) for wireless connectivity when powered by DC
- Weather rated IP65 for outdoor use in a covered location
Who this WiFi and PoE doorbell is best for
- Homeowners who want a local-recording alternative to Ring or Nest
- Small businesses and storefronts that need a reliable doorbell camera tied into a real NVR
- Offices and reception areas that want doorbell video plus two-way talk through phones and base stations
- Anyone who wants PoE wiring for reliability but still likes the option of WiFi and DC power
- Users who prefer to keep video on their own equipment instead of relying on third party cloud storage
Recording and storage: microSD and NVR, not the cloud
Unlike typical cloud doorbells, the IC1080PW does not depend on a cloud subscription to work. It gives you three recording options:
- Local NVR recording: When connected to an Avalonix Premium Series network video recorder, the doorbell can be recorded just like a normal IP camera, including 24/7 continuous recording if you choose.
- Edge storage with microSD: The built-in microSD card slot supports up to 256GB. When configured, the doorbell can store video clips locally at the door, providing a backup if the network or NVR is unavailable.
- No required cloud plan: All video can stay on your NVR and microSD card. There are no mandatory monthly cloud fees and no need to send video to third party servers if you do not want to.
Power and network options
This doorbell is flexible about how you power and connect it, as long as you follow a few important rules:
- PoE mode: Use a PoE injector or PoE switch to supply 802.3af/at power and data over one network cable. This is ideal if you want a clean, single-cable installation back to your network closet or router.
- WiFi mode with DC power: Use the included 12V DC power supply and connect the doorbell to your 2.4 GHz WiFi network. This is best when running network cable is difficult, but you have low-voltage wire available for power.
- Voltage warning: Many existing mechanical doorbells and chime kits use 24 VAC, which is not compatible with this intercom. You must use DC power or PoE only. Using AC power or miswiring polarity can permanently damage the device.
When the doorbell is on WiFi, it still needs wired power (it is wireless for data, not battery powered). When on PoE, the same Ethernet cable carries both power and network data.
Using the IC1080PW with your Avalonix security camera system
The IC1080PW is designed to integrate smoothly into an Avalonix security camera system. You can add it as another IP channel on your NVR, record it alongside your existing Avalonix cameras, and use the same remote viewing app to see live and recorded video.
You can also pair the doorbell with compatible base station monitors to answer calls and speak with visitors from inside your home or office, while still using your smartphone for remote access when you are away.
How-to videos for the IC1080PW WiFi Doorbell
Video 1: Unboxing and wiring overview
View transcript: IC1080PW unboxing and wiring overview
0:00 this is an overview of our Poe Wi-Fi video doorbell CCTV Camera World is proud to provide support for products purchased from our website if you purchased your product from another vendor please contact the vendor you purchased from for further assistance
0:14 here is what comes with our doorbell camera it is a Poe camera with Wi-Fi this is the box I have already emptied the contents here to display this is the doorbell camera it is both Wi-Fi and Poe
0:30 it comes with a back plate which is also a water shield cover when you install it the notch goes along the top of the doorbell you screw this into the wall and you can knock out the section to run any wires in the back
0:55 here is the knockout you remove it with a screwdriver and can run cables through the back it also comes with another backplate for very dry areas there is an inset screw on the bottom that locks it into the plate so no one can easily steal your doorbell
1:29 we provide a 12 volt DC 1 amp power supply with a male power plug inside the bag there are multiple cables pigtails and a screwdriver this bag is important and so is the inset screw inside it do not lose it because it secures the doorbell to the mounting plate
2:03 you also get a bag of screws to mount your plate and a screwdriver with a hex bit that is used for the small hex screw on the bottom plate
2:20 there is a quick start guide that shows different mounting styles and explains how to use the cover or backplate then we look at the doorbell itself on the front there is a button that visitors press to ring your phone a mic, a speaker, the lens, and IRs inside when someone presses the button the IR turns on so you can see them in complete darkness
3:02 on the back there is a diagram showing the connections there is a LAN connection for Poe and a connector for the breakout cable or wiring harness when connecting it you need to line up the rivets on the connector correctly you can unscrew the cover to access the ports
3:31 there is also a microSD slot inside that accepts a suitable microSD card you can remove the cover with the provided screwdriver to reach the Poe port, microSD slot, and wiring harness port
4:22 the wiring harness black spot marks the top you align it and push down into the connector do not break it because it cannot be repaired we test these before shipping
5:01 the microSD slot accepts up to about a 256 GB microSD card there is a small picture showing card orientation you gently insert it until you hear a click to lock it in and press again to release it this is not meant for frequent removal so leave the card inside and access recordings through the app
5:51 the wiring harness has a DC 12 volt power connector with red as positive and black as negative all DC voltage has polarity you must keep the polarity correct or you can damage the doorbell the terminal block shows positive and negative clearly
6:22 to bench configure the doorbell on Wi-Fi you connect the included AC adapter to 110 volts and plug it into the power lead then connect a network cable to the network port and to your router from a Windows PC you can use our IP config tool or the IP address on the label to reach the web interface and then connect it to your Wi-Fi once done you can disconnect the network cable and mount the unit
7:01 there are two basic power methods if you want to use Wi-Fi you should use the included 12 volt power supply only do not use an existing doorbell power supply as it is often AC and will fry the unit do not cut the included power supply cable because it has polarity marked by the stripe on the wire
7:31 if you have existing bare wire from your old doorbell you can splice into it using the female power pigtail on the power supply and the male pigtail on the doorbell then splice those to your existing doorbell wire keeping the polarity the same end to end reversing polarity can damage the intercom and is not covered under warranty
8:39 the center barrel of the power connector is positive and the outside is negative that completes the 12V DC Wi-Fi power method
8:40 the second method is to skip the wiring harness and use Poe only you just need the doorbell, a network cable, and a Poe injector you power the injector with 110 volts and connect the power plus data port to the doorbell using CAT5e or CAT6 then connect the data port of the injector to your router with another network cable
9:44 the Poe injector provides power and data to the doorbell and bridges it to your network so you can communicate with it over a wired connection this is often easier because you only need one cable to the doorbell from the injector
10:05 remember that Poe injectors and power supplies are not weatherproof keep them in a dry location like a basement and protect them from water any pigtail or wire splices should be wrapped with electrical tape or enclosed in proper connectors to prevent shorts
10:44 this wraps up how to connect and power the doorbell camera if you are watching on YouTube do not forget to like, comment, and subscribe
Video 2: Using the doorbell camera with a smartphone
View transcript: IC1080PW smartphone and app setup
0:00 in this video I am going to show you how to connect your intercom doorbell from CCTV Camera World to the remote viewing app for iPhone or Android CCTV Camera World is proud to provide support for products purchased from our website if you purchased your product from another vendor please contact that vendor for assistance
0:18 in this example I am on an iPhone first I open the app by tapping it it takes me to the home screen if any splash notifications appear I skip them then I tap the plus icon at the top right
0:37 I select the SN option and tap OK this step is best done after you have connected the intercom doorbell to your Wi-Fi while it is still on a bench test before mounting it on the wall the QR code shown on this screen is found on the back of the doorbell intercom we may also print the code on the product box but it is best to scan it directly from the intercom itself
1:21 the app opens the camera to scan the QR code if the app asks for camera permission tap allow I flip the doorbell over, find the QR code on the back near the diagram and model label, and scan it
1:48 after scanning it asks for a security code these intercoms do not use a separate security code so you can just tap next after confirming the serial number appears
1:58 the app identifies the device type this camera is a VTO under the video door phone section because it is an intercom doorbell not just a simple doorbell so you must select the VTO option
2:13 you can give your intercom a name I enter "Front Door" but you can choose whatever name you prefer then there is a username and password field
2:21 the username will always be admin the password is printed on the label on the intercom doorbell box near the QR code I enter that password now
2:46 after entering the password I tap Save at the top right the app may ask for permission to find and connect to devices on the local network you can tap allow or do not allow either way you can see in the background it is already connected to the doorbell intercom
3:06 the last step is enabling push notifications you need to allow notifications for the app in your phone settings then go back to the app home screen by tapping the arrow at the top left tap the three dots next to the device and choose Device Details
3:29 under Alarm Setting you tap Notification then tap Push Notifications to subscribe you can configure a period setting if you only want alerts at certain times I leave it set to 24/7 and tap Save
3:50 once the intercom doorbell is added and push notifications are subscribed you can press the physical button on the doorbell to test a call
3:58 the doorbell says "calling now please wait a moment" and a push notification appears on your phone you tap the notification to open the live view from the doorbell intercom
4:13 to answer the call you tap the green button and two-way audio starts so you can talk to the person at your door
4:18 hopefully this video helps thank you for watching if you are watching on YouTube do not forget to like, comment, and subscribe
Video 3: Pairing the doorbell camera to WiFi
View transcript: IC1080PW WiFi pairing and IP setup
0:02 CCTV Camera World is proud to provide support for products purchased from our website if you purchased your product from another vendor please contact that vendor for assistance
0:11 in this video I show how to access the intercom over your local network and join it to your Wi-Fi network if you want to deploy it wirelessly keep in mind it is not wire free it still needs the power supply
0:25 first open a web browser then navigate to the camera in this example I open Google Chrome
0:34 this intercom is configured with our default IP address 192.168.1.109 you will need to refer to the label on the box or to any email from our technicians before shipping if we pre-set it to a custom IP address for you
0:51 the intercom will either be on the default 192.168.1.109 if your network uses that range or on a custom IP we configured your box label shows the correct IP
1:13 I type 192.168.1.109 into the address bar and press Enter to access the web interface
1:20 the login screen appears I use the default username and password printed on the box label username admin and the default password then click Login
1:42 after logging in I maximize the window to join it to Wi-Fi I click the Network button in the main menu
1:51 there are two sides to this screen LAN and WLAN LAN refers to the wired connection whether the intercom is powered by Poe into an injector or by 12V DC into your router directly the LAN address here matches the IP we just used 192.168.1.109
2:26 on the right is WLAN which is the wireless local area network this will be the IP address used when the intercom is on Wi-Fi you can leave it set to DHCP so the router assigns an address or set a static IP manually and click Save
3:00 in this video I leave it as DHCP so the router assigns the address when the device joins Wi-Fi
3:10 to actually join Wi-Fi I click Wi-Fi on the left menu by default Wi-Fi is turned off so I toggle it on
3:25 the intercom scans for nearby Wi-Fi networks similar to how a phone or game console does once the list appears I select my Wi-Fi SSID and click the plus icon to connect
3:45 I enter my Wi-Fi password this is the same process as connecting any device to your wireless router then I click the Connect button
4:04 the interface shows "connecting please wait" as it attempts to join the network if the Wi-Fi password is correct the intercom will connect successfully
4:17 the intercom only supports 2.4 GHz Wi-Fi when we scanned, no 5 GHz networks appeared so if your router is only 5 GHz you must enable the 2.4 GHz band
4:35 if you see a "connection failed" message it usually means the password was entered incorrectly you can try again with the correct Wi-Fi key
4:46 after correcting my password the window closes and the status changes to "connected" next to my Wi-Fi network name
4:53 once connected I can go back to the Basic tab to see what IP address the intercom received on Wi-Fi the WLAN address is now updated
5:14 in this example the new wireless IP is 192.168.1.223 if you want to use the intercom wirelessly with 12V DC power or Poe you should note this IP so you can log in over Wi-Fi later instead of the wired address
5:40 hopefully this video helps you connect your intercom to your Wi-Fi network thank you for watching if you are watching on YouTube do not forget to like, comment, and subscribe
Connecting the doorbell using PoE
![]()
To integrate the doorbell with your network using PoE, you will typically use a PoE injector unless you already have a PoE switch. The doorbell connects to the PoE injector, which then connects to your router or switch. The NVR should connect to a separate port on the router or switch. Make sure the NVR and doorbell are on the same local network (subnet).
Do not connect the doorbell directly to the NVR PoE ports. Doing so places it on the NVR internal network and prevents doorbell calls from reaching your app or base station. Instead, treat it as a network device on the LAN and let the NVR add it by IP address.
Why choose this over Ring and other consumer doorbells
Most popular consumer doorbells are WiFi-only, rely heavily on cloud storage, and are meant to live inside their own ecosystem. That is fine for casual use, but it can be limiting if you want a professional system. The IC1080PW offers:
- PoE and wired reliability: You can power and network the doorbell over a single Ethernet cable, which is more stable than WiFi-only devices.
- Local NVR recording: Record the doorbell to an Avalonix NVR along with your other cameras. You keep your footage and do not have to rent cloud space.
- microSD edge storage: Use the built-in microSD slot as a local backup so the doorbell can still capture video even if the network is down.
- Professional ecosystem fit: It uses the same protocols and app as your other Avalonix IP cameras, so everything lives in one place.
- No required cloud fees: You can use this doorbell fully without any cloud subscription, while still enjoying remote viewing from your phone.
If you need a more advanced intercom that can unlock electronic door strikes and behave like a full door-entry system, take a look at our IC1080POE Professional WiFi and PoE Video Doorbell Intercom. It is designed for commercial entrances, gated access points, and any installation that requires remote door control.
Frequently asked questions
Does this WiFi doorbell require a cloud subscription?
No. The IC1080PW does not require any cloud subscription to function. You can record to an Avalonix NVR, the internal microSD card, or both.
Can I record 24/7 like a regular security camera?
Yes. When connected to an Avalonix Premium Series NVR, the doorbell can be recorded continuously just like a standard IP camera.
Does it support both WiFi and PoE?
Yes. The doorbell can be powered and networked using PoE, or it can be powered with 12 to 33 VDC and connect to your 2.4 GHz WiFi network. It does not support 5 GHz WiFi.
What size microSD card does it support?
The built-in microSD slot supports up to 256GB cards. For best results, use a high-quality card from a reputable brand.
Can this replace my existing mechanical chime transformer?
You should not connect this doorbell to a 24 VAC transformer used by many traditional chimes. It must use DC power or PoE only. Use the included DC power supply or a suitable low voltage DC source if you are wiring it into existing cable.
Will it work with other brands of NVRs?
The IC1080PW uses standard IP protocols such as RTSP and ONVIF. It is designed to work best with Avalonix Premium Series NVRs. While you may be able to stream video from the doorbell to a 3rd party NVR, two-way will not work as the doorbell uses SIP protocol for audio.
IC1080PW vs IC1080POE: Which doorbell is right for you?
We offer two professional-grade doorbell cameras, each designed for different installation needs. Here is a quick comparison to help you choose the right one:
| Feature | IC1080PW (WiFi Doorbell Camera with PoE) |
IC1080POE (Professional WiFi + PoE Intercom) |
|---|---|---|
| Primary Use | Home entryways, offices, small storefronts | Commercial entries, gates, warehouses, reception points |
| Power Options | 12-33V DC or PoE (802.3af/at) | PoE 802.3af or 12V DC |
| Network Options | WiFi 2.4GHz or wired PoE | WiFi (when powered by DC) or wired PoE |
| Built-in Storage | microSD slot (up to 256GB) | microSD slot (up to 256GB) |
| Intercom Capabilities | Two-way audio through app | Full intercom system with door strike support |
| Door Strike Control | No | Yes, supports up to two electronic door strikes |
| Best For | Users who want a professional WiFi/PoE doorbell that records locally | Users who need an intercom capable of unlocking doors remotely |
If you need a simple, reliable, professional doorbell camera, the IC1080PW is a great fit. If you need an intercom-style unit with the ability to unlock doors from your phone or base station, consider the IC1080POE.
Features
- 2MP CMOS Image Sensor
- 720P resolution video recording in real time 30fps
- Built-in Mic and Speaker for Two-way Audio
- H.264/H.265 video encoding
- Day and Night IR Cut Filter
- 110° Angle of View
- Up to 16ft Night Vision during call
- Ingress Protection IP65
- 2.4GHz WiFi 802.11 b/g/n compatible
- Works with CCTV Camera World NVRs
- Works with 12VDC to 33V DC current or 802.3af/at PoE
- Built-in microSD slot supports up to 256GB
What is included?
- (1) Professional WiFi Doorbell Camera (IC1080PW)
- (1) Female DC Power Pigtail
Specifications
| Image Sensor | 1/2.8" 2MP CMOS | ||||||||||||||||||||||||||||||||||
| Effective Pixels | 1920 (H) x 1080 (V) | ||||||||||||||||||||||||||||||||||
| IR Distance | Up to 16ft | ||||||||||||||||||||||||||||||||||
| IR On/Off Control | Auto, Manual | ||||||||||||||||||||||||||||||||||
| Lens Type | Fixed | ||||||||||||||||||||||||||||||||||
| Angle of View | Horizontal:110° | ||||||||||||||||||||||||||||||||||
| Focus Control | Fixed | ||||||||||||||||||||||||||||||||||
| Compression | H.264, H.265 | ||||||||||||||||||||||||||||||||||
| Streaming Capability | 2 Streams (Main Stream, Sub Stream) | ||||||||||||||||||||||||||||||||||
| Resolution | 720P (1280x720), D1 (704x480), VGA (640x480), CIF (342x240) | ||||||||||||||||||||||||||||||||||
| Frame Rate | Main Stream: 720P/WVGA/D1 (3, 25, 30fps) Sub Stream: 1080P/WVGA/D1/QVGA/CIF (3, 25, 30fps) |
||||||||||||||||||||||||||||||||||
| Day/Night | Auto (ICR), Color, B/W | ||||||||||||||||||||||||||||||||||
| Motion Detection | None | ||||||||||||||||||||||||||||||||||
| Digital Zoom | None | ||||||||||||||||||||||||||||||||||
| Audio Input | Built-in Microphone | ||||||||||||||||||||||||||||||||||
| Audio Output | Built-in Speaker | ||||||||||||||||||||||||||||||||||
| Audio Compression | G.711 | ||||||||||||||||||||||||||||||||||
| Bidirectional Talk | Two-way Talk Supported | ||||||||||||||||||||||||||||||||||
| MicroSD | 1 slot supports up to 256GB | ||||||||||||||||||||||||||||||||||
| Buttons | 1 | ||||||||||||||||||||||||||||||||||
| Ethernet | RJ-45 100Mbps, Wi-Fi 2.4Ghz (IEEE802.11b/g/n) | ||||||||||||||||||||||||||||||||||
| Protocols | HTTP, TCP/IP, DHCP, UPnP, SIP, RTSP, RTP | ||||||||||||||||||||||||||||||||||
| Max. User Access | 1 Users | ||||||||||||||||||||||||||||||||||
| Recording Method | Avalonix Premium Series NVR | ||||||||||||||||||||||||||||||||||
| Web Viewer | IE** | ||||||||||||||||||||||||||||||||||
| Smart Phone | iPhone, iPad, Android Phone or Tablet | ||||||||||||||||||||||||||||||||||
| Power Supply | 12 — 33 VDC 1 Amp or 802.3af/at compliant PoE | ||||||||||||||||||||||||||||||||||
| Power Consumption | 6W Max | ||||||||||||||||||||||||||||||||||
| Operating Conditions | -40°F – +140°F, Less than 90% RH | ||||||||||||||||||||||||||||||||||
| Installation | Wall Mounted | ||||||||||||||||||||||||||||||||||
| Ingress Protection | IP65 | ||||||||||||||||||||||||||||||||||
| Vandal Resistance | None | ||||||||||||||||||||||||||||||||||
| Casing | PC/ABS Plastic | ||||||||||||||||||||||||||||||||||
| Dimensions | 6.30" x 1.97" x 1.18" | ||||||||||||||||||||||||||||||||||
| Net Weight | 0.4 lbs | ||||||||||||||||||||||||||||||||||
| Camera Type | IP |
|---|---|
| Image Sensor | 1/2.8" CMOS Sensor |
| Video Encoding | H.265/H.264 |
| Resolution | 1080P |
| Lens | 2.8mm |
| Angle of View | 110° |
| Optical Zoom | No |
| Wide Dynamic Range (WDR) | WDR |
| IR Night Vision | 16ft |
| Important Features | Built-in Speaker |
| Audio | Built-in Mic |
| SD Card Slot | Yes |
| Video Analytics | No |
| Pan Tilt Zoom | No |
| Power Input | 12V DC |
| Operating Temperature | -40°F to +140°F |
| Dimensions | 6.30" x 1.97" x 1.18" |
| Weather Proof | Yes, IP65 |
| Camera Color | Dark Grey |
| Warranty | 1 Year |
| Brand | Avalonix |
| Return Policy | 30 Days Return Policy |
Write Your Own Review
Product Questions
Does this camera have audio detection?
Question by: Frank on Mar 13, 2026, 10:21 AM
Yes. Our professional Avalonix IP cameras support audio detection, and this setting can be managed through the camera’s built-in web interface.
To access these options, the user would open a web browser such as Chrome or Firefox on a Mac or PC that is connected to the same local network as the camera. After logging into the camera through the browser, they can go into the settings menu and turn audio detection on or off as needed.
In simple terms, audio detection lets the camera listen for sound changes in the area and respond when noise reaches a level you set. Through the web interface, the user can enable the feature, adjust how sensitive it is, set the threshold for what should count as an audio event, and choose what the camera should do when sound is detected. For example, the camera can be set to trigger recording or capture a snapshot when an audio event occurs.
Answer by: CCTV Camera World on Mar 13, 2026, 11:12 AM
Related Products
Check items to add to the cart or