

How to connect your security cameras to the Internet

Knowing how to network your security cameras is crucial to installing and establishing Internet connectivity to your security camera system. Security camera networking on a network with one router is not overly technical nor difficult, so hang in there! This article will help you understand basic computer networking, how it applies to your security camera system, and how you can be in complete control of remote viewing your system without any monthly charges besides what you pay your Internet service provider (ISP).
Difference between Modem and Router
First, we’ll talk about the differences between an Internet modem and a router. Your Internet modem supplies an external IP (Internet Protocol) address or WAN (Wide Area Network) to your router. Modems DO NOT have a Firewall, so in a setup where you connect a DVR straight to a modem, you will want to make sure you change your password in order to remain secure.
A router has a WAN port and also a LAN (Local Area Network) port. The Internet connection coming from the modem connects to the router’s WAN port. The LAN port is used for other network devices, such as computers, IP cameras or NVRs to connect to. All router's have some sort of a firewall to prevent unauthorized access from the internet (WAN) in to your local network (LAN). Port forwarding is the process of creating rules or exceptions in the router's firewall to allow specific types of requests from the internet to access specific devices on your network.
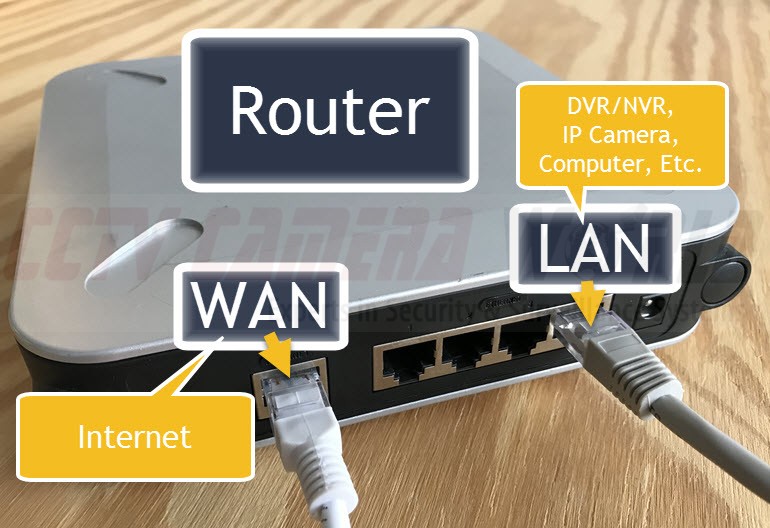
If you have a cable modem that has a built-in router, its WAN port will be a cable coming from the ISP that could be a coaxial cable if you have a cable modem.
Understanding How IP Addresses Work
What is an IP address?
LAN IP Address
Each device, whether it’s a router, camera or NVR, has an IP address. IP addresses allow devices to talk to each other on a network. IP addresses are a combination of numbers, or a scheme that consists of 4 sets of numbers separated by “dots.” Each set of number is considered an “octet.”
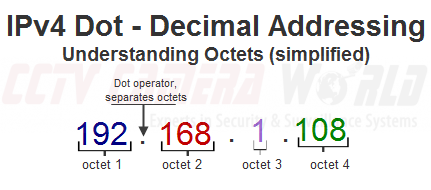
An IP address scheme may look like a complex set of numbers, but the concept is quite simple. Think of each octet as a specific unit of a house address - first octet is the country, second is the city, third is the street, and fourth is the house number. A common LAN IP address scheme is 192.168.X.X. This means that for a router with an IP address of “192.168.1.1” the first octet is “192”, second octet is “168”, third octet is “1”, and the fourth octet is “1”.
Network devices (computers, cameras, NVRs/DVRs, printers, etc.) need to be on the same network scheme as the router. This means that the IP address of each device will have the same first three octets as the first three octets of the router, but with a different fourth octet. For example, for a router with an IP address of 192.168.1.1, you can assign an NVR an IP address of 192.168.1.10 and an IP camera an address of 192.168.1.11. These three devices, router, NVR, and IP camera, would all be considered on the same network, affording them the ability to communicate with each other.
WAN IP Address
The WAN IP address is the IP address of your internet connection set by your ISP. It is the address you would use to access your network when outside the house when using the internet on your smartphone. You can check what is your WAN IP address by visiting www.myipaddress.com.

The WAN IP address is also of four octet form but will be a number scheme that's different from commonly used LAN IP address schemes like the one mentioned below. The reason for having unique WAN IP address schemes is because each internet connection has a unique number on the internet that can be "dialed" from another internet connection.
What is an IP address conflict?
If two devices on your home or local network have the same IP address, for example, if the NVR and security camera have an IP address of 192.168.1.12, then you would have an IP conflict, preventing communication from the router to the devices. You will need to change the IP address of one device in order to resolve the IP conflict.
To resolve an IP address conflict with two devices, you need to disconnect both conflicting devices from the network, reconnect one device, and change its IP address. You will then be able connect the second device and proceed conflict-free.
Determining the number of routers on your network
To properly setup your security camera system for remote viewing, first we need to see if there are multiple routers on your network. Bring up the Command Prompt window and type the command tracert 8.8.8.8.
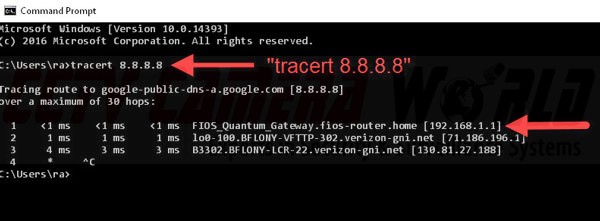
To understand the results of a tracert command, you would look at the first 3 lines of the results. In the example above, line one shows an IP address of 192.168.1.1. We can conclude that is a router as only local routers have recognizable IP address schemes of 192.168.1.1, 192.168.0.1, 10.1.1.1. Further, our results happen to have a name for the device, which makes it easier as the name has the word router and gateway in it. So we know this is a local router for our business network.
Line 2 of the results has an IP address of 71.186.195.1 which could only be a device on the internet. This line 2 stands for the "second hop" from our computer. Up to this point data has traveled from our computer to our router (192.168.1.1) and then to 71.186.195.1, which is really a router on our ISP's network.
If your results have a recognizable local IP address for line 1, and some obscure IP address for line 2, that means you have one router, and the IP address of your home router is that from line 1.
The address from Line 1 also tells us that the LAN network scheme is 192.168.1.x, meaning that any device that wants to connect to this network must have an IP that matches this network scheme, with a fourth octet that consists of a number other than 1.
Example of network with two routers
Below is an example of a network with two routers on the local network. After executing tracert 8.8.8.8 in the Command Prompt we received the following results:
Line 1 - one router with an IP address of 192.168.7.1
Line 2 - second router with an IP address of 192.168.1.1
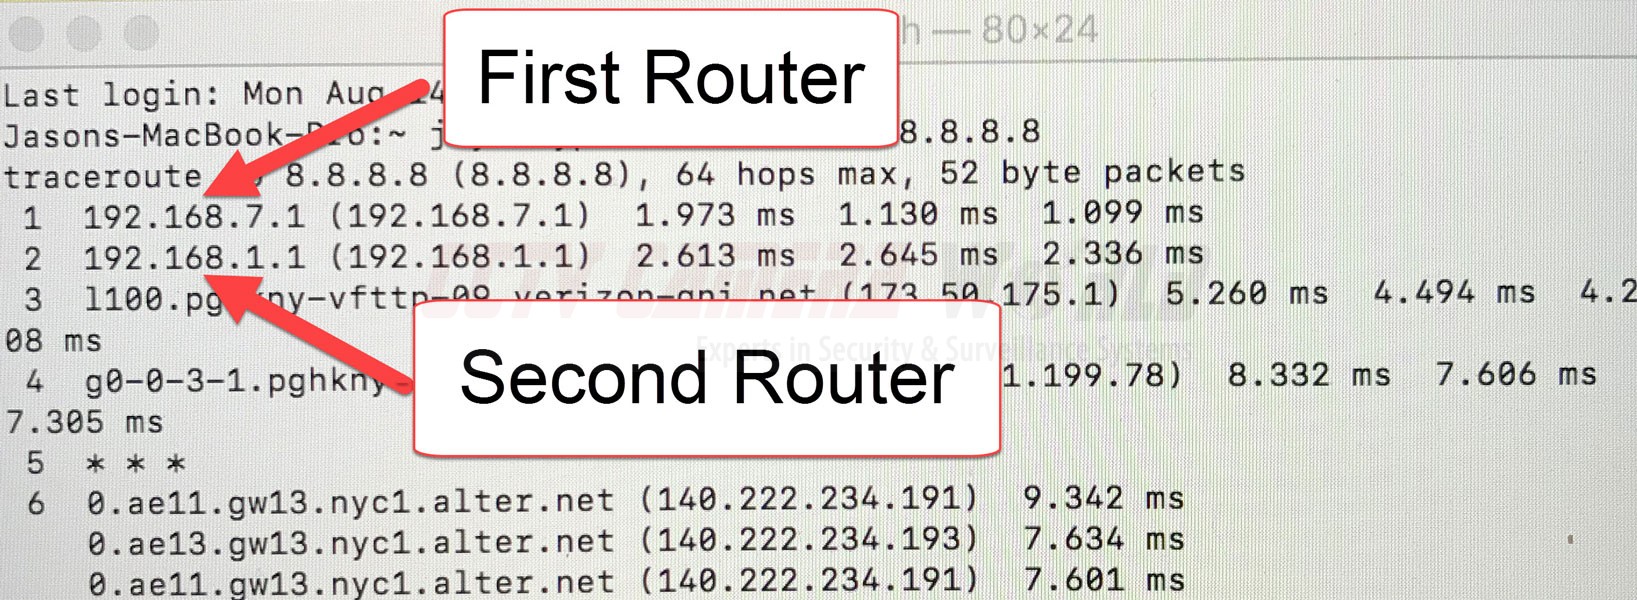
Having two separate routers on your local network will create issues when trying to setup your security video recorder or IP cameras for remote viewing. Unless you are an IT professional who understands advanced networking and port forwarding on such a network, your video recorder or IP cameras should be connected to the First Router with port forwarding rules enabled on the first router.
How to Find Out Your Router’s LAN IP Address Scheme
In addition to use tracert to determine the number of routers on your local network, ipconfig is another command that is useful in determining the IP address of the router your computer is connected to, and the IP address of your computer. Using the Command Prompt window, type ipconfig.
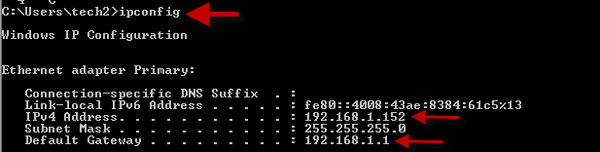
Under Ethernet adapter Primary look for the IPv4 Address which is the address of your computer on the local network. In the example above it is 192.168.1.152, which is the Local IP address (LAN) of the computer we ran this command on. The Default Gateway, once again, reveals the router’s address of 192.168.1.1.
If you are using a laptop with WiFi to run this command, you would look under Wireless LAN adapter, and in the example below, the IP of the computer is 192.168.1.191 and the IP of the router (default gateway) is 192.168.1.1.

Note that the router for both the wired and wireless networks is 192.168.1.1. That is because the same router manages both the wired and wireless network.
As we mentioned before, all devices on the same network have to match the IP address scheme of the router (default gateway) in order to work. The examples above show that the router is 192.168.1.1 and every device connected to it has an IP address that has the same first three octets, but only a different fourth octet. So we can call this scheme 192.168.1.x.
If we wanted to add a DVR, NVR or IP camera to this network we would assign it an IP address of 192.168.1.108. Fortunately, this IP address comes as default on all our network based devices. If you have multiple devices, like multiple IP cameras from us on the same network, you want to make sure you set each to a unique IP address.
Subnet Mask
The second number to pay attention to when assigning devices to your network is the Subnet Mask. You can find that by running the ipconfig command as shown above. The Subnet Mask is the same for all the devices on the same network and is usually 255.255.255.0 unless your network was setup to be extraordinary.
How to Assign an IP Address on Your DVR or NVR
To assign a DVR NVR to your network, you will need to set the following value in its networking section:
- IP Address - a unique value for the recorder's local (LAN) IP address that matches the router's IP address scheme as explained above
- Subnet Mask - usually 255.255.255.0
- Gateway - the value of the router's IP address found from running ipconfig (Windows) or ifconfig (Mac)
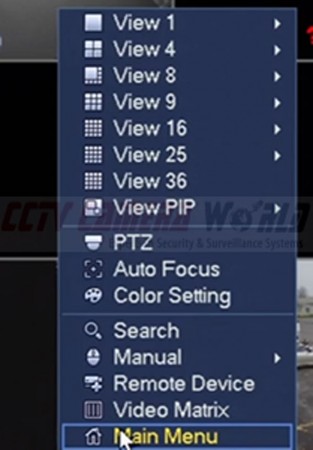
To set these values in your video recorder, access your DVR or NVR directly using a monitor connected to it, and right-click and scroll down and click Main Menu.
Under the Setting section, click Network
![]()
On the left, choose TCP/IP
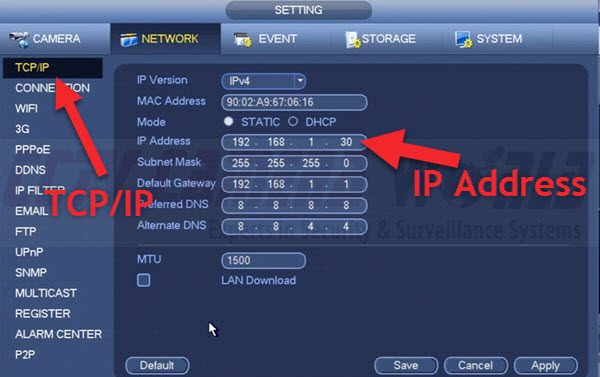
Here, you will find your DVR's IP Address. In this case, it is 192.168.1.30. If it doesn’t match the scheme of your router’s IP, you will have to change it so that it does as explained above. If your router's IP address is not 192.168.1.1, then you want to make sure you set a correct value for the above matching the IP address scheme of your router.
Let's say your router has an IP address of 10.1.1.1. Then we would set these values as follows:
- IP address 10.1.1.108
- Subnet Mask 255.255.255.0
- Gateway 10.1.1.1
Click "Apply" and "Save" to ensure that any changes made to these settings were completed. That's all there is to setting a DVR or NVR purchased from CCTV Camera World on your network.
How to Assign an IP Address to your IP camera
There's a good chance that at some point you'll need to assign or change the IP address of your IP cameras to match your network. If you were to connect an IP camera to the back of an NVR with built-in PoE ports, the NVR will automatically assign the camera with an IP address to match the NVR's own internal network. This is usually a 10.1.1.x network scheme. In this scenario, no further configuration is necessary as the NVR has done all the work changing and assigning an IP address. However, if you intend on connecting an IP camera to your network using a switch separate from an NVR, you will first need to assign the camera with an IP address that matches your network.
Let's say we're connecting an IP camera with an IP address of 192.168.1.108 to a network with a gateway or router with an IP address of 10.1.1.1. The IP address of 192.168.1.108 does not match the network we're trying to connect to, and we need to change it so it does. Our software program ConfigTool will find all network camera devices from our CCTV Camera World connected to a network, regardless of their IP addresses and if they match the current network scheme.
After opening the ConfigTool software, click the circular icon on top to search for devices. It will search for all CCTV Camera World network devices connected to your network. Click the pencil icon to edit the device's IP address.
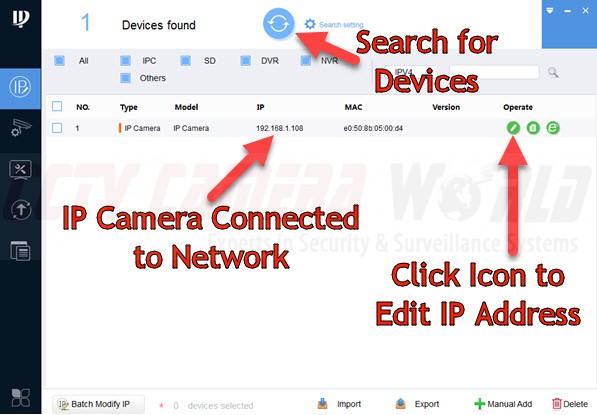
Note: if you have a password other than admin set on the cameras, then you will need to enter that in the "search settings" options before attempting to edit the IP address. See the illustration below on how that is done.

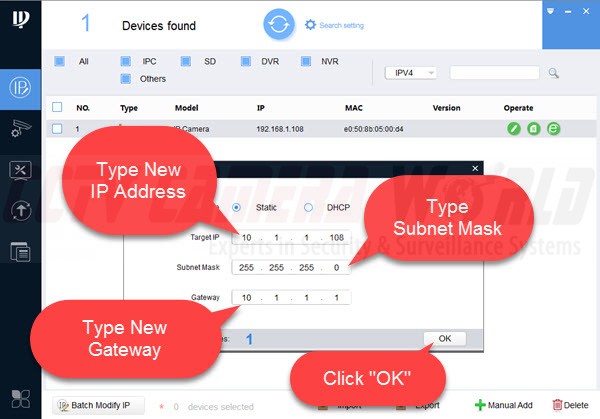
Once you click the pencil icon, a smaller window will appear. Here you can type in the target IP address, which in this case is 10.1.1.108. Subnet Mask for network devices will almost always be 255.255.255.0. Lastly, change the Gateway to a target IP address of 10.1.1.1. Click OK to save the changes.
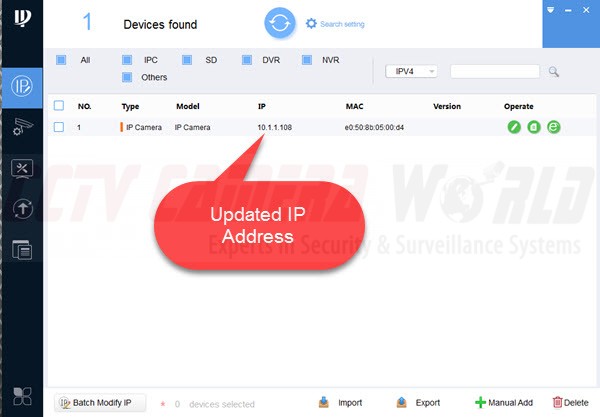
You will now see the new IP address for the camera displayed as 10.1.1.108.
Final Thoughts on Networking
Setting up your security camera system takes a certain amount of networking knowledge, as discussed in this article, but a degree in networking or computer science is not necessary. Now that you have a sufficient understanding on how IP security camera systems work, it’s time to connect one for yourself.
If you would like to view your recorder or camera remotely from an internet connection outside your home/business, you would need to enable port forwarding rules on your router by logging in to your router administration portal and configuring two separate rules for ports 37777 and 80 to be directed to the local IP address of the recorder or camera. Although port forwarding is simple and easy to do, it depends on the make/model and build quality of your router how hard it is to configure the rules.
You can refer to our guide on port forwarding to understand the principles of port forwarding rules, and how to check whether the rules are correctly configured and in effect. We also have step-by-step guides for port forwarding on various routers here. If you don't find your router, then we suggest using www.portforward.com as a resource to find a guide specific to your make/model of router.
We don't advise customers to use a P2P tunneling based method using a QR code to connect to devices remotely. There are issues with internet security and lag time when using such a method. Therefore, to setup a professional security camera system, configuring port forwarding rules in your own router is the preferred method as that yields fast connectivity to your recorder without using an intermediary server.