

How to Install Security Cameras on Your Home

It may seem a bit basic, but most people aren't in love with the idea of possibly defacing their home. Not only is it a matter of not creating an eyesore, but also the effective placement of surveillance cameras. There are times you may need more cameras than you think, and sometimes you may not need as many as you've planned for.
Camera Placement
This just seems like a good place to start. Let's begin by taking a look at where most of us usually start when we think about where cameras should be placed.
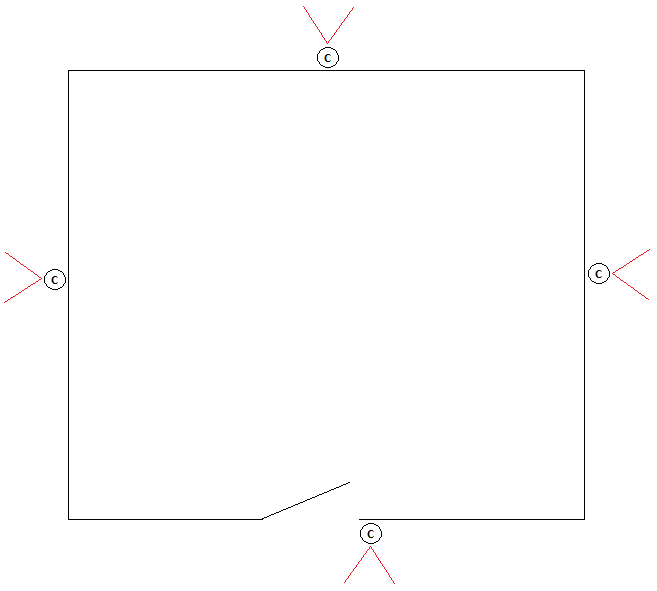
Whatever the reason may be, it seems natural for us to assume that cameras should be placed in some sort of "central" fashion in order to maximize their angle of view and limit the number of cameras we'll need. Figuring that most security cameras will have an 80-90 degree angle of view at best, lets now look at all of the blind spots we've created in this image.
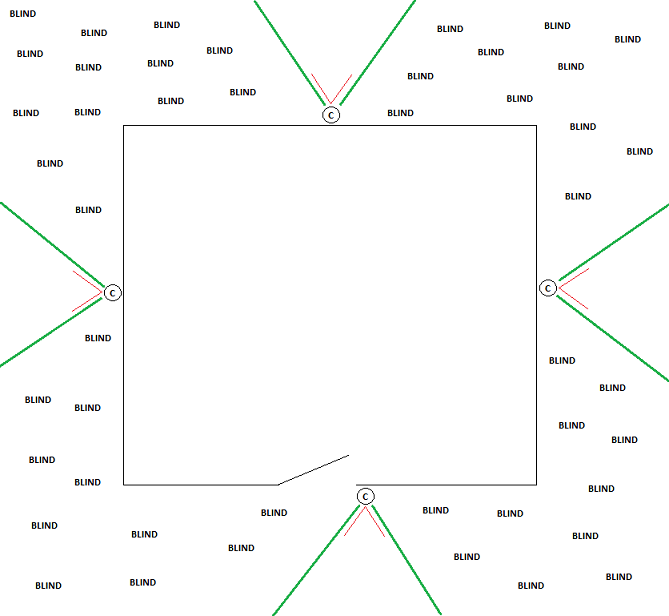
While you may end being able to see the entire perimeter of your property line a few hundred feet away, it should be very obvious that you're going to have a real problem viewing anything in these areas that are any closer. You get the idea.
Are Pan Tilt Zoom cameras a solution?
You can argue that placing a PTZ camera in these locations would be the solution to the problem and you'd sort of be right. The PTZ cameras would enable you to set up a "tour" that tells the camera to constantly be scanning the full 180 degrees needed. Unfortunately, that means that while the camera is looking right, there will still be a brief moment that you can't see left. The other, and more obvious, downside to using PTZ cameras is their unsightly nature. Mini PTZs are roughly two to four times the size of conventional fixed cameras and usually lack Infrared (night vision), and the regularly sized PTZ cameras are almost twice as big as the mini models making them a little larger than basketballs. There's also the price to consider. Even cheaper, but still effective, PTZ cameras will usually cost at least three times what a fixed security camera will and require additional setup.
How about something more effective overall?
Using the same image, let's look at what an effective installation might look like.
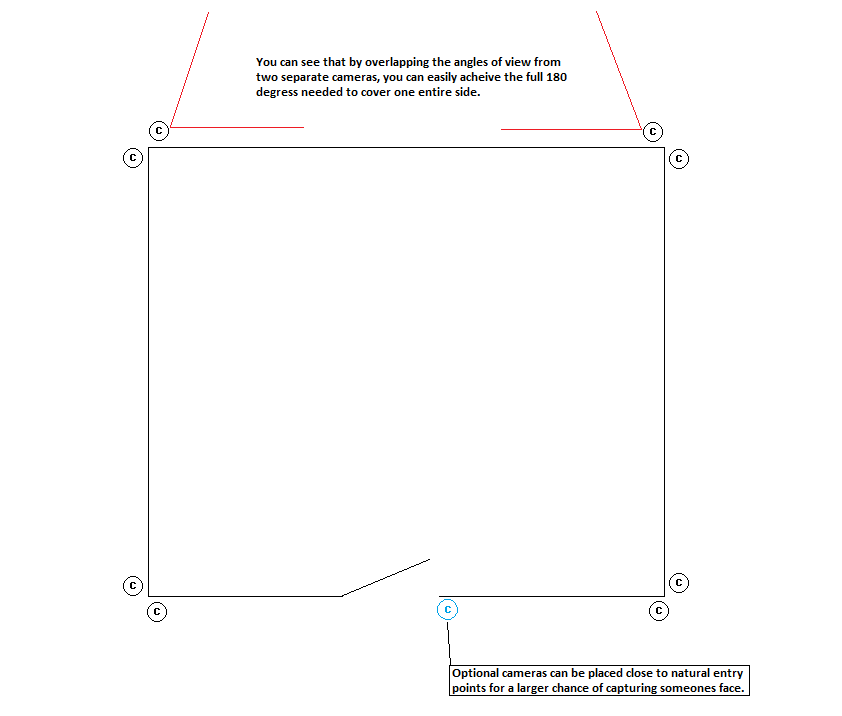
As the image states, overlapping angles of view from multiple cameras will ultimately end up guaranteeing the most effective and largest coverage area. This means adding additional cameras to the system, but the reward far outweighs the risk.
As you'll also see in the above image, placement of cameras near natural points of ingress/entry will ensure a much higher possibility of capturing someones face in detail. Cameras placed in these locations are specifically intended to be focused on the exact points/areas people will have to cross to enter your home. Let's look at an example that may be a little more realistic.
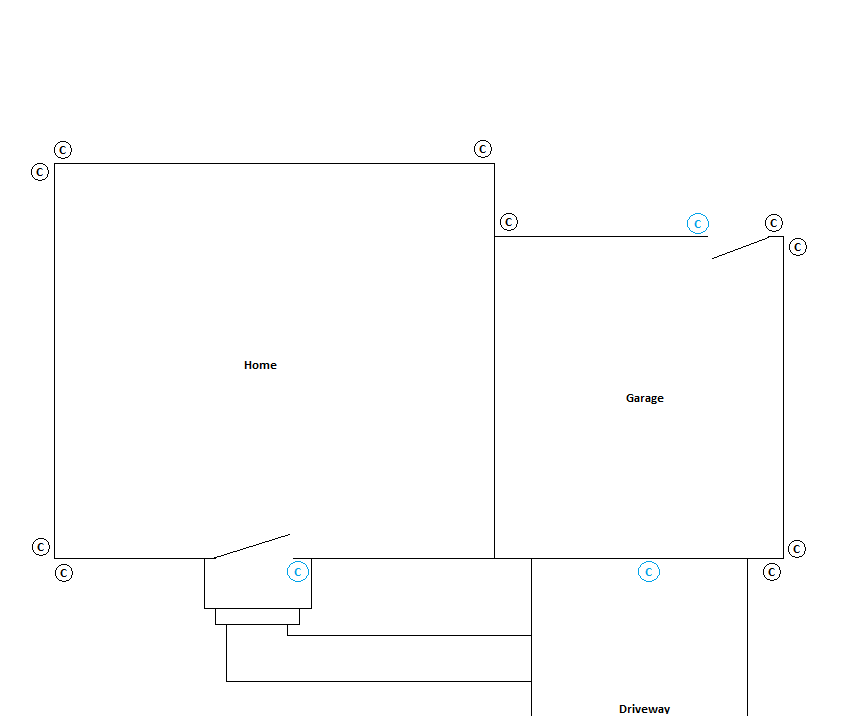
This is a fairly average looking home. You shouldn't see anything different here as the concepts are all the same. Overlapping angles of view and cameras placed at points of entry will ensure the exterior coverage of your home. You'll have removed any element of surprise and put yourself in a position to positively identify the individual before they've even had a chance for any wrongdoing.
Mounting Surface
Now that you've figured out where your cameras need to be mounted, you need to decide the best spot to mount them to in that area. The vast majority of cameras will have the ability to be mounted on any flat surface and still be adjustable to the angle you need (ceiling, wall, etc...). Your biggest decision here will be determining which spot is most aesthetically pleasing while still maintaining it's effectiveness.
This starts to get into a matter of opinion and what you're able to live with. Those of you with attics will probably have the easiest time making this decision. By mounting your cameras underneath your eaves, you'll be further protecting it from the elements, and giving yourself a very easy method of running your cable. After drilling a hole through the eaves and pushing the camera's pigtail through, you'll then have direct access to those connectors through your attic. From there, you can run the cable wherever you need to inside your home.
For those of you needing to "wall mount" your cameras, it gets a little more tricky. You'll need to know that the material you're drilling into will be able to support the weight of a camera in the long term. You'll also need to make sure that you seal those openings in the structure that you've created to avoid any water damage. The only real eyesore you risk creating here is if you end up having to run cable up the outside of your home before bringing it into the house. You can use conduit as a way to conceal it or some people will have the possibility of being able to tuck it underneath their siding.
DVR Placement
This is often the most overlooked step in any first time installation. Our initial thought here is to put the DVR where it'll be easily accessible and most convenient for us. But what about what's most convenient for the installation and what will protect you best?
Being able to easily access your DVR is not the best idea. You went through the painstaking efforts of proper camera placement to ensure that you'd be able to catch someone in the act. What does it matter if the first thing they see when they break into your home is your DVR? Burglars don't need to know that it's a DVR. Seeing that it's an electronic component is enough for them to know that it's worth money and worth stealing. It's nice that you got them on camera but that evidence is on the hard drive in your DVR that they just stole from your home. Your DVR should be placed in a more concealed location but never enclosed to the point of creating issues with overheating (i.e. - not locked in a small cabinet).
Easy access to your DVR is achievable in other ways thanks to today's technology. Connecting your DVR to your modem/router will mean connecting it to your home network. This will mean being able to have full access to your DVR through any computer in your home. For this reason, you should be taking this into consideration when you're planning this all out.
Let's wrap it up
Planning may not be the most difficult part of any installation, but it's what you should spend more time on than anything else. Having a solid plan will help things to move along much easier and smoother when the time comes. As it usually goes, if you have questions, it's better to ask right away then let your frustration build up.