How to secure a security camera for use over the web

In corporate or military network environments there can be strict requirements to use IP security camera equipment. One of those requirements is HTTPS access which safely encrypts data between the web browser and the network camera. All of the IP cameras and Network Video Recorders we carry at CCTV Camera World have a built-in web server and our models from 2019 onwards support SSL implementation for access. This guide will show you how to enable and setup HTTPS access on your IP camera. The same process can be followed on our NVRs.
Step 1. Connect to your IP Camera’s web interface and login
In order to setup HTTPS access you’ll first have to access the camera’s web interface using a web browser. If you’re unsure how please refer to our guide How to Connect an IP Camera to a Computer. If we pre-configured the camera before shipment, the IP address, username, and password for the camera will be found on the top cover of the product box.
Step 2. Navigate to the HTTPS settings
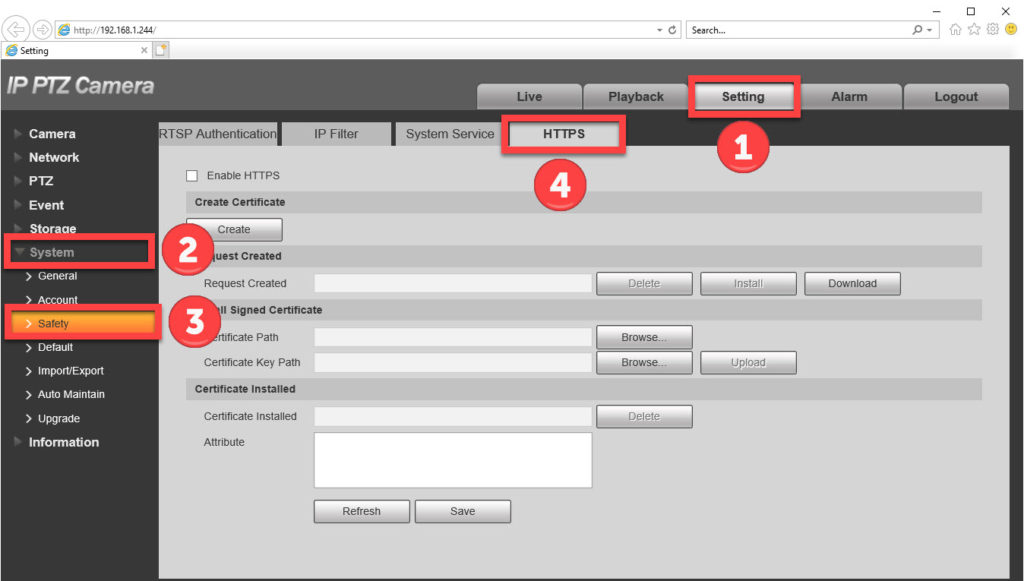
If your camera supports the HTTPS protocol you will find the HTTPS settings in the setup or settings tab for your camera. The HTTPS settings can be found by:
- Click Setting(Setup) on the main menu
- Click the System on the left-hand menu
- Click the Safety sub-menu under System
- Click HTTPS below the main menu
Contact our support team via email if you’re unsure how to access the HTTPS settings for your camera or to check if yours supports HTTPS.
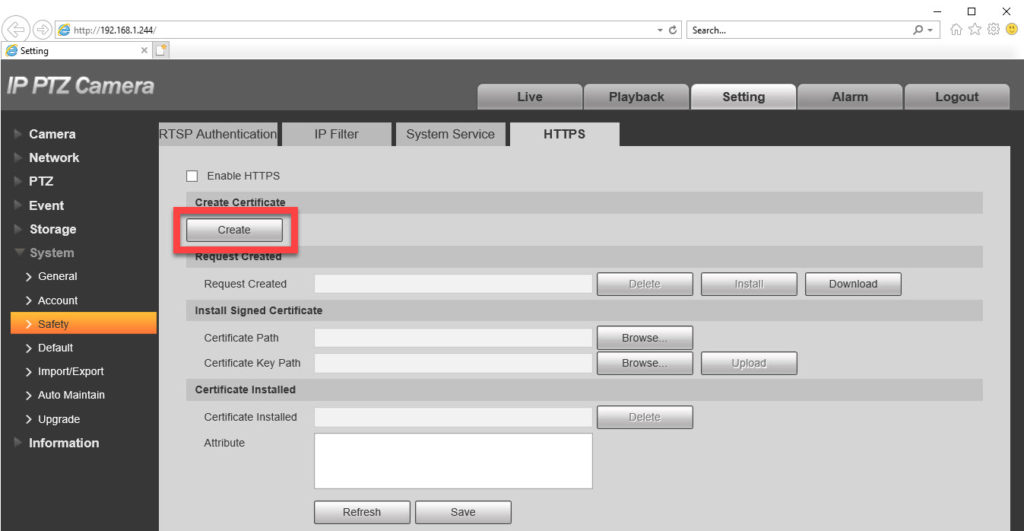
Step 3. Create a self-signed certificate
HTTPS relies on security protocols that use certificates with information that must match in order for encryption and decryption to happen. In this process we will create and install a certificate on the camera. The same certificate must also be installed on every computer that needs access to the camera, which is done in a later step.
Step 3a. Click the create button
Clicking the create button will bring up a certificate creation screen.
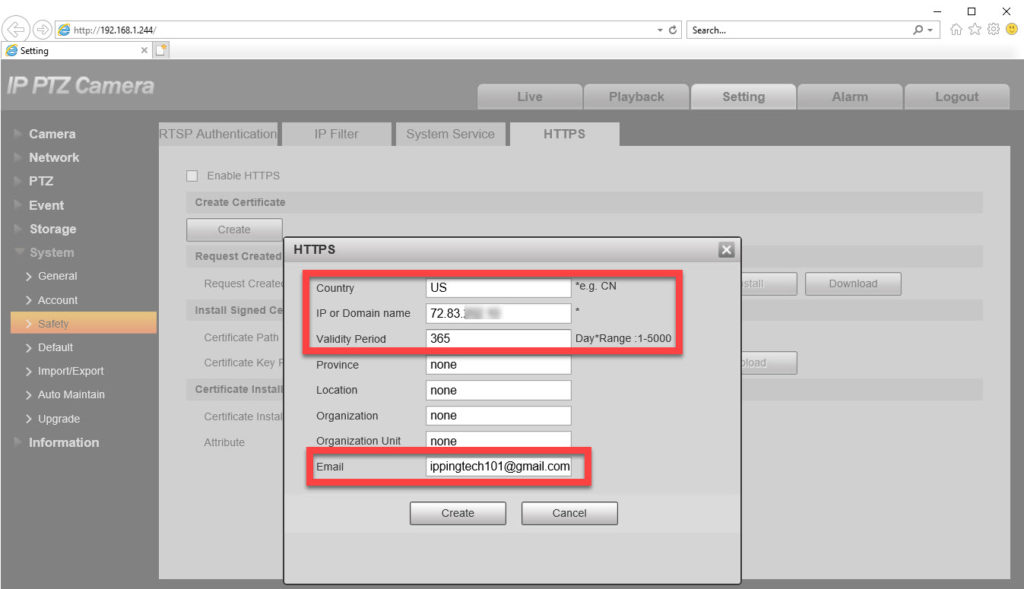
Step 3b. Enter the external IP address for your network and 2-letter country code
In the certificate creation screen you are only required to enter the:
-
- IP address or Domain Name - Enter the either static IP address or domain name that you have routed to access the camera. This section allows use of three different kinds of values
- LAN IP address - if the camera is going to be used solely on the internal network, then you can enter the LAN or local IP address assigned to the camera or recorder.
- External IP address - if there is portforwarding in place on your router to allow access using the external IP address assigned by your ISP, then you can use that external IP address
- Domain name - if you have a domain name for the external IP address, you can even use that. Alternatively, a domain name purchased from a DDNS provider can be used here.
- 2-letter country code
- IP address or Domain Name - Enter the either static IP address or domain name that you have routed to access the camera. This section allows use of three different kinds of values
Some common country codes include:
-
- United States - US
- Canada - CA
- United Kingdom - UK
- Valid email address
You can fill out the rest of the information if you or your organization requires it.
You can also specify how many days you would like the certificate to be valid for, we use the default 365 days or 1 year.
Important: Ensure there are no typos or errors before clicking the create button. If you make a mistake simply logout, and log back into the camera before moving forward in the guide.
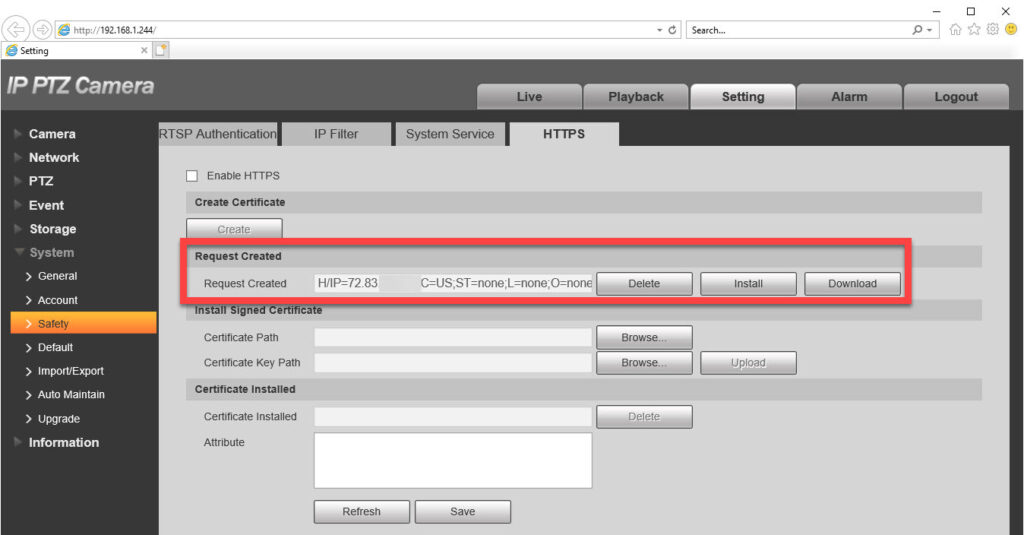
Step 3c. Click the Create button
Clicking the create button will copy your information and create a certificate request.
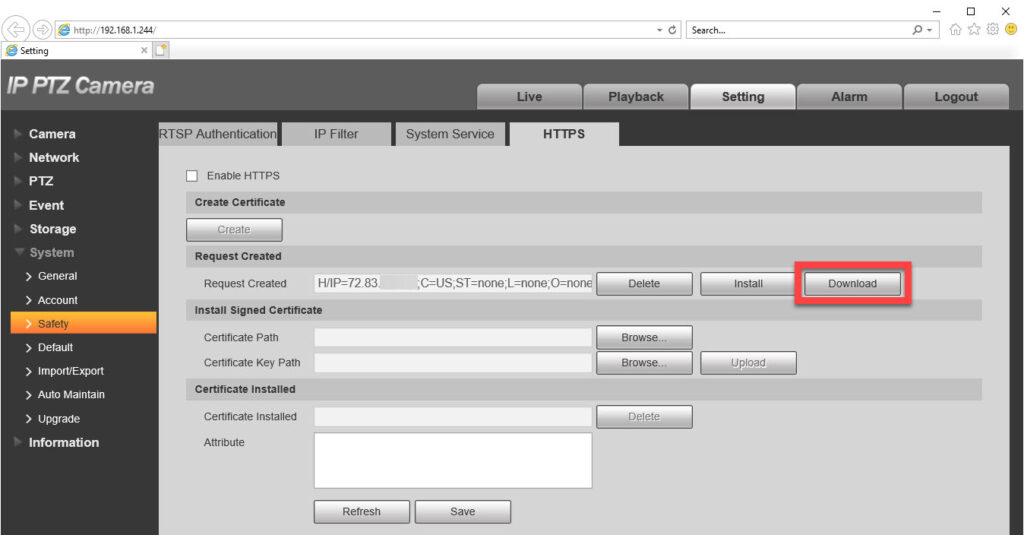
Step 3d. Click the Download button
The download button will allow you to export the certificate to your computer for installation on the computer.
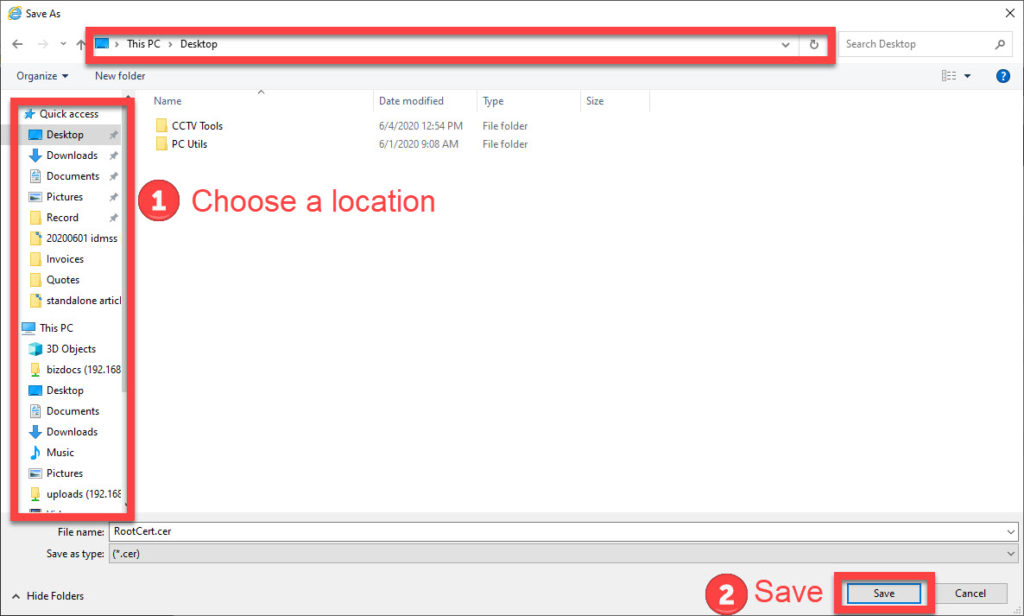
- Choose a folder that you know how to reach. In our example we use the Windows Desktop folder.
- Click the Save button to download the certificate.
- If you’re installing the certificate on multiple computers you will want to save a copy to a flash drive or network share.
Step 4. Install or import the certificate into Windows
For every computer that needs to access the camera through the HTTPS protocol you will need to install the certificate into Windows. If you do not install the certificate, the browser on that computer will alert stating the website you are trying to access is not secure.
Step 4a. Open a Windows Explorer window
Use the keystroke combination Windows Key + E or click the folder icon on the taskbar to open a new file explorer window in Windows 10.
Step 4b. Browse to the location of your certificate file
Navigate to the folder or directory that you saved your certificate in. In our example we are using the Windows Desktop folder.

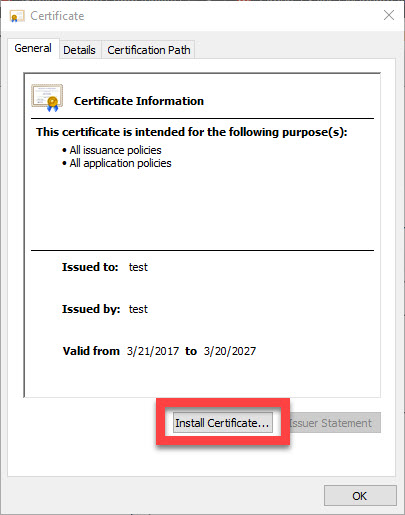
Step 4c. Double click the certificate file and click Install Certificate...
Double clicking the certificate file will open the Certificate details window and allow you to click the “Install Certificate…” button to import your certificate.
Step 4d. Use the Certificate Import Wizard
Clicking the Install Certificate button pulls up the Certificate Import Wizard.
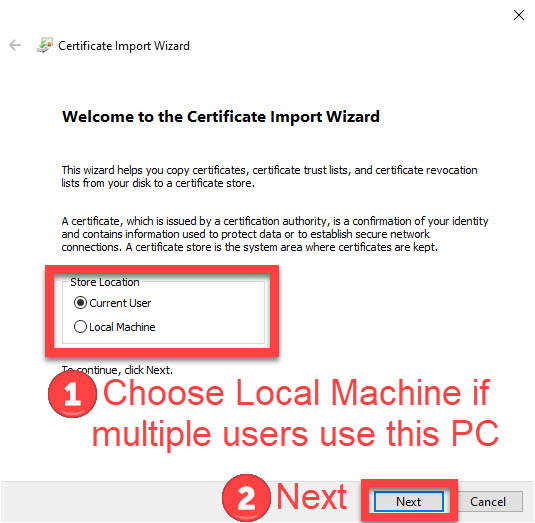
If this computer is used by more than one user we recommend selecting ‘Local Machine.’ If the computer is only ever used by one person then select ‘Current User’. Click next to start the import process.
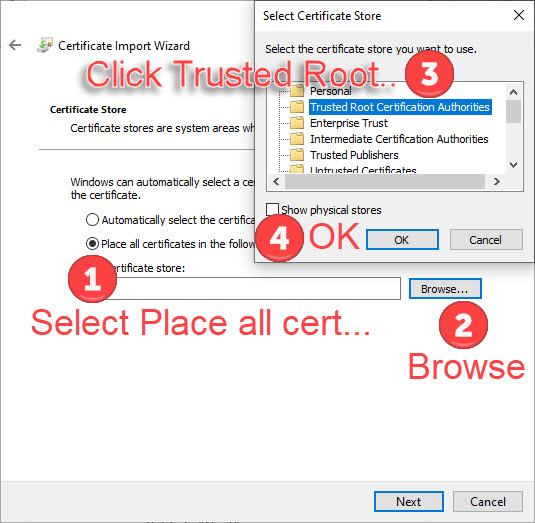
- Click the “Place all certificates in the following store” selection
- Click Browse.
- Select “Trusted Root Certification Authorities” by clicking it. Make sure it is highlighted.
- Click OK to finish importing your certificate
Click Next and Finish to exit the wizard.
You should receive a success message. If you do not, there is something wrong with your Windows installation, contact Microsoft or your network administrator for support if you receive an error message.
Step 5. Install the certificate into the camera and enable HTTPS
Back on the IP camera’s web interface you can now install the certificate and enable HTTPS.
Step 5a. Installing the certificate
To install the certificate into your camera:
- Click the “Install” button.
- Allow up to 15-30 seconds for the camera to install the certificate. After some time you will see the certificate installed and the Attribute field will populate.
- Click the Save button to finish installing the certificate.
You should see an ‘Operate Succeed’ message, if you receive an error message make sure that your certificate is valid and has no mistakes.

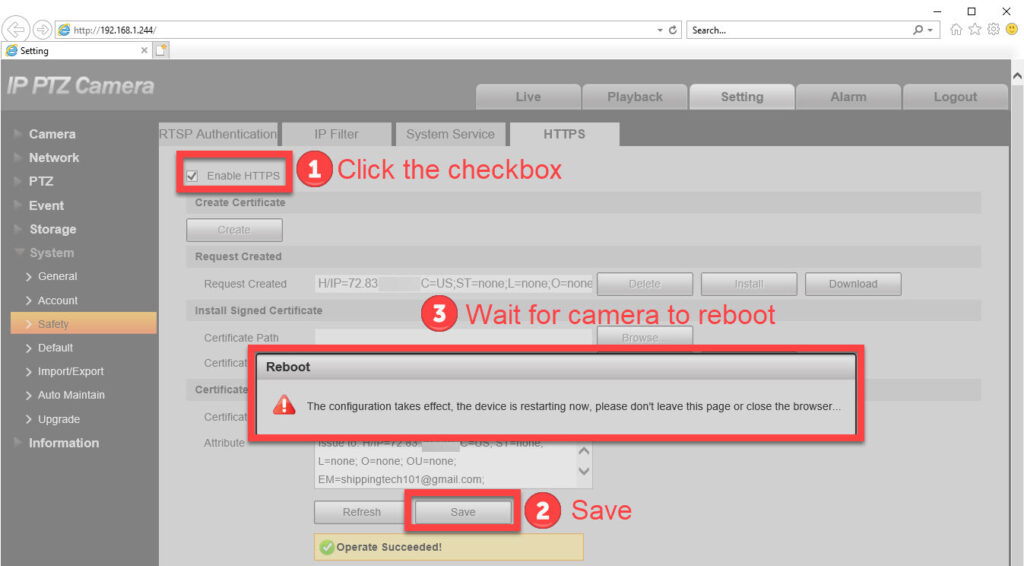
Step 5b. Enable HTTPS and Save
After installing the certificate on your computer, and on the camera you’re almost done! The last steps are:
- Check the HTTPS checkbox
- Click Save.
- You may be prompted about the camera rebooting, click OK or Yes to allow the camera to reboot. Your camera will reboot and HTTPS will be enabled.
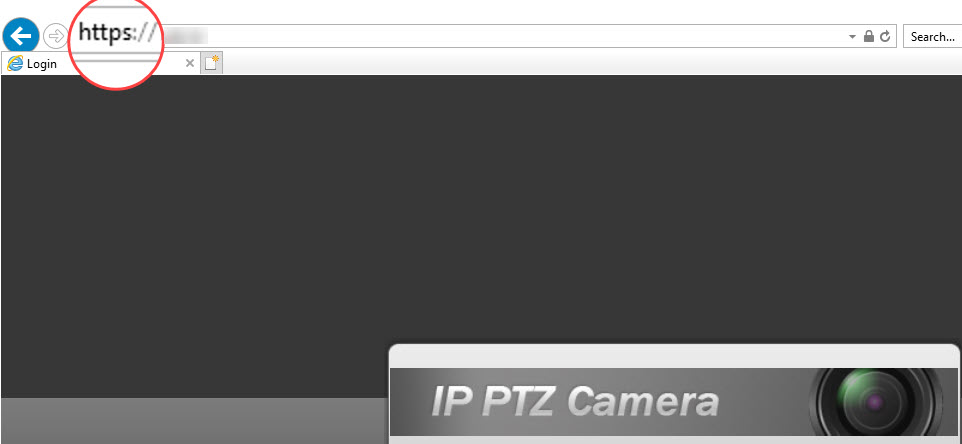
Step 6. Check to see if HTTPS is working
After the camera has rebooted you’ll want to double check and verify that HTTPS is working. When accessing the camera you’ll need to access it using the IP address you created the certificate for. If you don’t you may encounter a warning from your web browser.
You will need to precede the IP Address with https://.
In our example we connect using the URL: https://72.83.xxx.xxx
You may also receive a warning from your web browser the first time you connect. Depending on the browser you may need to add an exception, acknowledge a warning, or acknowledge the camera is a “safe site.” Since you created the certificate, and are accessing the camera you know it’s a safe site.
If you receive a “TLS out of date” or other error try refreshing the page before changing any settings. The error will likely clear out with a refresh.
Since the data is being encrypted and decrypted the camera’s web interface may take longer to load.
Here you can see we’ve successfully enabled and connected to our camera using the HTTPS protocol.