

How to secure a security camera system for use over the web
In today’s world it is becoming increasingly important to secure electronic devices that are connected to the internet. One of the best ways to secure security cameras and security camera systems is to set up HTTPS. HTTPS provides an extra layer of security when accessing a security camera system using a web browser. The HTTPS protocol encrypts data between the web browser and system so that the data cannot be easily read by potential hackers. Most security camera systems sold by CCTV Camera World from 2019 and onward support setting up HTTPS access. To learn more, continue reading.
Step 1. Connect to the Recorder web interface and login
To enable the HTTPS protections for a security camera system login to the web interface. We recommend using Internet Explorer from a Windows 10 computer for the best compatibility. Using the Internet Explorer interface will require the user to install a plugin. Make sure the Windows computer has admin rights before following our guide.
Step 1a. Login to the web interface of the system by typing the IP address of the DVR or NVR into the web browser address bar. The address bar is located at the top of the web browser.
Step 1b. Enter in the username and password that is found on a label attached to the top of the recorder. Click Login.
Step 1c. If the plugin is not installed then follow through with installing the plugin. The bottom of the browser will indicate there is a plugin to install after clicking the Install Plugin button.
Step 1d. Run through the installation wizard of the plugin and refresh the web page after completing the installation. Login to the admin user again after completing the plugin installation.
Step 2. Navigate to the Security settings page
In order to enable HTTPS settings a user will need to navigate to the Security settings of the recorder. The Security settings can be located by:
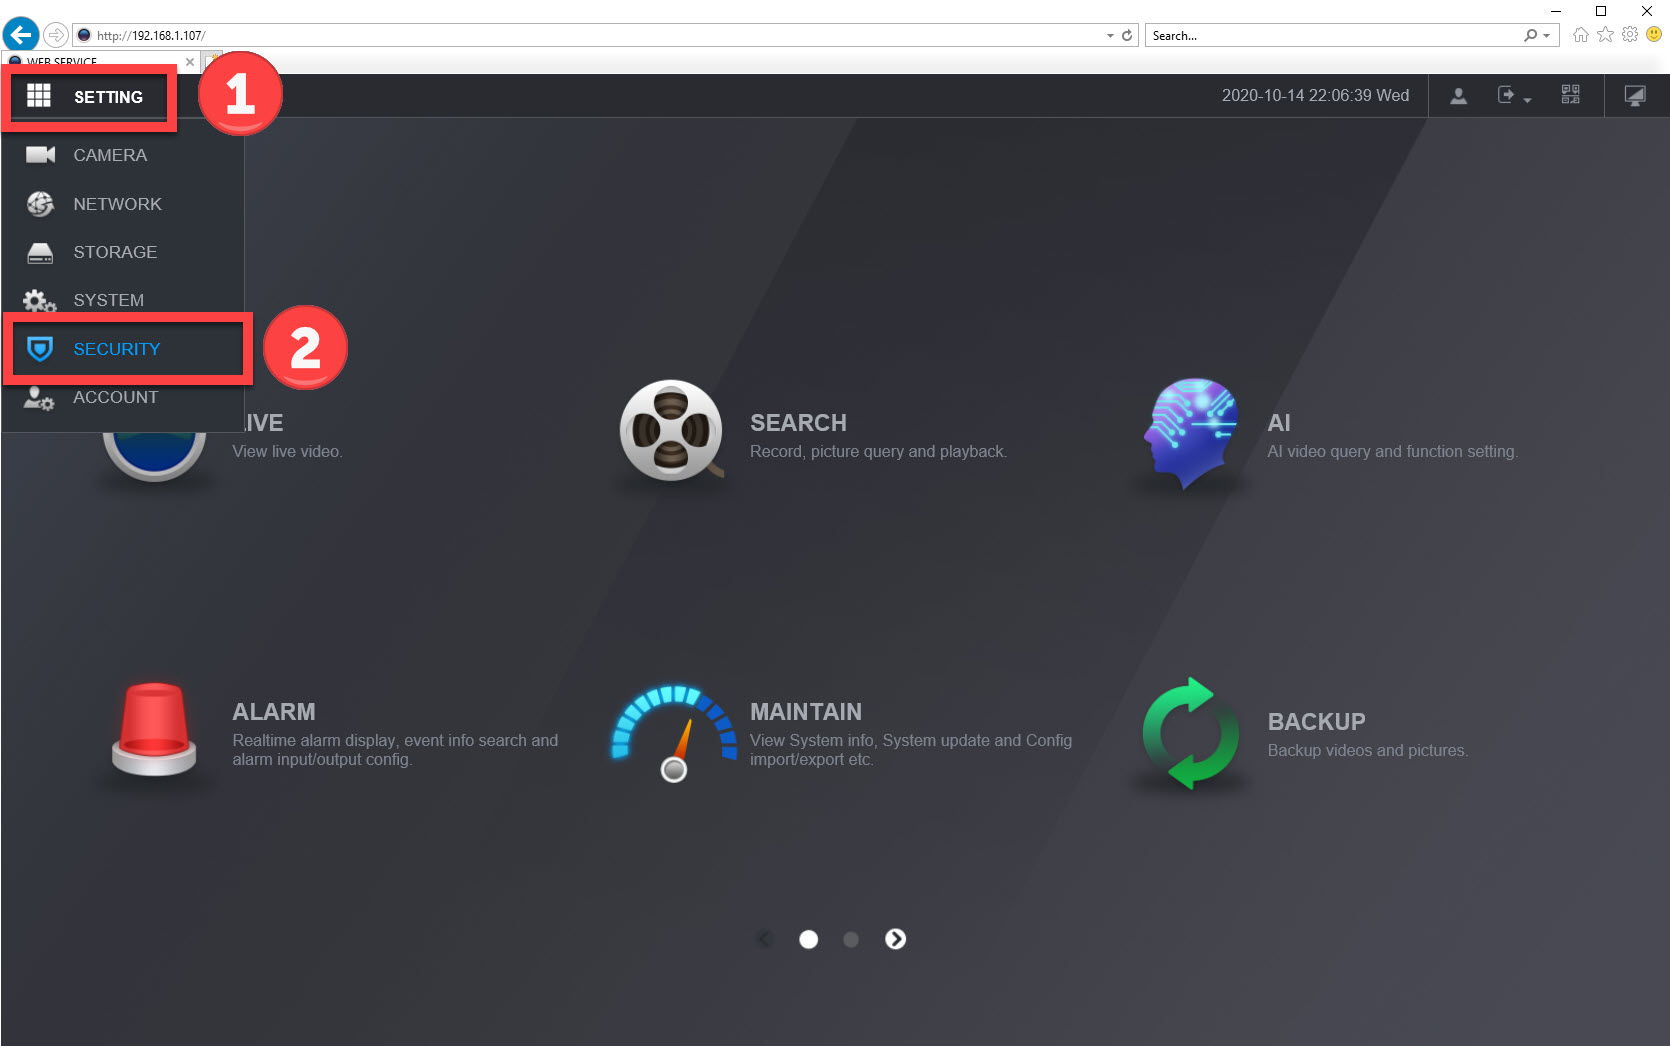
Step 2a. Clicking the SETTING button at the top left. This brings up a menu.
Step 2b. Click the SECURITY menu option.
[+] to Enlarge
Step 3. Download the Certificates
For the HTTPS protocol to work it requires your computer to have valid certificates in order to access the recorder securely. In other words certificates provide a handshake between your computer, web browser, and the recorder. In order to install the certificates you will need to download them to your computer.
Download the Device Certificate
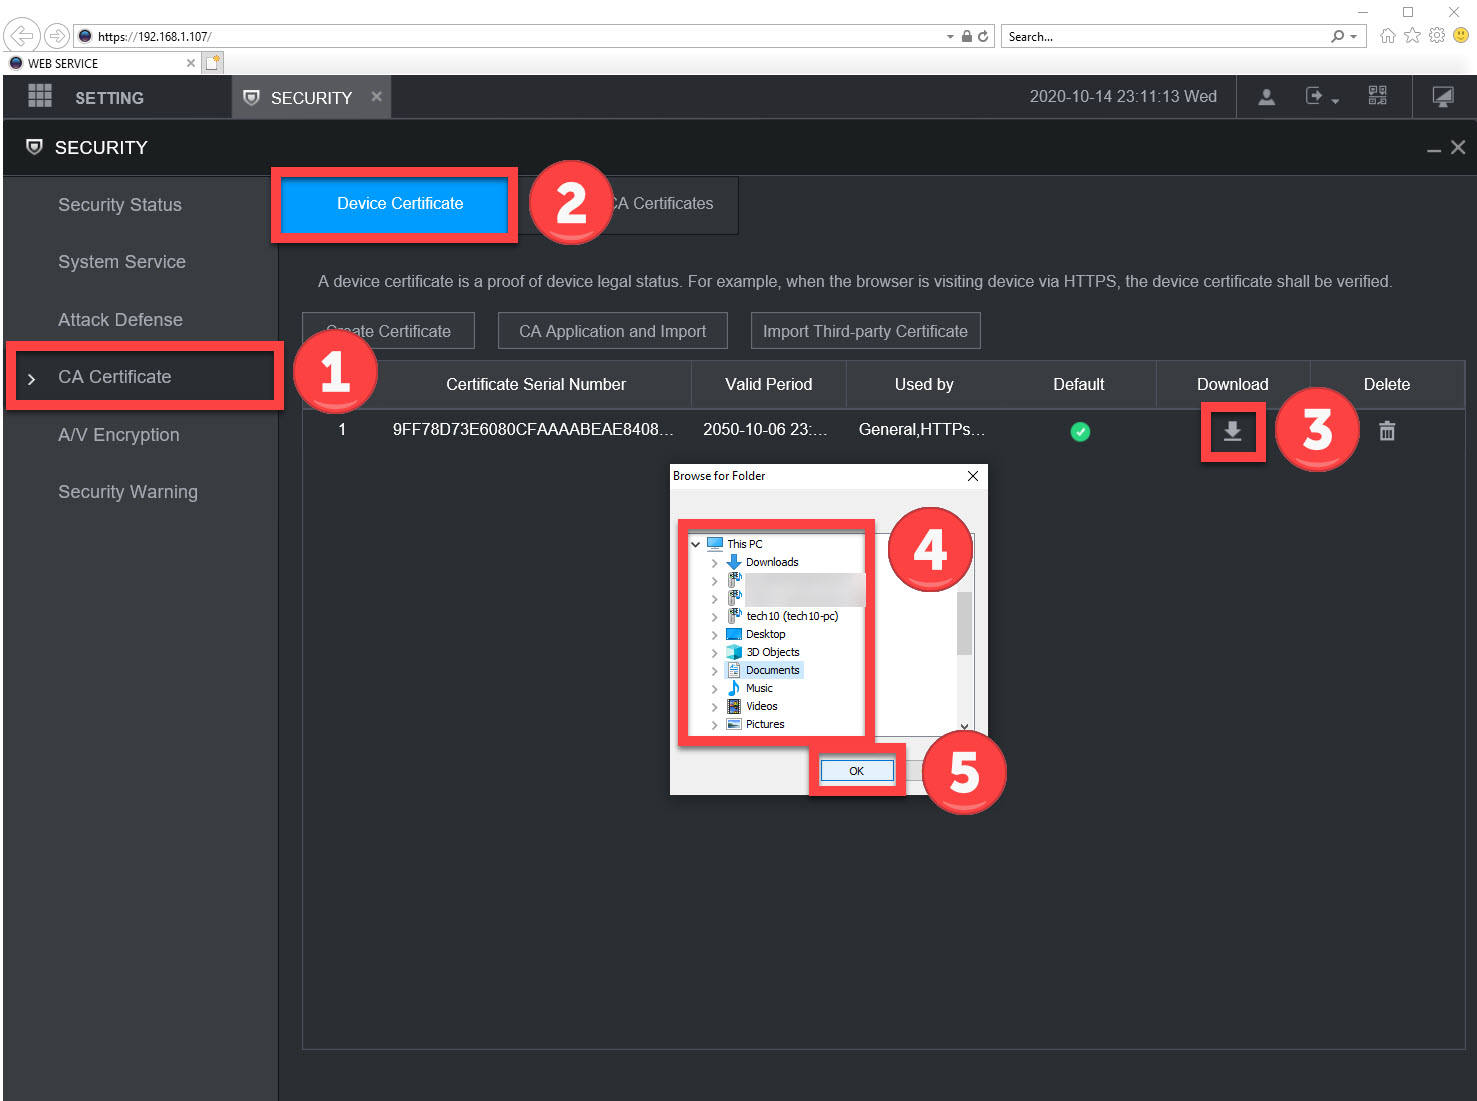
Step 3a. Click on the “CA Certificate” tab.
Step 3b. Click the “Device Certificate” tab if it’s not already selected
Step 3c. Click the Download button.
Step 3d. Click to highlight a folder to download the certificate to. We choose the Documents folder. You can also create a sub folder called “Certificates” to stay organized if the Documents folder has a lot of files already.
Step 3e. Click “OK” to download the certificate. A green “Download Completed” notification should appear at the top. If there is an error close out of the browser and re-login to try again.
[+] to Enlarge
Download the Trusted CA Certificate
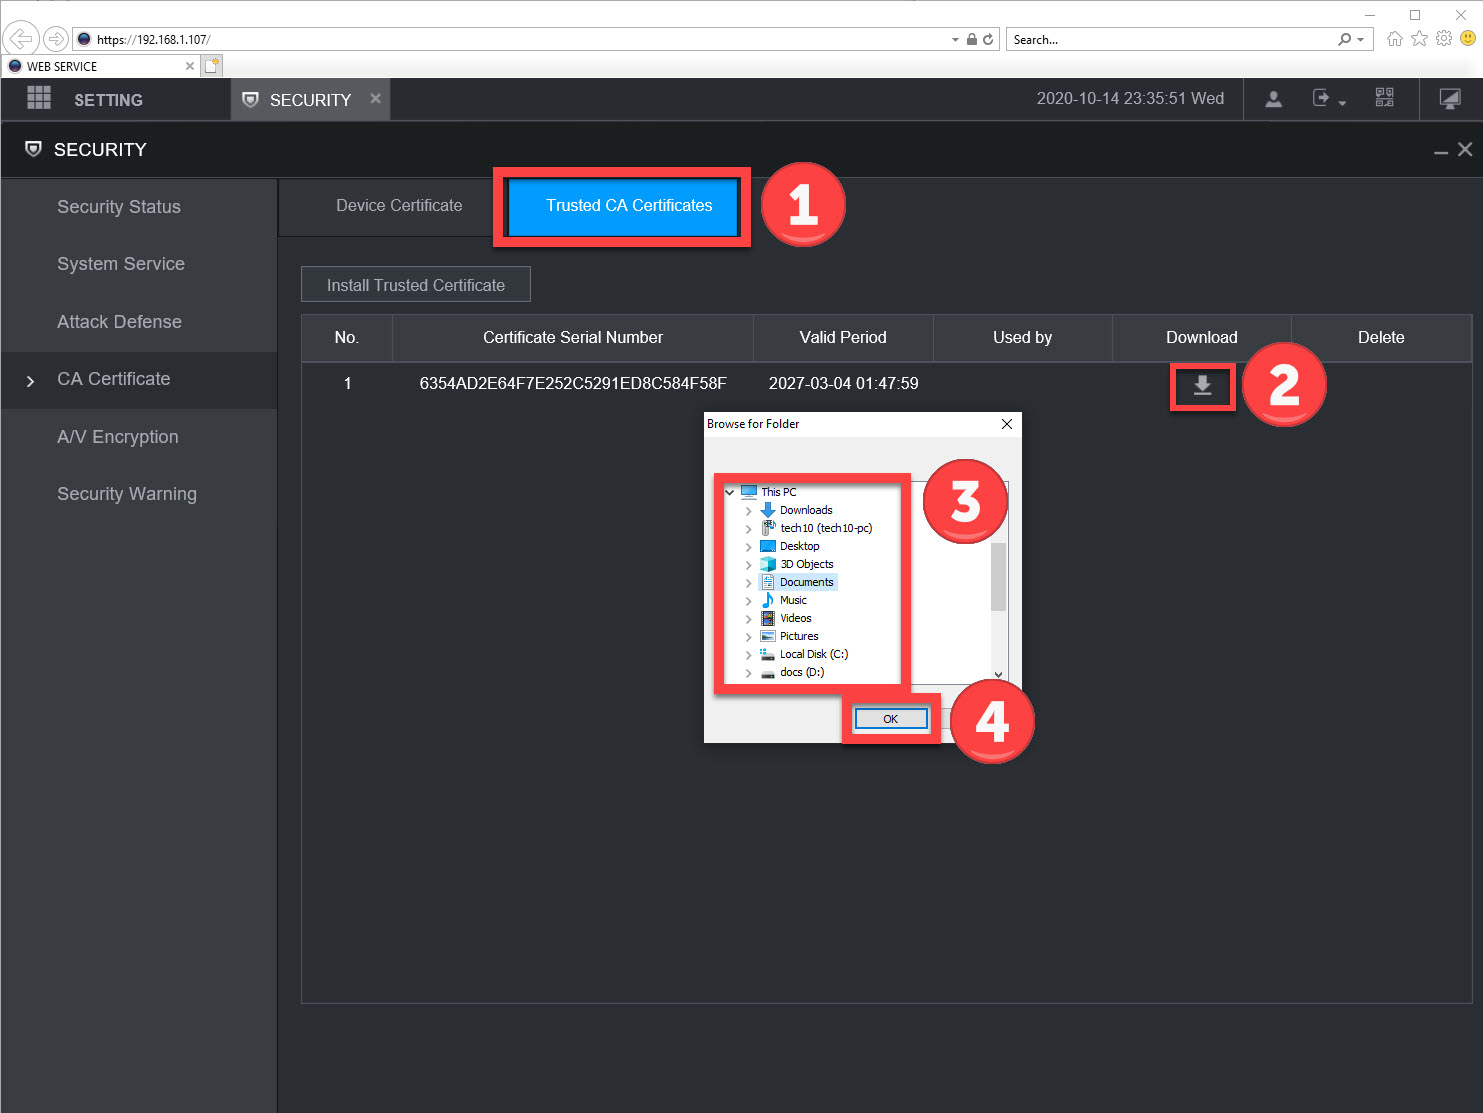
Step 3f. Click the “Trusted CA Certificates” tab.
Step 3c. Click the Download button.
Step 3d. Click to highlight a folder to download the certificate to. We choose the Documents folder. You can also create a sub folder called “Certificates” to stay organized if the Documents folder has a lot of files already.
Step 3e. Click “OK” to download the certificate. A green “Download Completed” notification should appear at the top. If there is an error close out of the browser and re-login to try again.
[+] to Enlarge
Step 4. Install the Certificates for Internet Explorer
The next step involves installing the certificates created by the recorder into the computer. This tells the computer and recorder that they can trust one another. You will need to install the certificates on each computer that requires HTTPS access to the recorder.
The process is the same for each computer that requires the certificates. Copy the certificates to a secure thumb drive so they can be copied, and are not lost. If the certificates are lost they must be redownloaded from the recorder from a computer that has access.
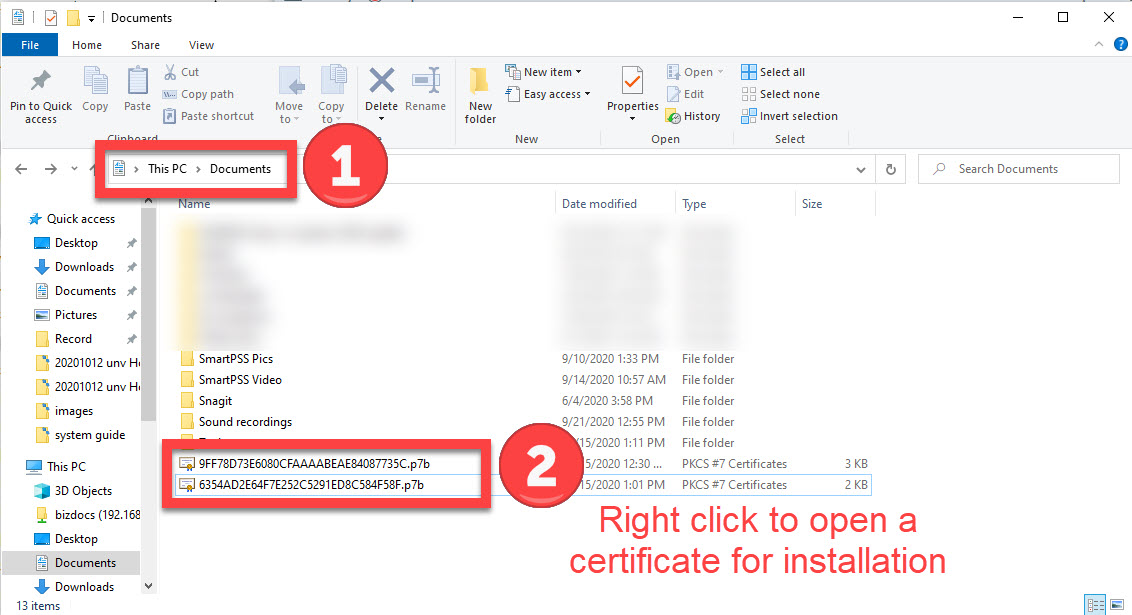
Locate the Certificate Files using File Explorer
Step 4a. Open a Windows File Explorer window. This can be done by clicking the folder icon on the taskbar or using the Windows Key + E key combination.
Step 4b. Locate where the certificate files were saved. In our example we saved the certificates to the Documents folder.
[+] to Enlarge
Install the Certificates into Windows for Internet Explorer
For Internet Explorer and the recorder to finish their handshake the certificates must be installed to the Windows Certificate Store.
Repeat this process for both certificate files
Step 4c. As shown in the photo above and below, right click the certificate file to open the menu to install the certificate. Click “Install Certificate”. This will open the Certificate Import Wizard.
Step 4d. Click the Next button on the first screen of the Import Wizard
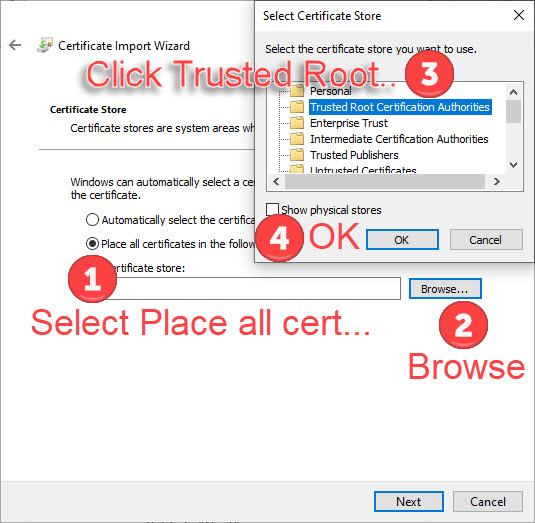
Step 4e. Click the “Place all certificates in the following store” selection
Step 4f. Click Browse
Step 4g. Select “Trusted Root Certification Authorities” by clicking it. Make sure it is highlighted
Step 4h. Click OK to finish importing your certificate
[+] Click to Enlarge
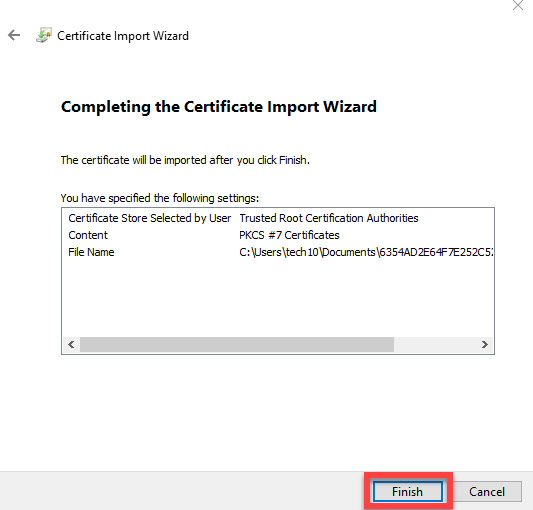
Step 4i. Click Finish to finish the import process
[+] to Enlarge
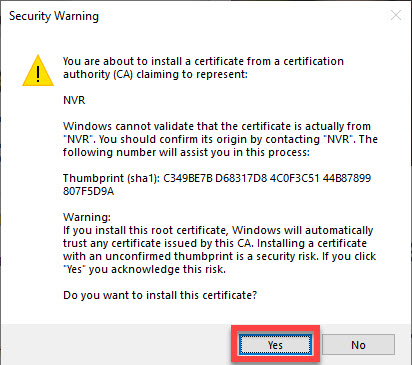
Step 4j. Click Yes on the Security Warning if it appears
[+] to Enlarge
Step 4k. Repeat the step 4c through 4j process for the other certificate file that was downloaded in the Step 3.
Step 5. Install the Certificates for Google Chrome
If you or people in your organization intend to use the HTML5 web plugin available through Google Chrome, then Chrome will also need the certificates installed. Following the process below will allow for Chrome to access the recorder using the HTTPS protocol.
Navigate to the Security Certificate settings for Chrome
To install security certificates into Chrome there is a specific area in the settings. For novices this area may be difficult to locate. Follow the instructions below to get there.
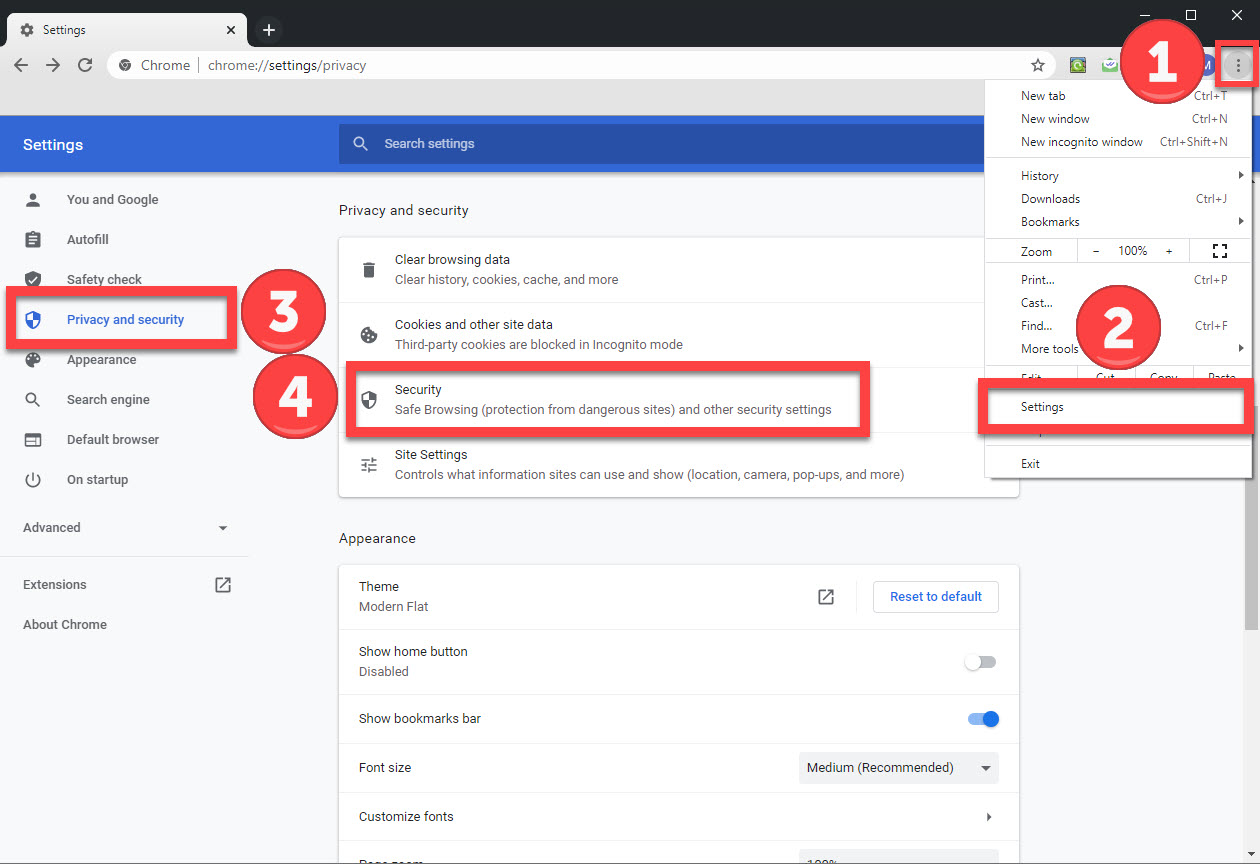
Step 5a. Click the 3 horizontal dots at the top right of the Chrome window. This will open a menu.
Step 5b. Click the Settings option on the menu. This will open a new tab or window inside of Chrome.
Step 5c. Click the Privacy and security button on the left hand side.
Step 5d. Click the Security selection in the “Privacy and security” section.
[+] to Enlarge
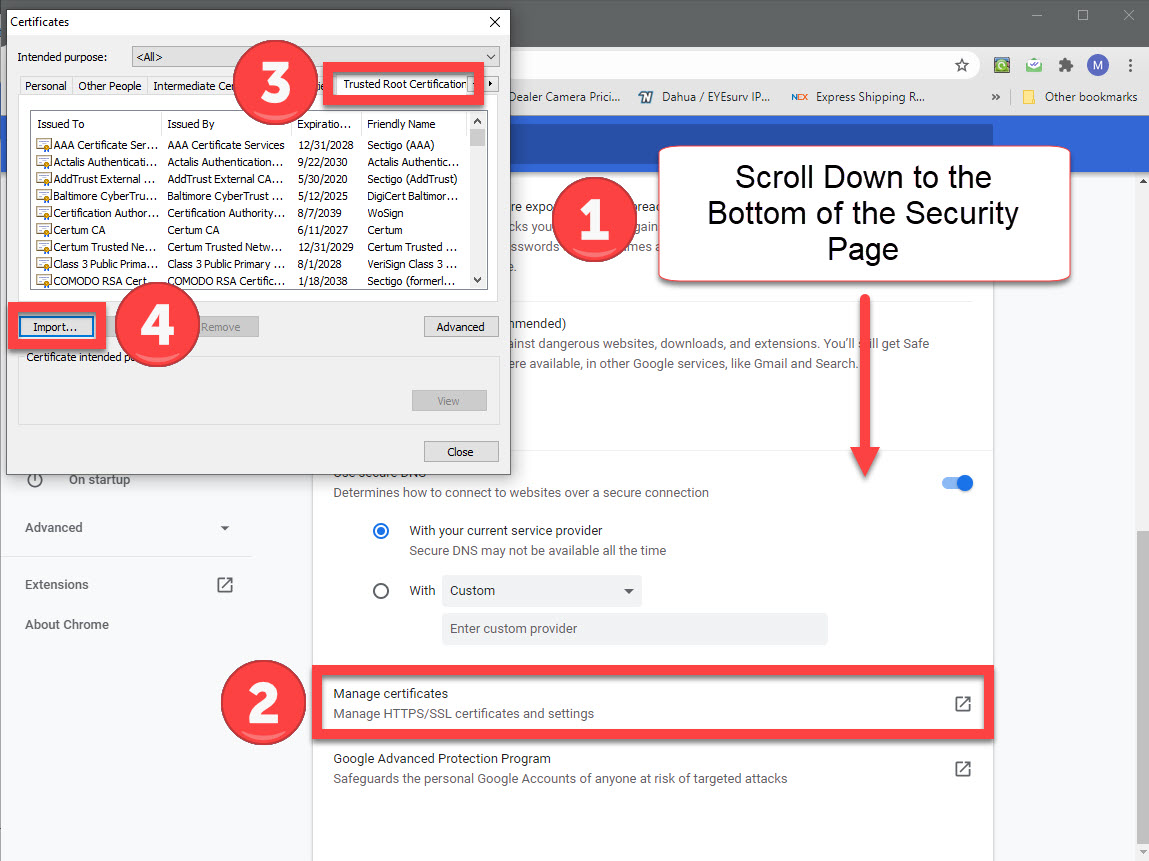
Step 5e. Scroll to the bottom of the Security page and click “Manage certificates”. It has a subheading of “Manage HTTPS/SSL certificates and settings”.
Step 5f. Click the Trusted Root Certification Authorities Tab.
Step 5g. Click the Import… button. This will open the Certificate Import Wizard.
[+] to Enlarge
Step 5h. Click the Next button in the Certificate Import Wizard. The next screen is to browse to the certificate files.
Step 5i. Click the Browse… button and navigate to the certificate files using the File Explorer window. At the bottom right make sure the file type is set to “All Files” or the “PKCS #7” file type.
Step 5j. Double click on one of the certificate files to open the certificate. You can also highlight the file and click open at the bottom right.
Step 5k. Both certificates must be installed for HTTPS to work with Chrome. Repeat the step 5h through 5k process for the other certificate file that was not chosen for the first import.
Step 6. Locate and enable the HTTPS Security Configuration
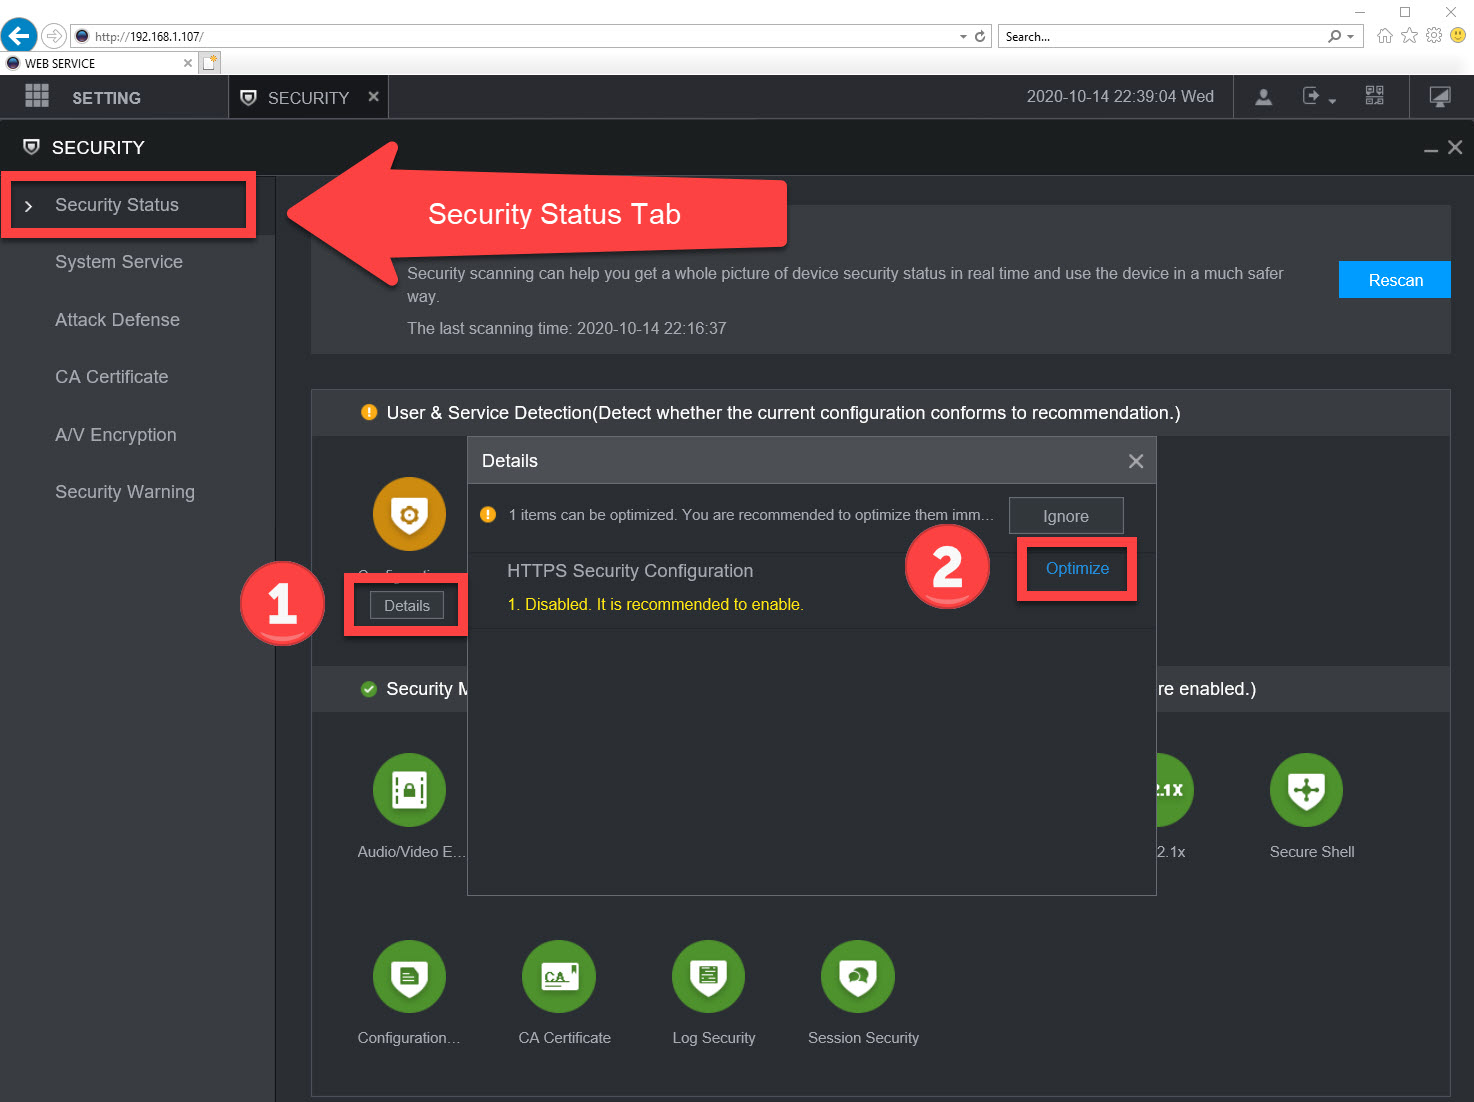
Go back to the DVR/NVR web interface. Inside of the Security settings for the recorder there is a Security Status screen. This screen will show a warning for User & Service Detection. The warning is for the Configuration of the HTTPS protocol. Make sure the Security Status tab is the selected tab.
Step 6a. Click the Details button for the “Configuration…” warning. This brings up a “Details” window.
Step 6b. There will be a “HTTPS Security Configuration” entry with an Optimize button at the right. Click the Optimize button. This will bring up the HTTPS settings for the recorder.
[+] to Enlarge
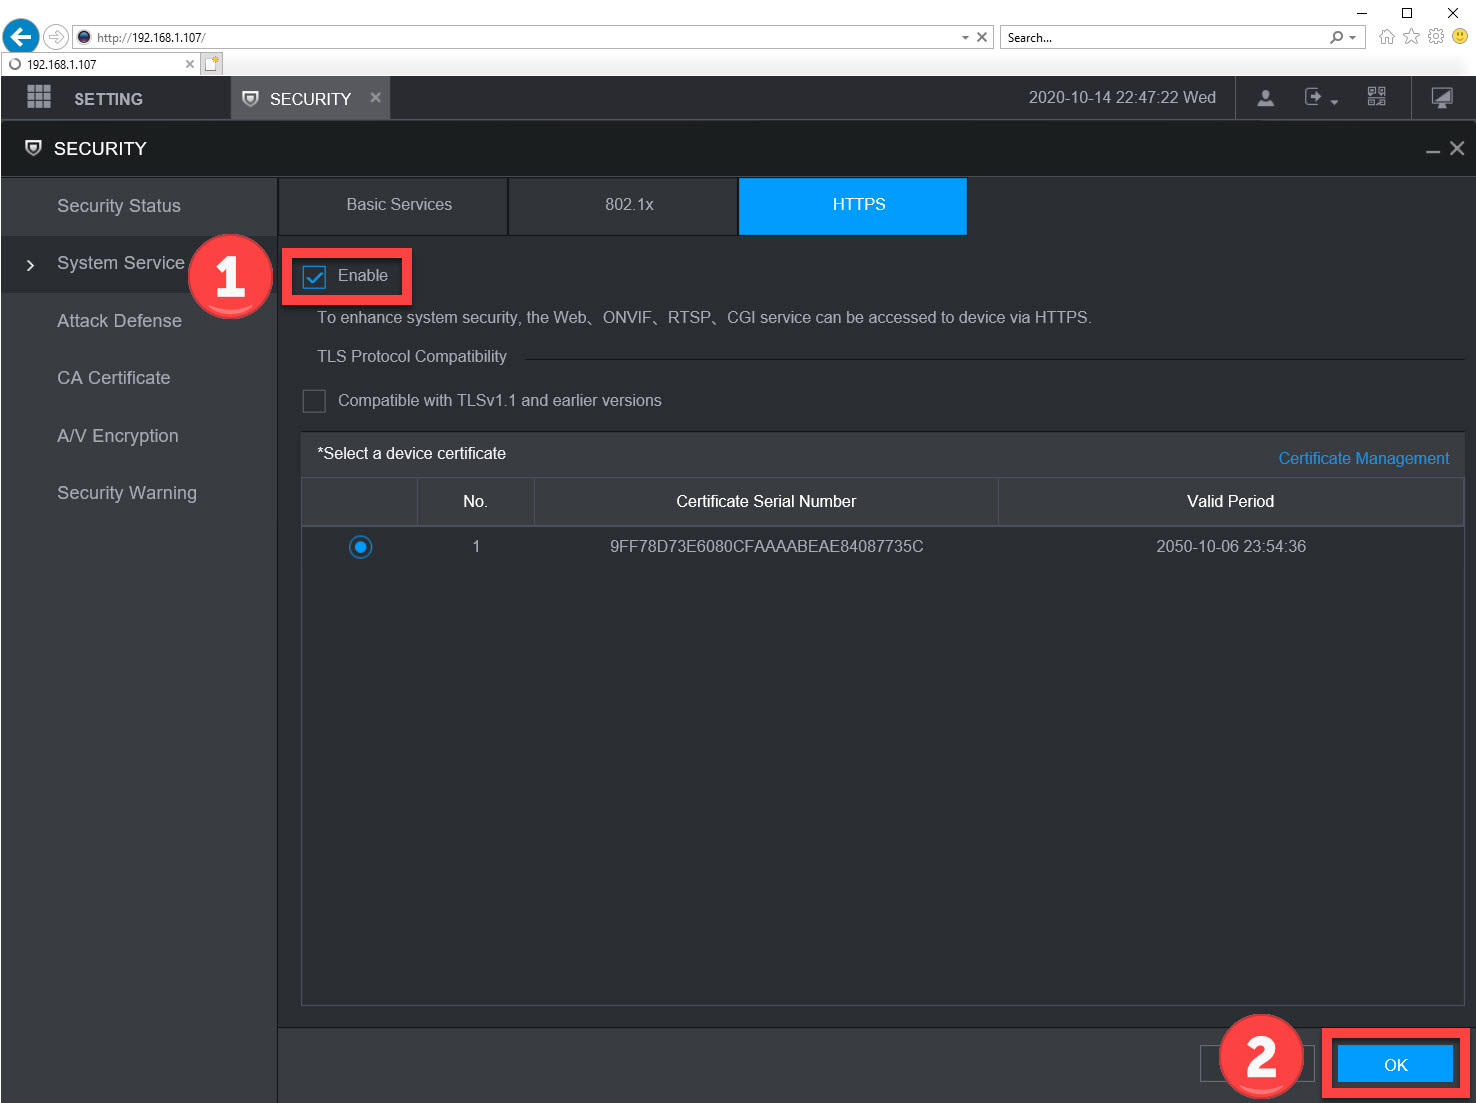
Inside of the HTTPS settings there is an enable button. Click the enable button and then the OK button.
[+] to Enlarge
HTTPS will now be enabled. To test it try accessing the NVR or DVR by typing the IP address into the address bar and pressing enter. Since HTTPS is enabled the web browser should try to automatically connect using the HTTPS protocol.
If you receive a “Certificate Error” or “Untrusted Site” warning then the certificates were installed incorrectly, run through the guide again ensuring you follow each step. For Chrome you may need to reinstall the certificate files into a different Certificate folder using the “Import Certificate Wizard” in step 5.
Learn more on our website at the links below:
How to setup HTTPS on a camera
How to secure your security camera system
Security Cameras
Security DVRs