

How to Set Up Email Alerts on PoE NVR Systems
We demonstrate in this guide how simple it is to set up email alerts on your PoE NVR system. We use Gmail as our preferred email account because it is free and quick to send emails.
This guide shows how to set up email alerts on PoE NVR systems. The steps are similar on many brands and models, and the screenshots come from our AvaEye platform so you can follow along exactly.
Using compatible AvaEye PoE IP security cameras and NVRs ensures accurate event analysis and recording. All AvaEye cameras include video-based motion detection, and most support Smart Motion Detection (Ultra Motion Detection, UMD).
We recommend the free AvaEye app for fast push notifications, and email alerts as a backup. Because email requires a compatible provider and an outbound network path for SMTP, this tutorial uses Gmail with an app password. You can follow the same flow on other PoE NVRs.
Setting up email alerts is not a straightforward process for many, as a compatible email account and unhindered ability to host an email server on your internet connection are required.

Table of Contents
- Before you get started
- Access the NVR Web Interface and Configure the Email Account Settings
- Set Up Event Detection and Enable Email Alert Triggers
- Video Tutorial
- Outlook-based Email Alerts

Before you get started
There’s a few things that you’ll need to have set up before you’re able to get email alerts working with your AvaEye NVR and PoE cameras.
-
To access the NVR's web interface, you must connect your computer to the same local computer network as the NVR.
While you can set up email alerts using the HDMI or VGA monitor interface, we found that setting them up on a computer is easier.
- Both the NVR and IP cameras are operational, and the connected cameras are streaming video for their respective channels.
- The NVR system time is accurate.
- A recording schedule is set to Event recording in the Snapshot Schedule settings under the Storage menu.
- If you intend to use Gmail, generate an app password for your account. For help with setting up an app password, visit our How to Set Up an App Password in Gmail guide.
Access the NVR Web Interface and Configure the Email Account Settings
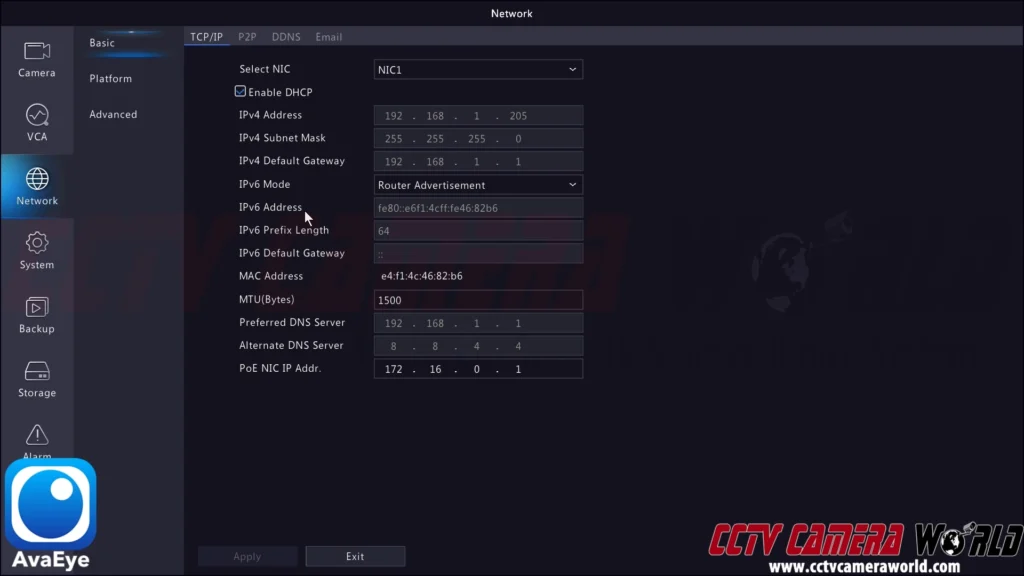
To access your NVR's web interface using your preferred browser, type the NVR's local IP address into the address bar and hit Enter on your keyboard. Log in to the admin user account using the credentials printed on a label at the top of the NVR.
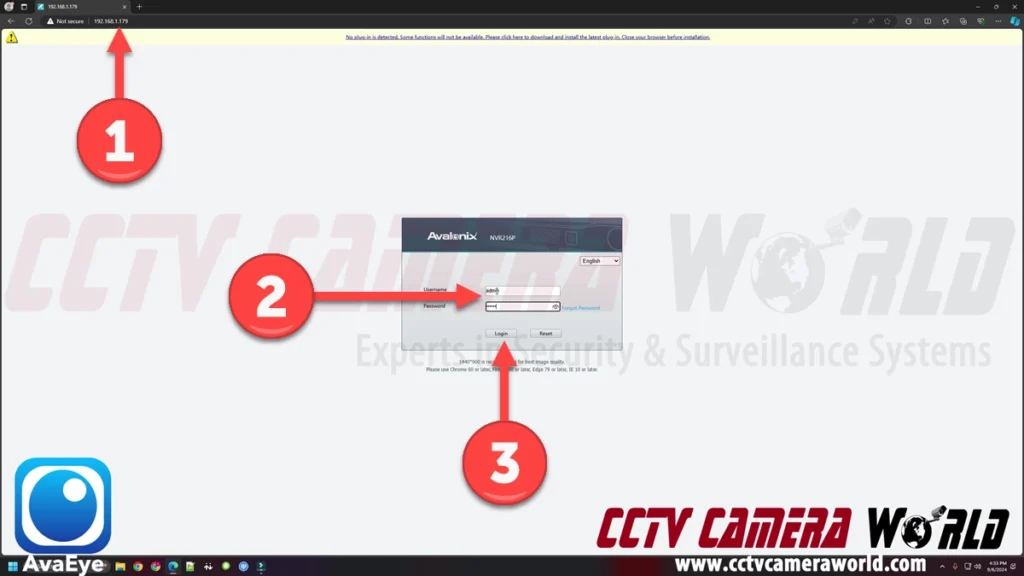
If you don’t know what the local IP address for your NVR is, navigate to the network settings page using the TV or computer monitor interface. You can find the IP address in the Network settings, Basic tab, and TCP/IP page after logging into the admin user and going to the main menu.
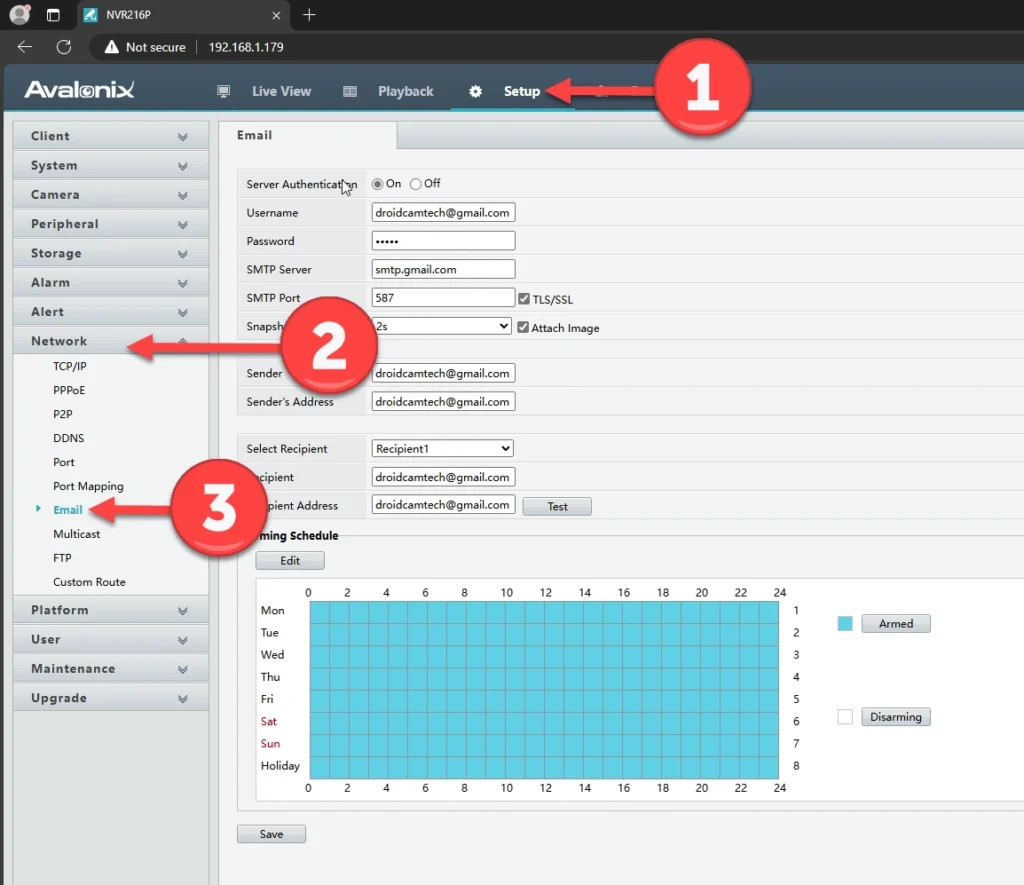
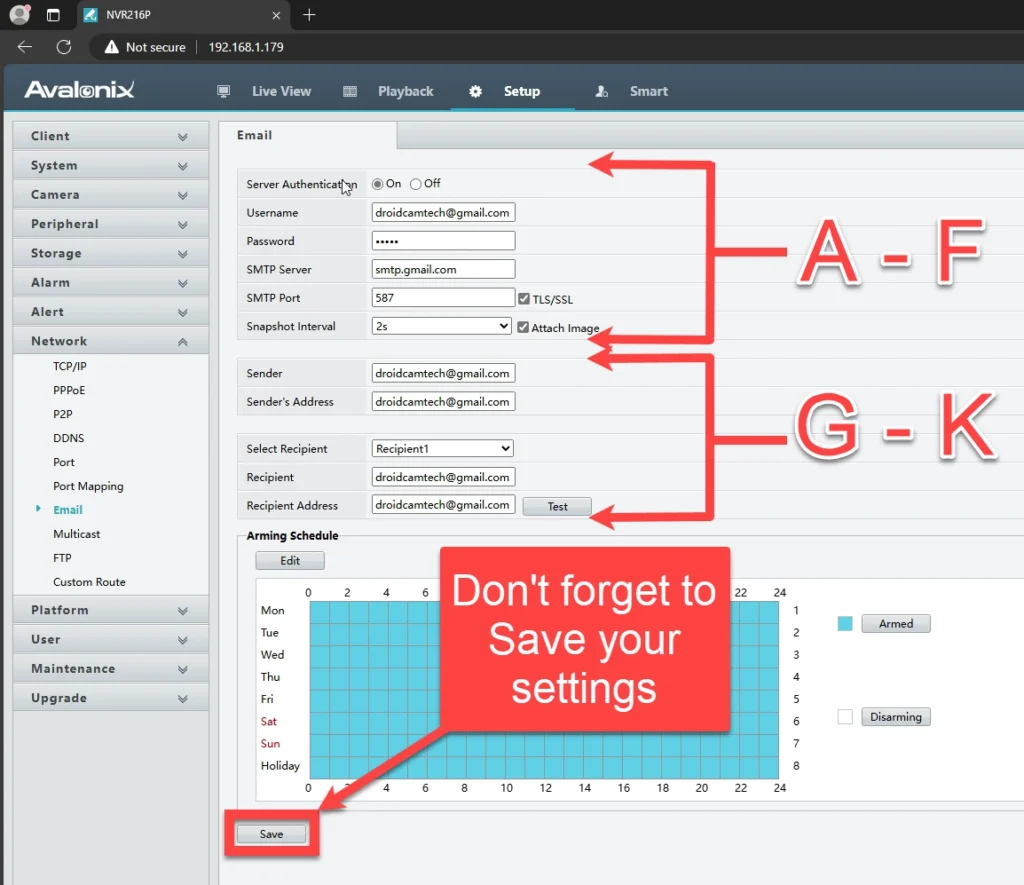
- Navigate to the Setup and Email Settings page.
- Enter your account authentication and email server settings on this page, or copy and paste them. Below are examples of what you need to enter, along with a description of each setting.
- Server Authentication: On — This setting activates authentication using the email account you provide.
- Username: example@gmail.com — This is the email address you'd like to use to send email alerts.
- Password: 123456 — This is the password for the email account you want to use to send email alerts. If you’re using a Gmail account, enter an App Password you created.
- SMTP Server: smtp.gmail.com — This is the SMTP server for the email provider your account is with. For their SMTP server information, check your email provider's knowledge base, support, or blog. Tick the TLS/SSL checkbox if your email provider requires TLS/SSL authentication, which most do.
- SMTP Server Port: 587 — This is the SMTP port for the email provider your account is with. For their SMTP port, check your email provider's knowledge base, support, or blog.
- Snapshot Interval: 2s — This is the amount of time you want to elapse between each snapshot email. The range is between 2 seconds and 5 seconds. We recommend setting a higher interval for cameras that you expect to see a lot of activity from.
- Sender: example@gmail.com — This is the alias or name you want the sent email to have. It does not necessarily need to be an email address.
- Sender’s Address: example@gmail.com — This is the email alias or name that is attached to the email. We recommend using the same email as the username above.
- Select Recipient: Recipient1 — You can add up to 3 recipient email addresses. We recommend that you use only one recipient email address to avoid being flagged as spam or getting an account restriction due to automated email abuse.
- Recipient: example@gmail.com — This is the alias or name you want the recipient to appear under in the sent email. It does not necessarily need to be an email address.
- Recipient’s Address: example@gmail.com — This is the email address for the recipient. You can either have the email sent right back to the sender account or to an alternate email address.
- To save your settings, click Save at the bottom of the email settings page.
- Before moving on to the next section, it is a beneficial idea to click the Test button next to the Recipient Address setting to ensure your email settings work. If you run into any errors, double check that you’ve correctly entered in the information, and if you’re using Gmail, use an app password, as your real password will not allow the NVR to use your Gmail account.
Set Up Event Detection and Enable Email Alert Triggers
As discussed in the before you get started section, double check that the AvaEye system has the correct date and time, and the snapshot recording schedule is set to Event based recording. In this section, we’ll explain how to enable motion detection and enable the email alert trigger for motion detection. It’s worth noting that you can use any type of Event Detection that the AvaEye cameras and NVR support.
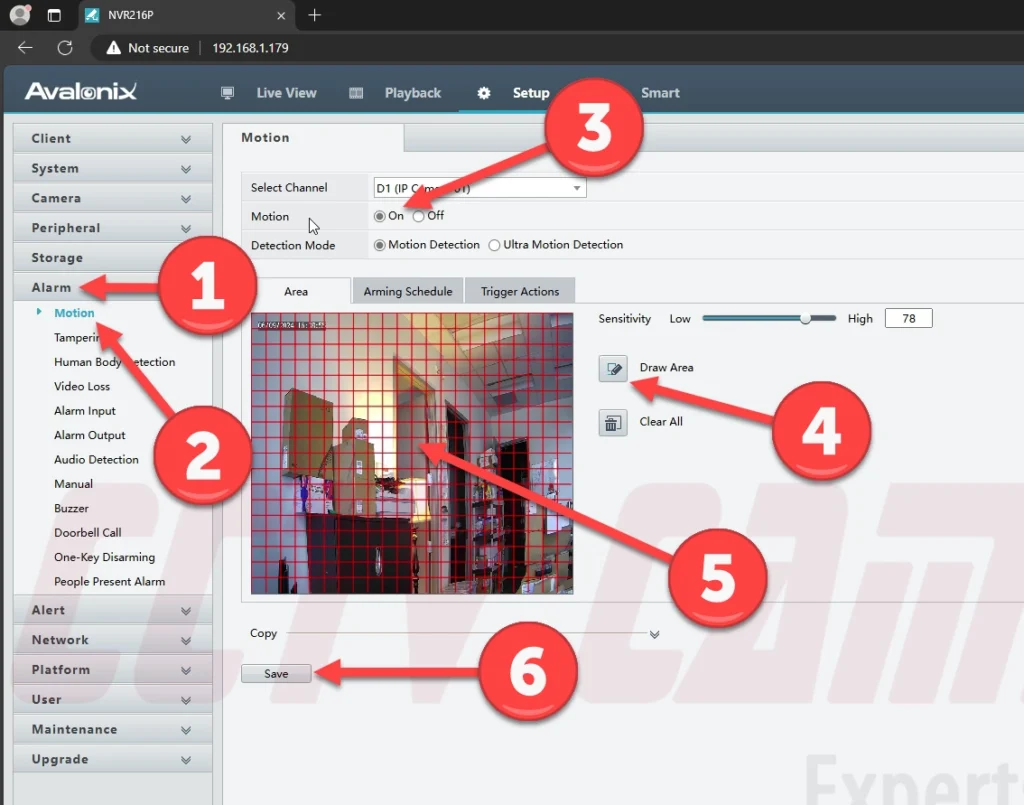
- Navigate to the Alarm and Motion menu option in the NVR's web interface Setup tab.
- To enable motion detection, click the On button at the top of the page. Click Save.
- You can use pixel-based motion detection, which is the default option, or click Ultra Motion Detection if your camera supports it. Ultra Motion Detection (UMD) does full-screen analysis and allows you to set a filter to determine if you want the camera to detect humans, vehicles, or both. Please check the features and specs of your cameras to confirm whether its UMD is capable of both human and vehicle detection. Click Save if you changed the mode.
- For pixel-based motion detection, you may need to draw the area you want to detect motion in if there is no red grid present. To draw a motion grid, click the Draw Area button, and then click and drag across the video preview to create your desired grid. To complete drawing the grid, click the Finish Drawing button. To save the grid, click Save.
- This step is optional. By default, the arming schedule for motion detection is 24/7. If you don’t want motion detection recording or an alert during certain periods of the week, use the Arming Schedule tab to create a custom schedule.
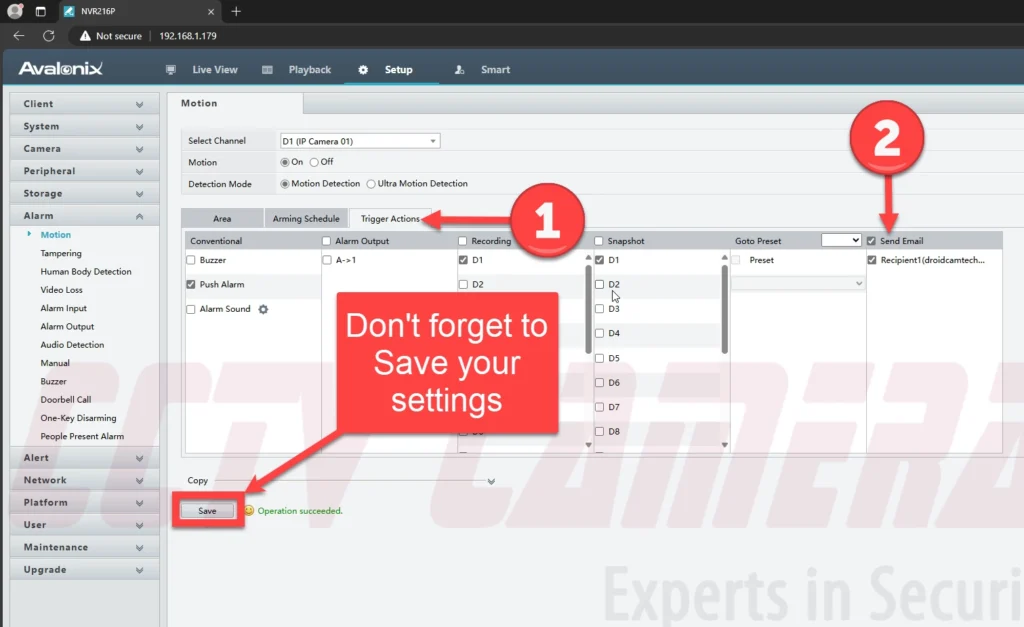
- After enabling motion detection, you'll want to set up the email alert by clicking the Trigger Actions tab, selecting the checkbox for the recipients (Recipient1, for example), and then clicking Save.
- Test your motion detection rule and check to see if you receive an email alert!
Video Tutorial

If you follow this guide, you should have successfully set up email alerts with a few snapshots in your inbox. If you’re having trouble, don’t hesitate to send an email support request. Also, check out the AvaEye app, which can receive push notifications using event detection to quickly pull your cameras up on your phone.
Outlook-based Email Alerts
Microsoft consumer mailboxes (Outlook.com, Hotmail, MSN) no longer support app passwords or basic SMTP sign-in from third-party devices like NVRs. If you use one of these addresses, email alerts will fail even with the correct settings. For reliable results, use Gmail with an app password, your ISP’s SMTP relay, or a dedicated SMTP service.