

Dummies Guide to Remote Viewing AvaEye Security Camera Systems

If you're not super familiar with technology but you want to be able to keep an eye on your AvaEye security camera system from your phone, this guide is for you! Once you've connected your cameras to your recorder and can see them on a monitor, just follow these easy steps to get free remote access to the system. You don't have to be a computer expert or know a lot about networking - this Dummies Guide is written in simple language that anyone can understand!
Overview
- Before You Get Started
- Step 1) Connect your Recorder to the Main Internet Router or Modem
- Step 2) Prepare Your AvaEye NVR For Remote Viewing
- Step 3) Download and Install the AvaEye App
- Step 4) Link your Recorder to your Smartphone
- Live Viewing Your AvaEye NVR and Cameras Using the App
- Playback Recorded Footage from Your AvaEye NVR
- Troubleshooting Remote Viewing Issues
Before You Get Started
Before proceeding with this guide, ensure the following:
- You are at the recorder's location.
- A monitor is connected to the AvaEye recorder using the VGA or HDMI port.
- The cameras are visible in the grid on the monitor.
- The recorder has a hard-wired broadband internet connection from a router or modem.
Note: wireless mesh or network extenders such as Orbi, Google WiFi, or EERO may interfere with the setup process. The recorder in your AvaEye security system must be connected directly with a hard wired cable to the main router or modem in your computer network.
The user is responsible for following this guide completely and thoroughly. Any attempts to skip the steps outlined below will only result in failure of the connection process. We advise customers to rewatch the videos and make sure they are not missing a step.
Make sure you are using a known good networking cable and that your network firewall or ISP is not blocking the recorder from connecting to the P2P server. If for some reason the recorder is unable to connect to the P2P services that means you have misconfigured network settings or your network environment is blocking the recorder. You would then need paid networking services as per our terms and conditions. Networking services are affordable and can be purchased here
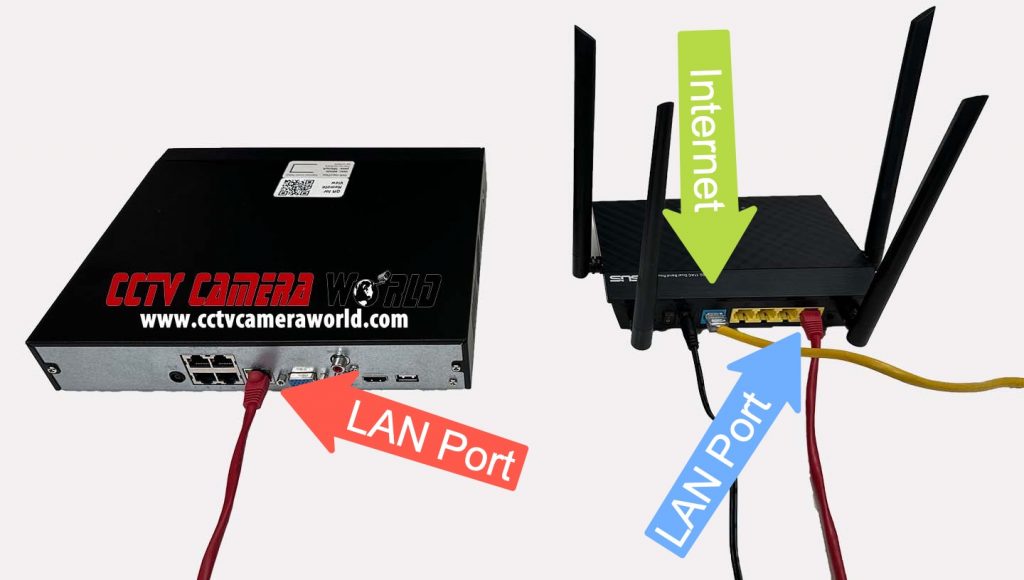
Step 1) Connect your Recorder to the Main Internet Router or Modem
Your internet service provider (ISP) usually provides a modem with a built-in router. Look for a set of four ports that are all the same color (usually yellow). Then, take an Ethernet cable and plug one end into the back of your AvaEye camera recorder and the other end into one of those ports on the router. This connection provides internet access for your recorder, allowing you to view your cameras at home or on the go.
This is an important step to make sure a good hardwired internet connection is provided to the system. If you have a corporate firewall or other network devices in between the internet connection and the recorder, you may need to whitelist the recorder so it has internet access.
Step 2) Prepare Your AvaEye NVR For Remote Viewing
While we already enable DHCP, which helps the recorder obtain an IP address automatically from your router, it's essential to know how to activate it in case the setting is accidentally changed. DHCP (Dynamic Host Configuration Protocol) automatically assigns local IP addresses to devices connected to a router, so knowledge of how to set IP addresses is not required.
Before shipping the NVR, we also enable the P2P setting, which is required for this Dummies method to work. We show how to enable both of these settings in the video tutorial below.

Step 3) Download and Install the AvaEye App
With a “Network Connected" status for the P2P field, your security camera recorder is ready to connect to a smartphone or PC. Access the Smartphone App links below by tapping or clicking the images. To connect the recorder to your PC or Mac, follow our AvaEye Camera Monitoring Software guide.
 |
 |

Step 4) Link your Recorder to your Smartphone
Once the app is installed on your phone or computer, add the system to the app by scanning the QR code located on the recorder or on the P2P page where you checked the status shown in Step 2.

Live Viewing Your AvaEye NVR and Cameras Using the App
When people remotely view their security system, they often want to understand what's occurring in and around their home or business in real time. With the smartphone app, you can see the live feed from your camera system whenever and wherever your phone has a data connection. Some noteworthy features include:
- Landscape or Portrait mode viewing options
- Simultaneous display of 4, 6, 9, 12, or 16 channels in Live View mode
- Expanding a single camera to full screen
- Operating and managing a PTZ camera or Motorized Zoom Camera
- Activating and listening to audio security cameras
- Recording pictures or videos to your phone for later review or to share with others
- Adjusting image settings
Watch our instructional video to see demonstrations of these features and learn how to use them.
Playback Recorded Footage from Your AvaEye NVR
When you use your AvaEye PoE security system over the app, you may also want to look at recorded footage of an event or look through the saved timeline to see what happened around your property or business. The app's playback feature offers comparable controls and options to live viewing. But it's important to mention that you can only use the PTZ camera movement and motorized zoom functions when you're watching a live camera. You can't control a camera when you're watching recorded video. To gain a deeper understanding of how to play back recorded video from your AvaEye NVR, watch our tutorial video below.
Troubleshooting Remote Viewing Issues
Problem 1: P2P setting remains "Offline" and never says “Network connected.”
Solution: Make sure that you’ve followed the video in Step 2) and that the following are true:
- DHCP is enabled. If the recorder doesn't immediately receive a new IP address, restart it using the software reboot button, flipping the power switch off and on, or by unplugging and reconnecting the NVR to power.
- Proper DNS settings are in place. If the recorder doesn't automatically obtain DNS settings when set to DHCP, manually set the “Preferred DNS Server” to 8.8.8.8 and the “Alternate DNS Server” to 8.8.4.4 in the Network settings.
- Avoid using Orbi, Google WiFi, Eero, or other mesh network devices with poor wired network support. Connect the recorder directly to the router or modem provided by your ISP.
Problem 2: Remote Viewing doesn't work while away from the WiFi and you have an antivirus app on your phone
Solution: First, make sure P2P services are enabled in the NVR or DVR settings as shown in Step 2). The antivirus software may also be preventing your phone from utilizing the remote viewing service. To fix this, add the app to the list of exceptions in your antivirus settings. This will let it talk to other apps over the internet without any problems. Without internet connectivity, the app will consistently be unable to access your system remotely.