
How to Set Up Email Alerts on AvaEye PoE IP Cameras
Several features of AvaEye IP security cameras enable you to monitor your home, apartment, or business more efficiently by detecting events in front of the cameras. Among these features are motion detection, ultra motion detection, line crossing, and intrusion detection. Some higher-end models have more options. Not only can the cameras sense events using these methods, they can also alert you using the AvaEye mobile app with push notifications or send emails with snapshots. If you have a complete camera system with a network video recorder, check out our guide for setting up email alerts from an AvaEye NVR. This guide will demonstrate the quick and straightforward process of setting up email alerts for your standalone AvaEye camera.

Table of Contents
- Before starting…
- Start by Powering and Connecting the Camera to your Network
- Access the Web Interface and Configure Time Settings
- Check the SD Card Settings and Format if Needed
- Optional: Check and Set the Resolution
- Enable and Schedule Snapshots
- Enter and Test Email Settings
- Setting Up Event Detection and the Email Alert Trigger
- Video Tutorial

Before starting…
Here’s a small checklist you can use before getting email alerts set up for your PoE camera.
- To access the web interface, make sure you connect your IP camera to the same router or modem as your computer.
- Confirm the camera has an SD card installed. If you purchased an SD card for your camera, we installed and formatted it before shipping. If you install your own, take special care to not damage the SD card slot or expose the camera to moisture. An SD card is required to send email snapshots.
- If you want to use your Gmail account, create an app password. For assistance in creating an app password, see our How to Set Up an App Password in Gmail tutorial.
Start by Powering and Connecting the Camera to your Network
You must connect the camera to power it up and connect it to your local computer network. We recommend benchtesting the camera before mounting it to ensure that you are able to access its web interface and configure any settings you need. You can power the camera with a 12V DC adapter, PoE injector, or PoE switch. If you’re using a PoE injector or switch, you’ll need two Ethernet cables. When using a 12V DC adapter, you can use a single Ethernet cable. In our example, we use a PoE injector that is available for purchase alongside our cameras.
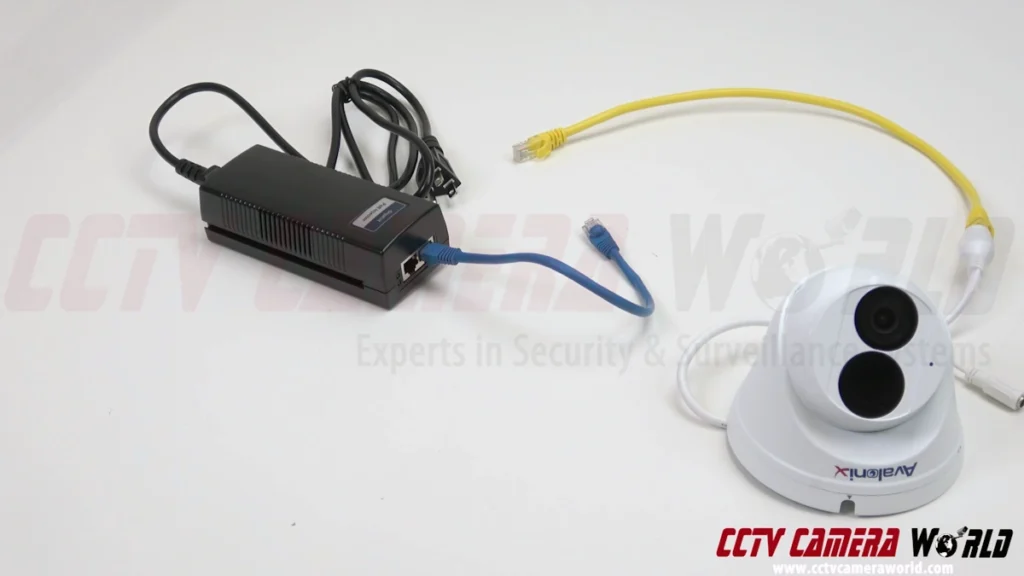
- Use the 3-prong power cable to connect the PoE injector to a 120V power outlet.
- The PoE injector will have designated, labeled ports. One should be Data, sometimes labeled ,D, and the other should be Power+Data, sometimes labeled P+D.
- Connect an Ethernet cable from your router or modem to the data injector port.
- Connect another Ethernet cable from the camera to the power and data injector port.
- Wait 3 to 5 minutes for the camera to power on and connect to the network. You can confirm the camera has powered on by turning off the lights or covering it with a box, then watch for IR lights after 5-10 seconds. You may also hear a click when the IRs turn on and off.
Access the Web Interface and Configure Time Settings
The next step involves connecting to the camera from your computer and making sure that the time settings are accurate. Without the correct time, your camera might not connect to the internet to send emails, and your snapshots will be inadmissible in court.
- Open your preferred web browser. You can use Chrome, Edge, Safari, or Firefox.
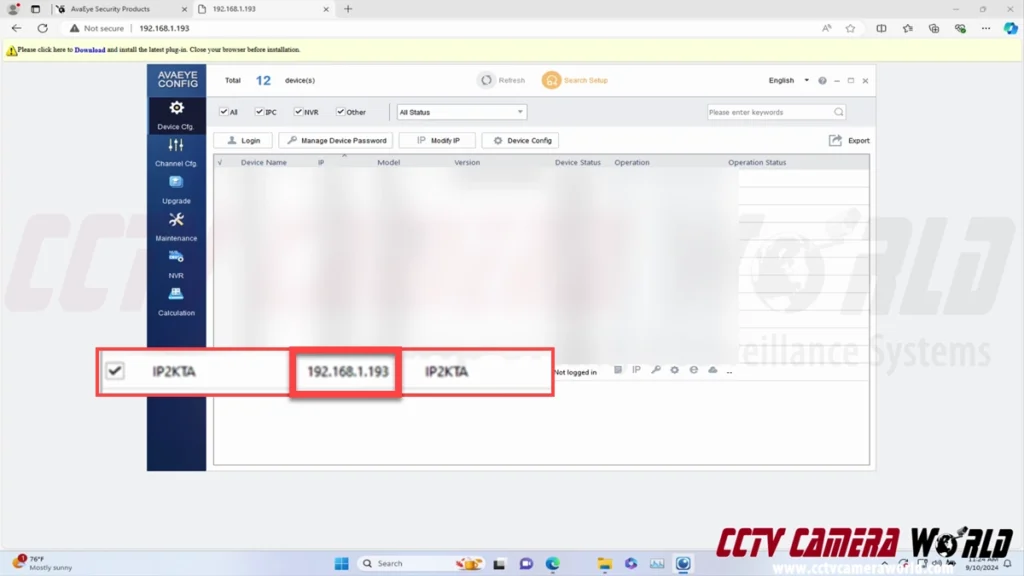
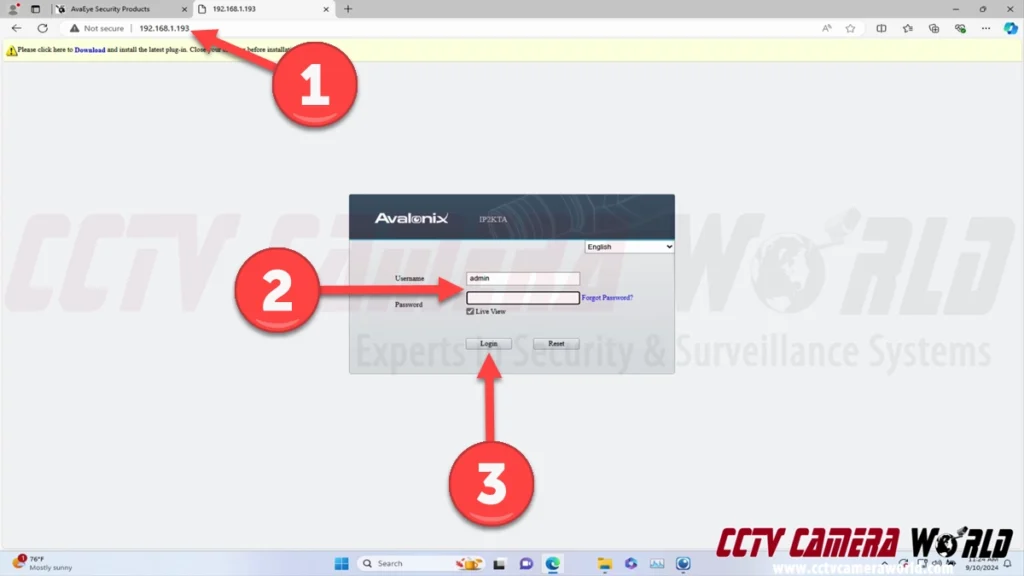
- Type the current IP address for the camera into your web browser address bar and hit Enter.
If you’re unsure what the IP address for your camera is, check the label on the camera’s box. If your camera was not preconfigured or the label is missing, consider using the AvaEye Config Tool software to search your network for the camera. The software also has a convenient web button to automatically open a web browser for accessing the camera.
- To log into the camera, use the admin user account and password. A label at the top of the box contains this information, as well as the IP address. If there is no label, please email our support team with your order number for assistance.
- After logging in, you should see video from the camera in the web player. If you don’t, try installing the plugin that’s linked at the top of the page within an alert.
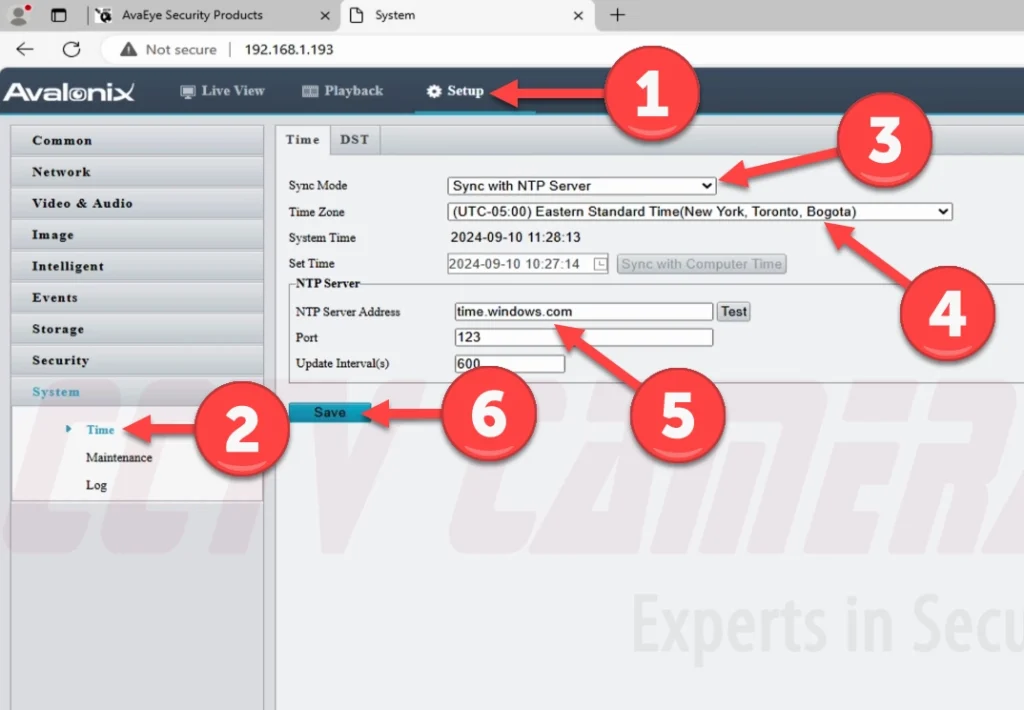
- To manually set the time or set up automatic time updates, navigate to the Time settings within the Setup page and System menu option.
- To set up automatic time updates, change the Sync Mode to the “Sync with NTP Server” option.
- Set your Time Zone.
- Under the NTP server section, enter in the following configuration and click Save.
- NTP Server Address: time.windows.com
- Port: 123
- Update Interval(s): 600s — This means the camera will sync its time every 10 minutes. You can adjust this setting if needed.
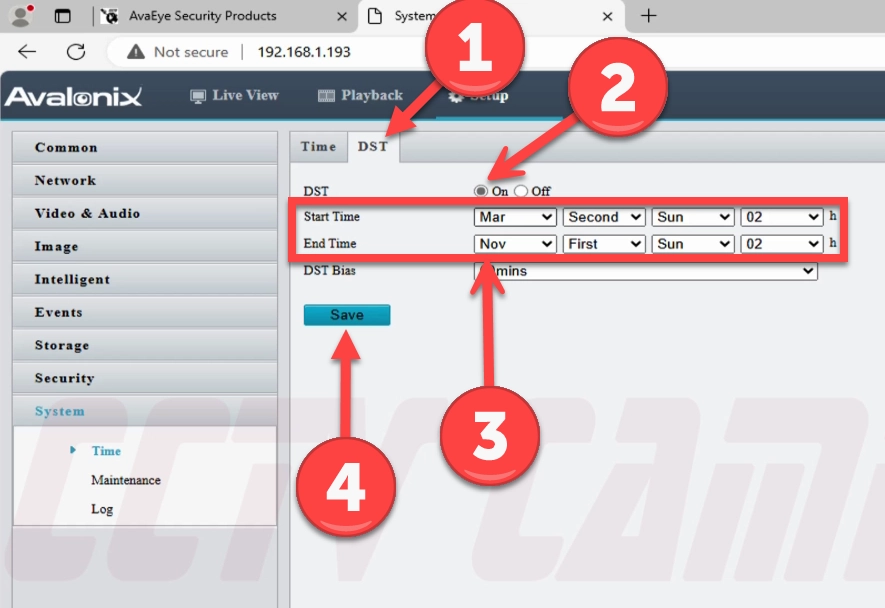
- Click the DST tab at the top, then click the On option. As shown below, set the Start and End Times, as well as the DST Bias. Click Save after setting the DST settings.
- Start Time: Mar. Second Sun 02
- End Time: Nov. First Sun 02
- DST Bias: 60mins
- Check the Time settings page or the video stream to confirm the time is accurate. If the time is not accurate, double check that your camera is able to access the internet and that you’ve entered the configuration correctly. You can manually set the time by switching the Sync Mode to Sync with System Configuration, but it may drift over time and require manual maintenance.
Check the SD Card Settings and Format if Needed
After the time is set correctly, it’s time to make sure that the SD card is formatted and has a normal status.
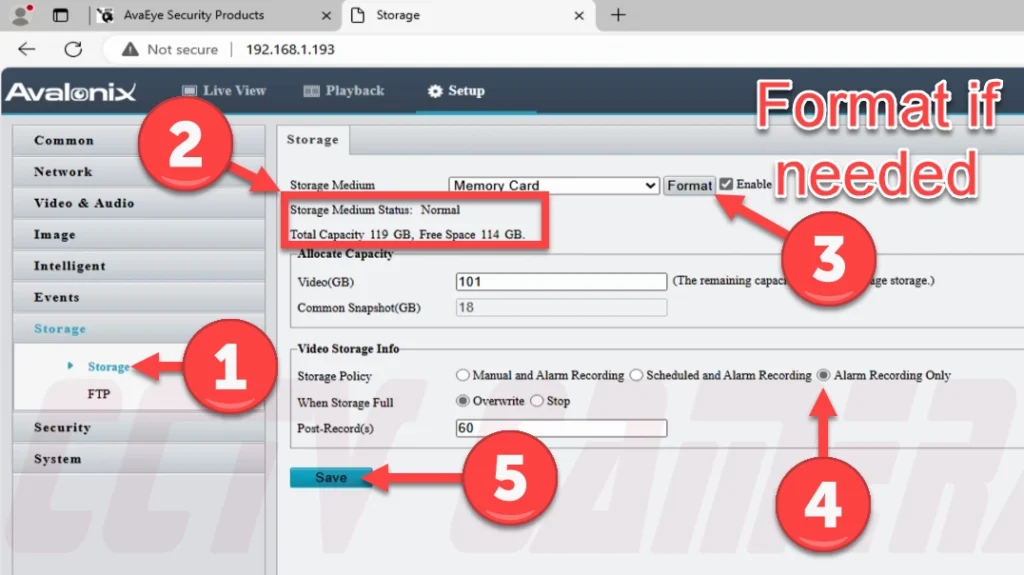
- Navigate to the Storage settings by clicking the Storage menu option and Storage submenu option.
- Check the Storage Medium Status to confirm it says Normal.
- Check the Total Capacity and Free Space. If you have a 128GB SD card installed, it should be around 119GB total. A 256GB SD card should show around 238GB total.
- If the Status is not normal or the Free Space is a small amount of GBs you should format the SD card. To format the card, click the Format button and then Save. Your camera may reboot.
- You can also adjust the video storage information. If you make any changes, save your settings.
- Storage Policy: We recommend setting Alarm Recording Only for snapshot alerts and to save space on the SD card.
We recommend using the Manual and Alarm Recording setting if you want your camera to record 24/7 video in addition to snapshots.
The Scheduled and Alarm Recording setting means that the camera will only record video following the set schedule. It will still record snapshots of events when they occur.
- When Storage Full: Overwrite: The camera will continue to record when the SD card is full, overwriting the oldest video and snapshots.
Stop means the camera will no longer record when the SD card is full and will require a manual format to start recording again.
- Post-Record(s): This setting controls the duration of video recording after detecting an event. If you only want snapshots saved to the camera, this setting is not relevant.
- Storage Policy: We recommend setting Alarm Recording Only for snapshot alerts and to save space on the SD card.
Optional: Check and Set the Resolution
Most cameras already have their maximum resolution set, so this step is not required. However, if you want to capture lower-resolution snapshots or videos to save on storage space, you can reduce the resolution by following the steps below.
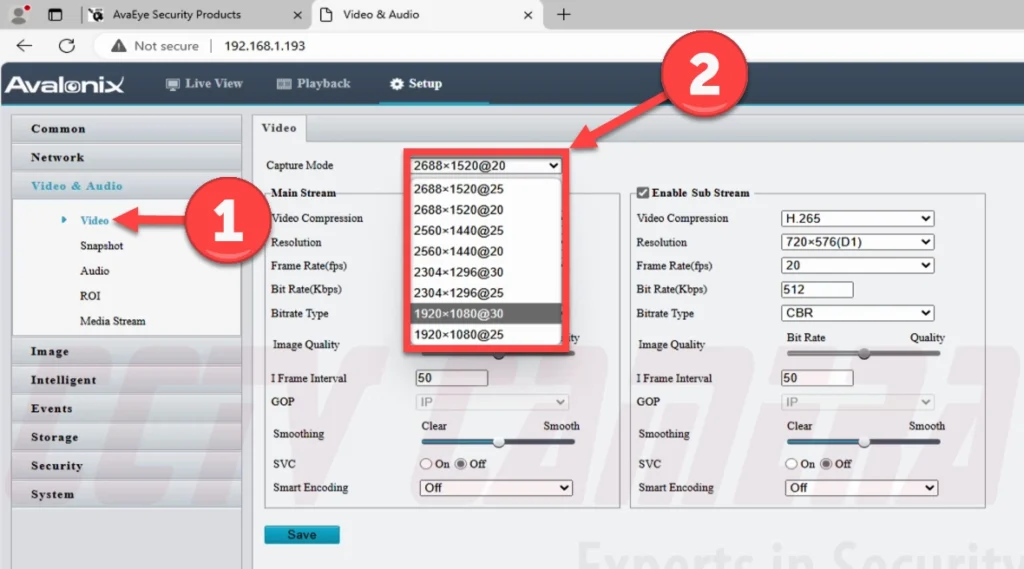
- To access the video encoding settings, click the Video & Audio menu option, and then click the Video submenu.
- The Capture Mode dropdown menu at the top provides simple presets that you can use to lower or increase the resolution as needed.
- We only recommend changing the encoding settings at the bottom if you have prior experience optimizing them.
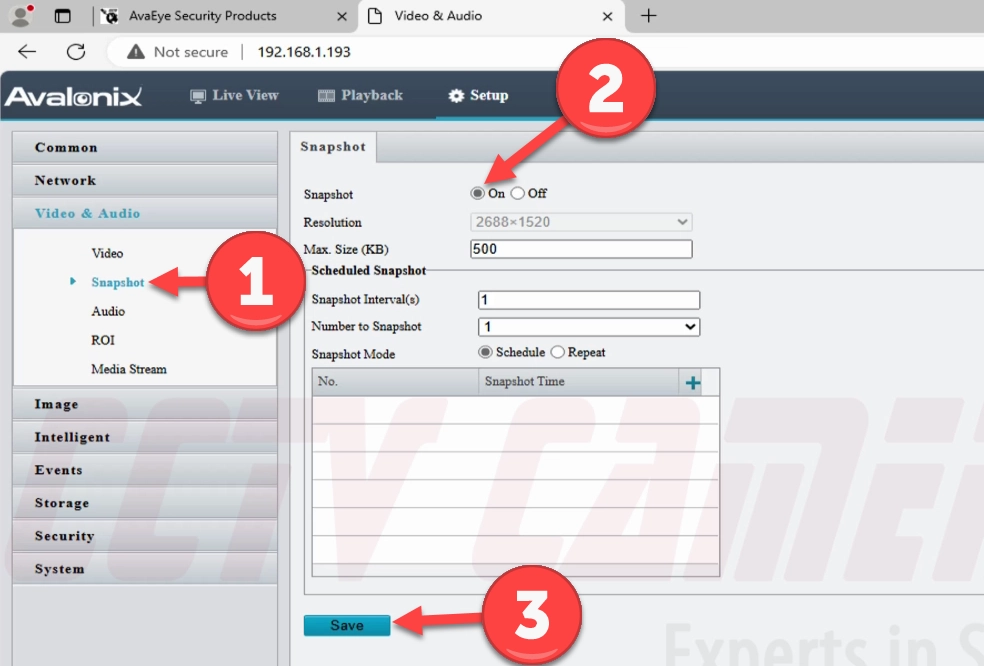
Enable and Schedule Snapshots
It's now time to schedule them, enable the snapshot feature, and record them to the SD card for email delivery.
- To access the snapshot settings, click the Snapshot submenu option under the Video & Audio menu.
- Click the On option at the top.
- You can set a Max. Size, but we recommend leaving it on the default setting. In our example, the default setting is 500 KB; yours may be 300 KB.
- At the bottom of the Snapshot page, you can set Scheduled Snapshots. You can select the Schedule option to program the camera to take snapshots at predetermined intervals you set. The Repeat option will save snapshots continually throughout the day based on the interval and schedule you set.
However, we recommend leaving the default settings as they’re not necessary for email alerts and only required if you want to save snapshots to the SD card for later review.
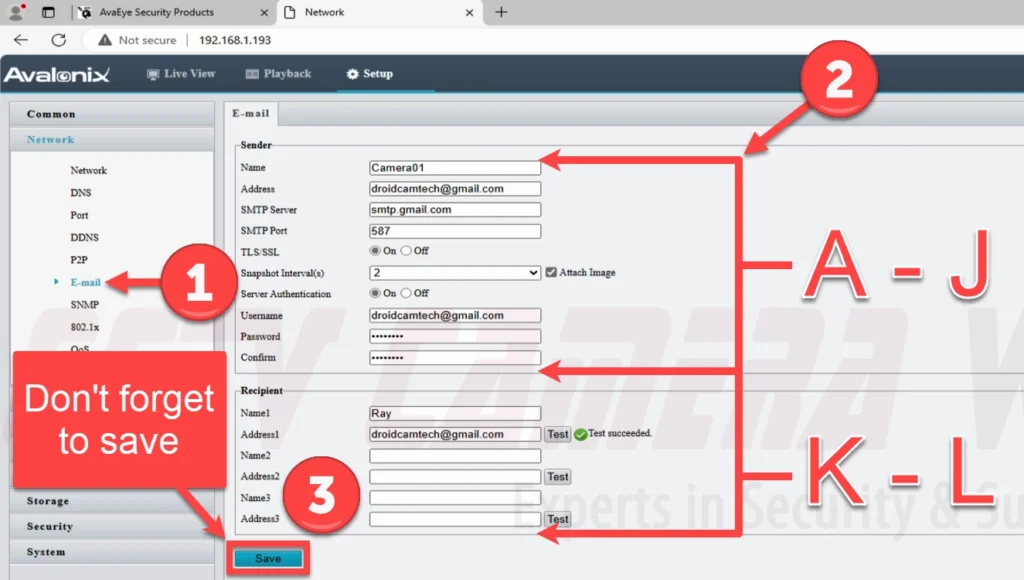
Enter and Test Email Settings
The second-to-last step entails entering your email information into the camera and testing to see if the settings work.
- To access the email settings page, click the E-mail submenu option under the Network menu.
- Enter your account authentication and email server settings on this page, or copy and paste them. Below are examples of what you need to enter, along with a description of each setting.
- Name: Camera01 — The name you would like associated with the email account that sends the alert.
- Address: example@gmail.com — This is the email address you'd like to use to send email alerts.
- SMTP Server: smtp.gmail.com — This is the SMTP server for the email provider your account is with. For their SMTP server information, check your email provider's knowledge base, support, or blog. Tick the TLS/SSL checkbox if your email provider requires TLS/SSL authentication, which most do.
- SMTP Server Port: 587 — This is the SMTP port for the email provider your account is with. For their SMTP port, check your email provider's knowledge base, support, or blog.
- TLS/SSL: 2s — This is the amount of time you want to elapse between each snapshot email. The range is between 2 seconds and 5 seconds. We recommend setting a higher interval for cameras that you expect to see a lot of activity from.
- Snapshot Interval: 2s — This is the amount of time you want to elapse between each snapshot email. The range is between 2 seconds and 5 seconds. We recommend setting a higher interval for cameras that you expect to see a lot of activity from.
- Server Authentication: example@gmail.com — This is the alias or name you want the sent email to have. It does not necessarily need to be an email address.
- Username: example@gmail.com — This is the email alias or name that is attached to the email. We recommend using the same email as the username above.
- Password: Recipient1 — You can add up to 3 recipient email addresses. We recommend that you use only one recipient email address to avoid being flagged as spam or getting an account restriction due to automated email abuse.
- Confirm: example@gmail.com — This is the alias or name you want the recipient to appear under in the sent email. It does not necessarily need to be an email address.
- Recipient Name1: example@gmail.com — This is the email address for the recipient. You can either have the email sent right back to the sender account or to an alternate email address.
- Recipient Address1: example@gmail.com — This is the email address for the recipient. You can either have the email sent right back to the sender account or to an alternate email address.
- To save your settings, click Save at the bottom of the email settings page.
- Before moving on to the next section, it’s excellent advice to click the Test button next to the Recipient Address1 setting textbox to ensure your email settings work. Check the inbox of the email you sent the test email to, and you should see one arrive within a few minutes.
If you run into any errors, double-check that you've correctly entered in the login and email server settings. If you're using Gmail, use an app password; your actual email password will not allow the NVR to access your Gmail account.
Setting Up Event Detection and the Email Alert Trigger
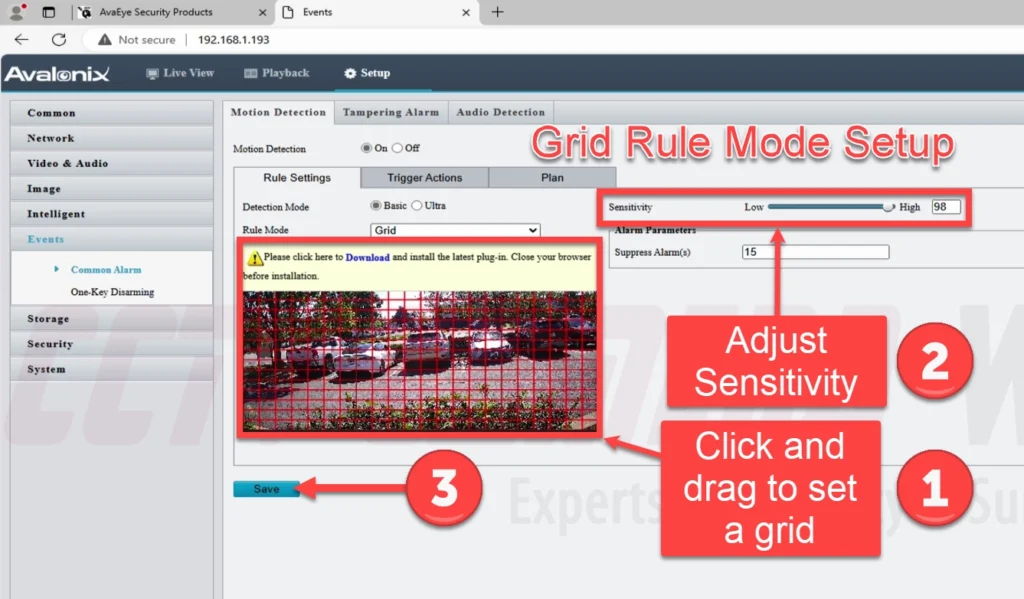
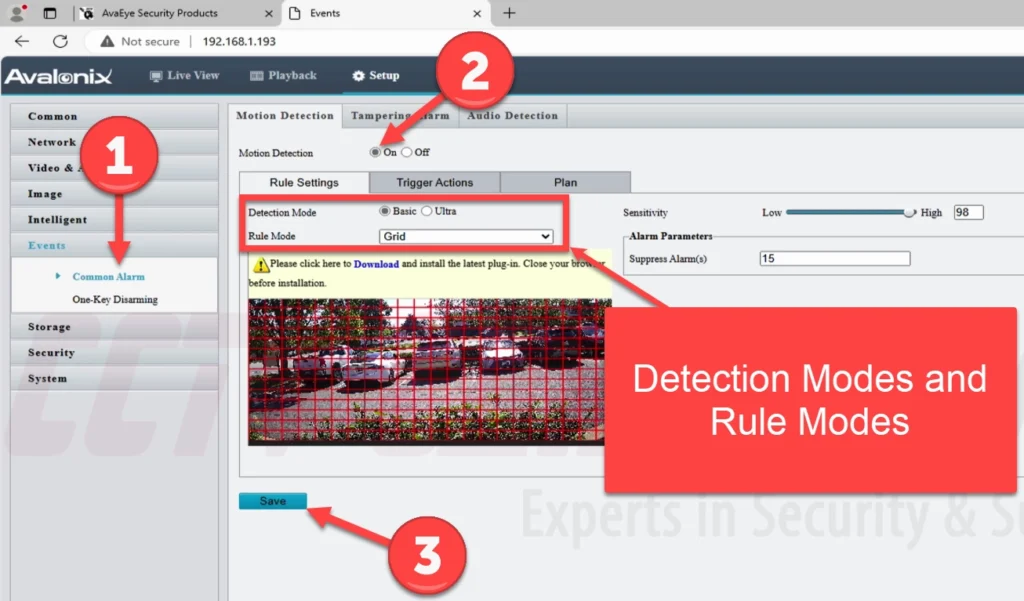
- To access motion detection settings, click on the Events menu and then Common Alarm submenu options in the Setup tab of the web interface.
- Click the On toggle to turn Motion Detection (MD) on.
- The camera model and features it supports determine the MD options that will be available. There are two different features that may have options: Detection Mode and Rule Mode.
- The Detection Mode options are Basic or Ultra. Basic means that the camera will simply rely on pixel changes in the image to sense if motion is occurring. The Ultra setting, also known as Smart Motion Detection (SMD), will utilize an AI-driven algorithm to actively monitor video for objects based on the enabled filters.
- The Rule Mode for Basic MD provides a choice between grid and area-based motion.
The Grid option is simpler and only requires you to set up the grid and overall sensitivity for the area you want to detect motion from.
The Area option allows you to set up a few areas within the camera view and adjust the sensitivity and object size you expect within each area. The area option also contains a neat graph to determine how much motion is required to trigger recordings and alerts based on the sensitivity and object size you set.
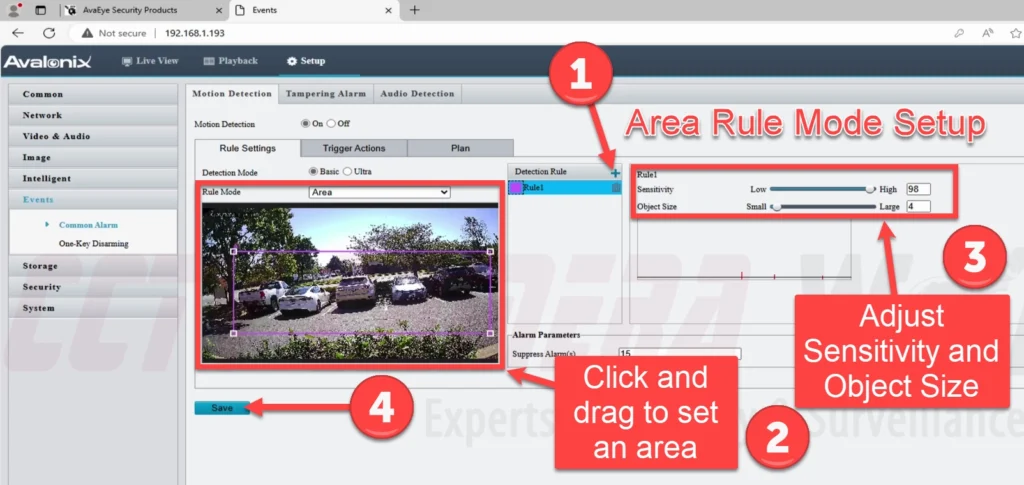
- Choose the options that best fit your scenario and create a grid or areas for MD based on what you expect the camera to capture. Click Save after adjusting these settings to ensure that MD is enabled and so the grid or areas you created are saved to the camera.
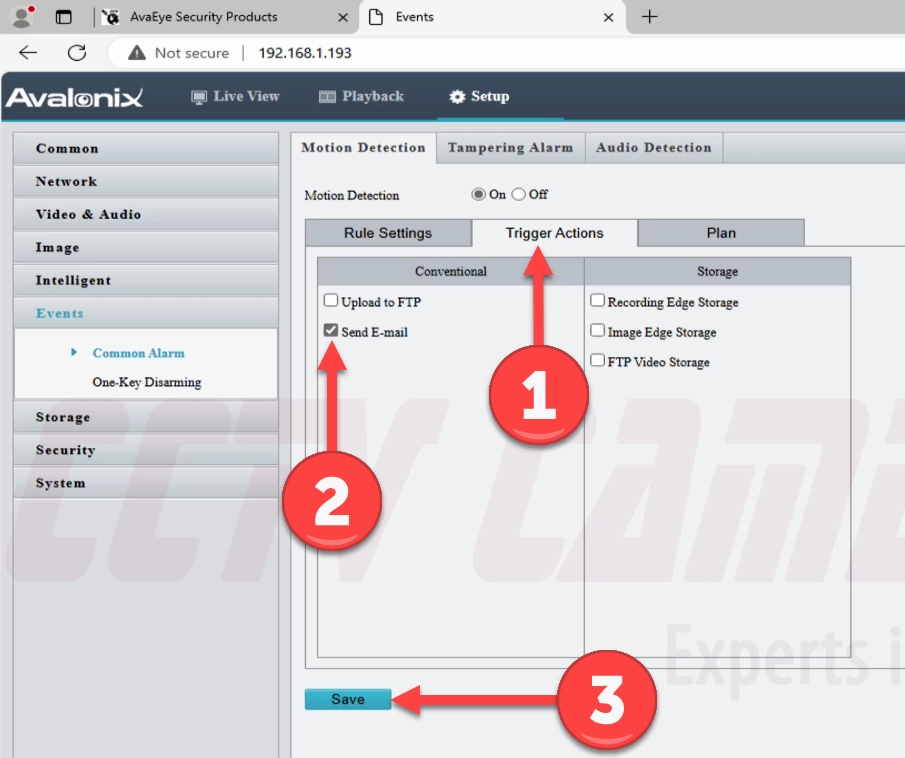
- Click the Trigger Actions tab, and then click the Send E-mail checkbox and make sure it’s ticked. Click Save.
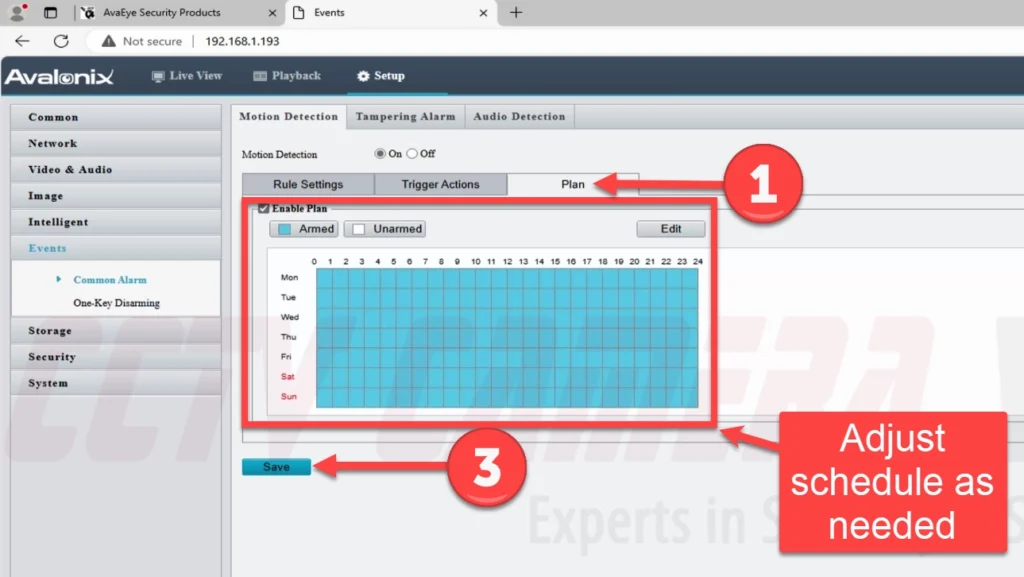
- Click the Plan tab to make sure that a Plan is enabled and this is where you can schedule MD and alerts if you don’t want them during certain periods of time during a day or week. Click Save after setting a plan.
Video Tutorial
The video below show the above instructional steps in action and how they all come together in practice to set up email alerts with snapshot on the AvaEye IP cameras. We suggest watching the video below to gain a better understanding, and you can always pause and rewind the video.

If you’ve followed this guide to a T, then you should have email alerts coming from the camera to your email regularly. Be sure to test an alert to make sure your settings are correct. If you run into any issues, feel free to reach out with a valid order number using our email support form. Have pictures of the settings you’ve put into the camera ready for our team to review. Last but not least, check out our free AvaEye remote viewing app for a way to receive push notifications right to your phone.