How to Connect a Network PTZ Controller to a DVR or NVR
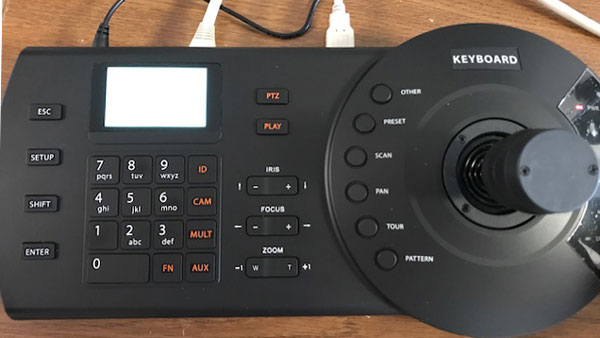
CCTV Camera World has simplified the configuration and setup for controlling HDCVI and IP PTZ cameras. Using a network PTZ joystick controller, you can control PTZ cameras by simply connecting the controller to a security video recorder with a single network cable. This provides hands-on control over your PTZ camera with a setup that takes only minutes to complete.
If you have our BNC PTZ cameras or IP PTZ cameras, they can be easily controlled using our Network Based PTZ Controller. After connecting the cameras to our security video recorder, follow this guide to setup the joystick controller to talk to our video recorder and command the PTZ.
We break down the setup and configuration in the easy to follow steps below. We start by connecting the 12V DC power supply to the PTZ controller and connecting a network cable from the network port of the PTZ controller to the network port of a DVR or NVR.
Press the "SETUP" button on the PTZ controller to begin configuration.
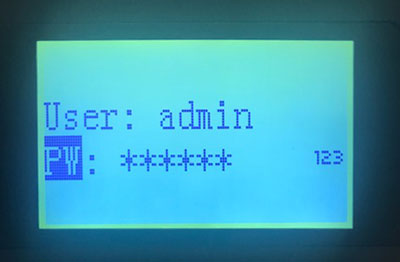
Type in the User and Password of the PTZ controller, and press the Enter button on the controller. The default user is "admin" and default password is "888888."
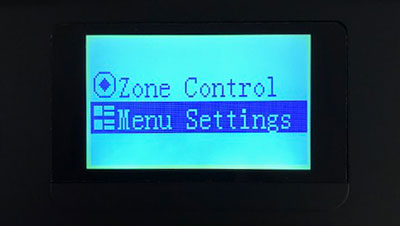
Using the joystick, scroll down and select "Menu Settings". You can use the joystick on the PTZ controller to navigate down. Hit the Enter button once "Menu Settings" is selected.
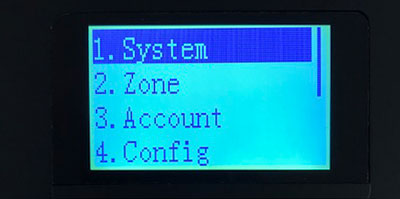
Press enter to select "System"
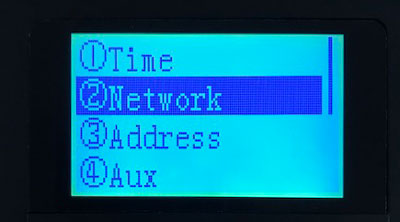
Navigate down to "Network" and press Enter.
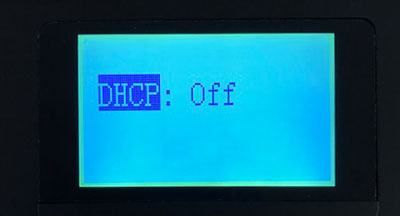
By default, DHCP will be on. You need to turn it off by toggling the joystick to the right or left until the screen reads "DHCP: Off" like in the image below. Press Enter to save this setting.
Since the DHCP is now off, you have to assign the controller to an IP address manually. The IP address needs to match your network scheme. In this case, the controller was given an IP address of "192.168.1.109," shown in the image below. Please remain on this page and follow the next step.
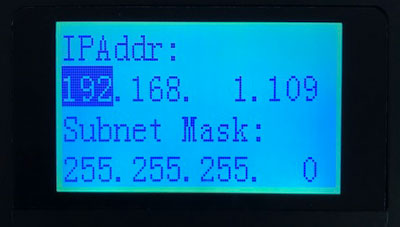
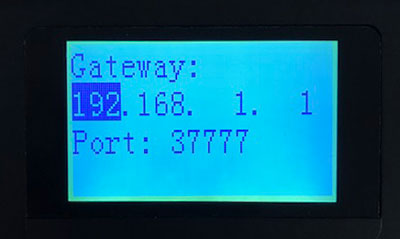
Toggle the joystick down to make sure the Gateway matches the IP address of your router. In this case, the Gateway/router has an IP address of 192.168.1.1. Press Enter to save these settings.
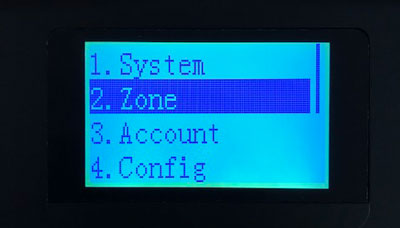
Press the "ESC" button on the PTZ controller to navigate to the screen pictured below. Toggle down to "2. Zone" and press Enter.
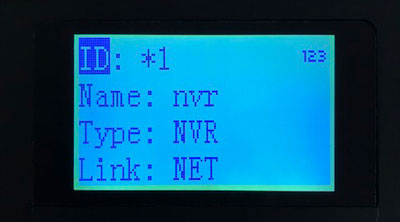
The "ID" is a random number designation for the device you want the PTZ controller to communicate with. The device in this case is an NVR. The NVR was assigned to an ID of "1", which is covered by the asterisk (*). Please note, the ID in the image below is "1", not "*1". The PTZ controller, by default, reveals the hidden ID number to the right of the asterisk.
Stay on this screen to proceed to the next step.
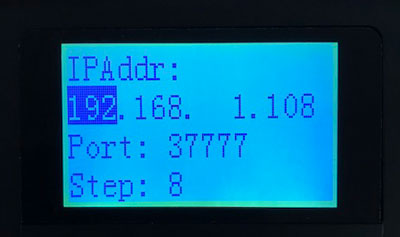
Scroll down to type in the IP address of the device you want the PTZ controller to communicate with. In this case the NVR is the device we want to control, and it has an IP address of 192.168.1.108. Port should be "37777". Stay on this screen to proceed to the next step.
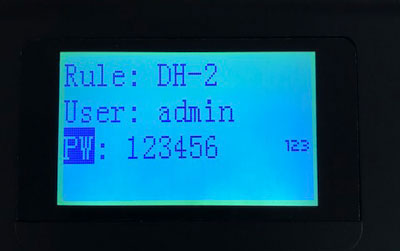
Toggle down to type in additional credentials shown in the image below. "Rule" will have a default setting of "DH-2", which you need to keep in place. Next, type in the User and Password of the NVR. Press Enter to save these settings. You have now created a zone, which is a device represented by an ID number.
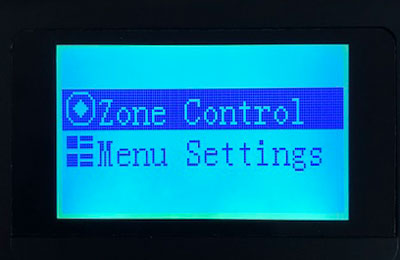
Press the "ESC" button on the controller to navigate back to the screen pictured below. Select "Zone Control" and press Enter.
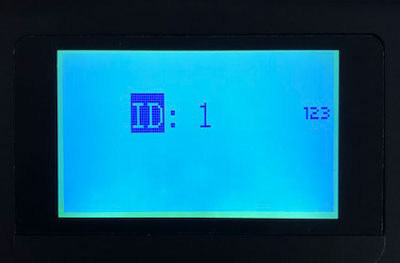
A new screen will appear asking for the ID of the device you want to control. This is the numbering convention of the NVR that was configured above. The NVR was assigned to an ID of 1, so in order to control that device you have to type "1" and press Enter.
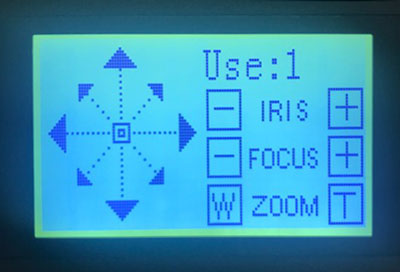
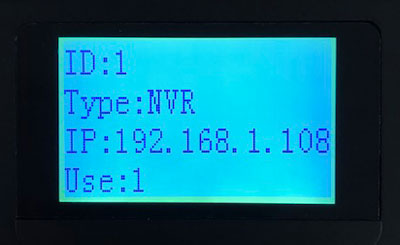
 Based on the ID, the controller will recognize that the device is an NVR with an IP address of 192.168.1.108. Underneath the IP is the setting for "Use". In our example we have a PTZ camera attached to our NVR on channel 1. In order to control that camera, you need to press 1 so that the screen display "Use:1" as shown in the image below.
If you have multiple PTZ cameras on a NVR, simply type in the number of the channel to control the respective PTZ camera. For example, if you want to control a PTZ camera on channel 4 of your NVR, the display should read "Use: 4".
Stay on this screen to proceed to the next step.
After entering the channel number of your PTZ camera, press the "PTZ" button on the PTZ controller.
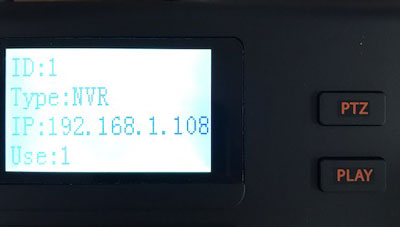
Once you see the screen pictured below, you will now be able to use your PTZ controller to talk to the NVR and control PTZ cameras connected to the NVR. You can move the PTZ camera with the Joystick and control the zoom with the dial on the top of the joystick.