
Backing up footage from your security camera system to the cloud adds an extra layer of protection and peace of mind. Many camera systems sold by big-box retailers and our online competitors come with monthly fees or require long-term commitments. With Security Cameras Inc™ (SCI) cameras and recorders from CCTV Camera World, you can back up footage from one of our security camera systems to Dropbox for free! There are no hidden fees or subscriptions to worry about. If you prefer Google Drive, we also offer a guide on how to back up your security cameras to Google Drive.
Security Cameras Inc™ systems, whether they are analog DVR systems or PoE camera systems, have a backup to the cloud feature that allows for motion activated video to be backed up to the cloud in real-time. All you need is an SCI system and a high-speed internet connection. Based on whether you have video-based motion detection, smart motion detection, or AI event rules, these systems can upload video from a few select camera channels or all of the cameras, depending on your internet upload speed.
Cloud video uploads are limited to the substream of the camera. For SCI cameras, that is 720P (1280x720 pixels).
Table of Contents
- Required Equipment
- Cloud Backup your DVR or NVR System Footage for Free Using Dropbox
- How to Backup your Security Camera System to the Cloud for Free to Dropbox - Video

Required Equipment
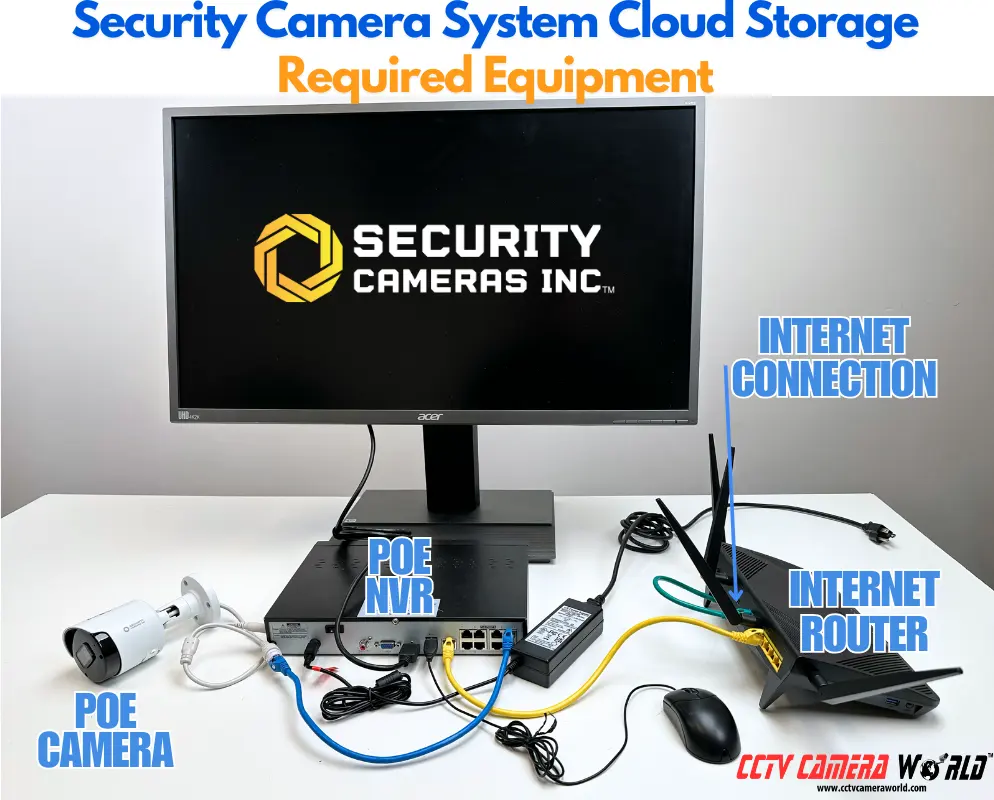
As pictured above, you need just a few items in addition to a Dropbox Account:
- Security camera system by SCI
- Security camera cable to connect cameras and recorder
- Network cable to connect the recorder to your router
- Internet Router to connect the NVR and provide it an internet connection
- High Speed Internet Connection to the router
When considering cloud backups for your surveillance camera system, you need to factor in your internet upload speed. On average you will need 1 Mbps of upload speed per camera you are backing up to the cloud. For larger properties or installations with multiple cameras, this can add up quickly.
For example, a 32-camera security system would require around 32 Mbps of upload speed to support cloud backups for all cameras at the same time. But not every camera needs to be backed up to Dropbox. Our SCI systems allow you to select specific cameras or channels for cloud backup. Whether you want to upload footage from just one camera, a few, or all of them, you have full flexibility to customize your setup.
If you are looking for a complete solution, we offer scalable system options like our 32 camera security systems, which includes everything you need and is ready for cloud backup. If you need even more channels, we have 32 channel NVR and 64 channel NVR by SCI that are fully compatible with Dropbox cloud uploads, so you have the flexibility to add more cameras while managing your bandwidth.
Cloud Backup your DVR or NVR System Footage for Free Using Dropbox
Setting up cloud backup with a DVR or NVR from Security Cameras Inc™ only takes a few simple steps. This section shows how to link your SCI recorder to Dropbox and back up your footage for free.
For the following steps, you'll need to use a PC to visit Dropbox.com and the web interface of your SCI recorder. You'll need to be present on the same local network as the camera system so you can enter its IP address in a web browser and configure your settings.
Step 1: Create a Dropbox Account
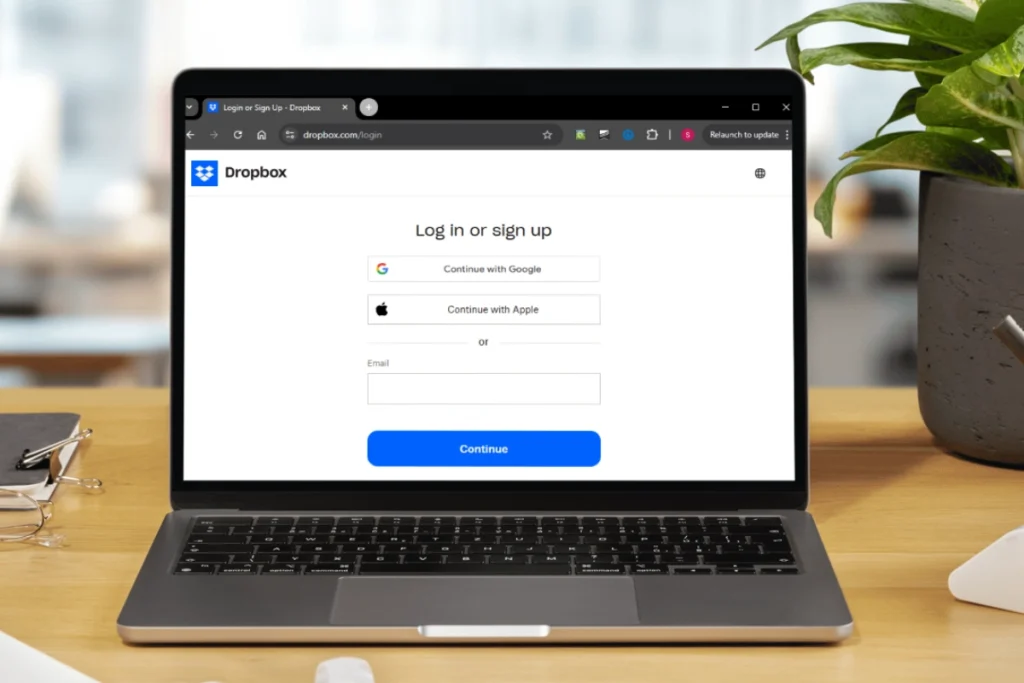
Before you’re able to link your recorder to Dropbox, you will need an active account. Dropbox offers free account creation for a Basic plan with 2GB of storage.
- Creating a Dropbox account is easy. You have a couple of options for creating an account: registering an email address or pairing it with your Gmail or Apple account. We’ve included the link to their register page below for your convenience:
https://www.dropbox.com/register
For help with creating a Dropbox account, visit the How to create and set up a Dropbox account guide.
- You are provided with 2 GB of storage for free after creating your account, which is enough for a day or two of event-based recordings, depending on how much motion your cameras see. If you live in an area with very little motion, 2 GB could last a week or two.
If you want to store more than a few days of event-based recordings, consider upgrading to one of the paid plans for Dropbox. For more information on their paid plans, visit their Dropbox Plans page.
Step 2: Configure Your SCI Camera System
To enable cloud uploads, first connect your Security Cameras Inc™ recorder to your router or modem. Then, you will need to follow the guide below to enable motion detection and cloud video uploads and link the system to your Dropbox account.
Login and Enable Motion Detection Cloud Upload
To back up video to the cloud, you will need to enable one of the event detection methods. This guide shows how to enable backups using traditional video-based motion detection to keep things simple, but there is the option of using Smart Motion Detection (SMD) for uploading only when humans or vehicles are detected. There are also various other AI-enabled detection methods that can upload to the cloud when triggered.
By default, traditional pixel-based motion detection is already enabled on SCI systems, and to start configuring backups, you simply need to toggle the Cloud Video option in the Alarm and Motion menu. Cloud Picture is also enabled by default, so if you forget to toggle Cloud Video, you will still at least get snapshots of motion events.
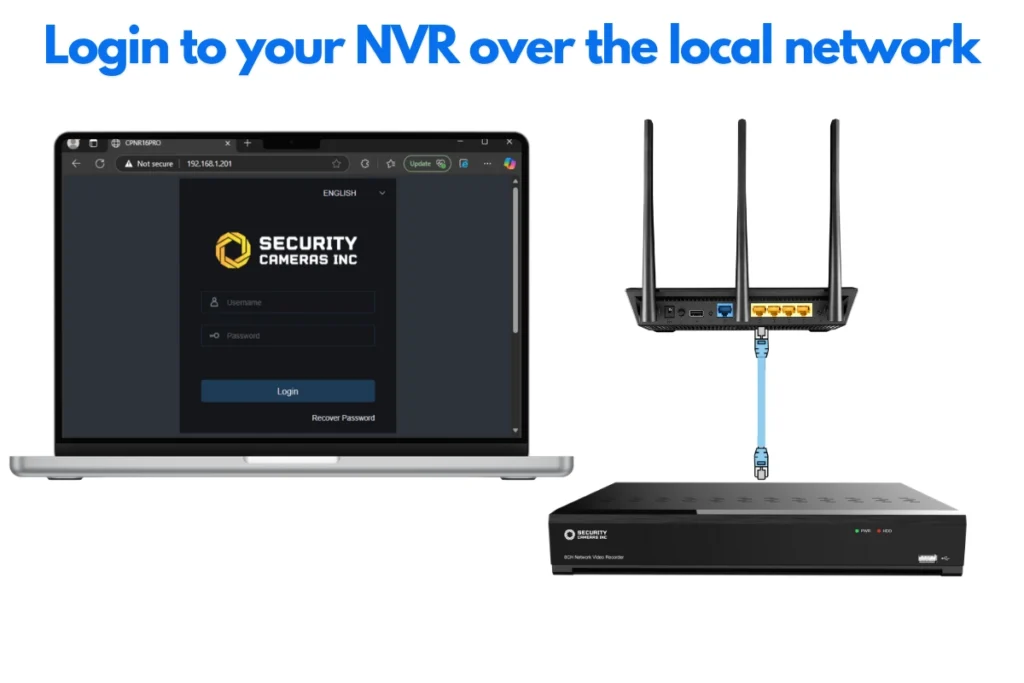
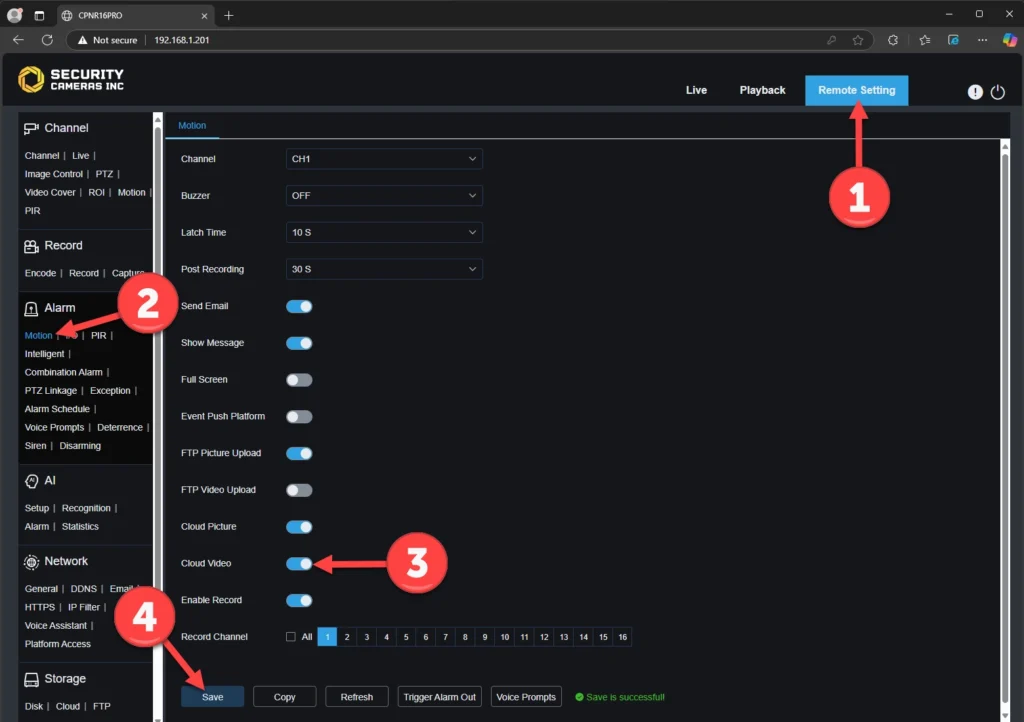
- Access your SCI NVR or DVR by entering its local IP address in a web browser from a computer.
You can find its current local IP address by accessing the network settings with a mouse and monitor, using the SCI ConfigTool software, or searching your router’s “Connected Devices” page.
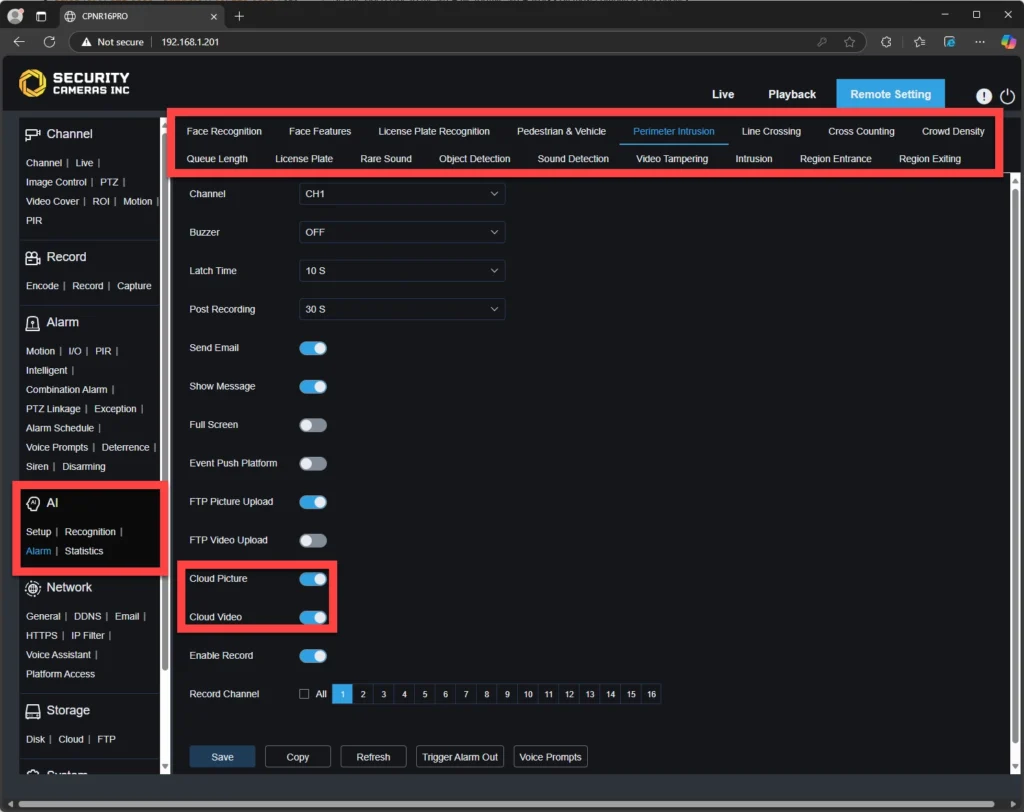
- Click the Remote Setting tab at the top right.
- In the menu on the left side, under the Alarm section, click Motion.
- Click the grey toggle, which will turn it blue, to enable Cloud Video for each camera channel you want to back up to Dropbox.
- (Optional) Leave Cloud Picture enabled if you also want to upload image snapshots.
- Click Save.
Configuring the Cloud Storage Settings
Before pairing the recorder with your Dropbox, there are a few important settings to modify:
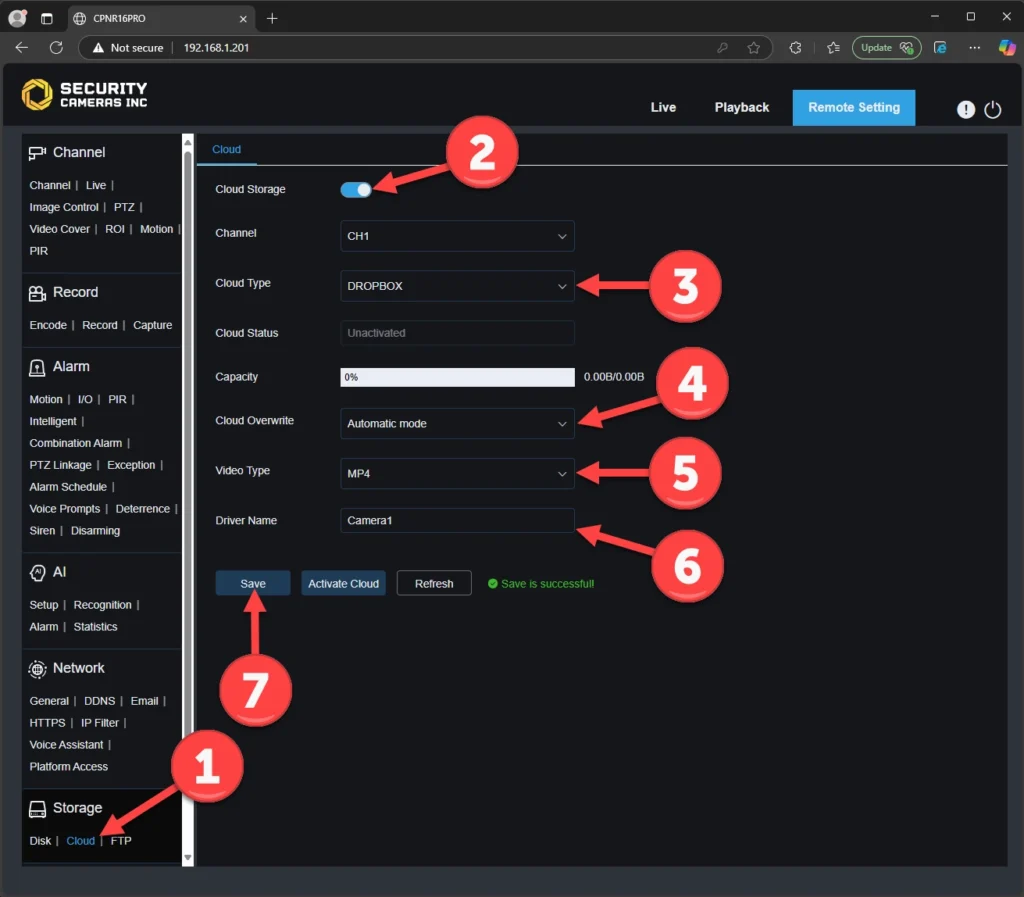
- Within the Storage section of the menu, click Cloud.
- Click the cloud storage toggle to turn it on. It will turn blue.
- The cloud type should be Dropbox by default. If it is not, switch it from Google Drive to Dropbox.
- Choose one of the Cloud Overwrite settings:
- Automatic (default): will overwrite the oldest files when storage is full.
- Off: requires manual deletion and will stop uploads until managed.
- 1, 3, 7, 14, 30, or 90 Days: These options store files for a given number of days and delete them after the time expires.
- Set the video type to the MP4 file format. MP4 works on most computers and phones.
- In the Drive Name field, you can customize the folder name that will be used in your Dropbox account (for example, Camera1).
- Click Save.
Pairing your NVR or DVR with Dropbox for Cloud Backups
Now it’s time to link your Dropbox account with the recorder. To do this, make sure you’re still in the recorder’s web interface and cloud storage settings.
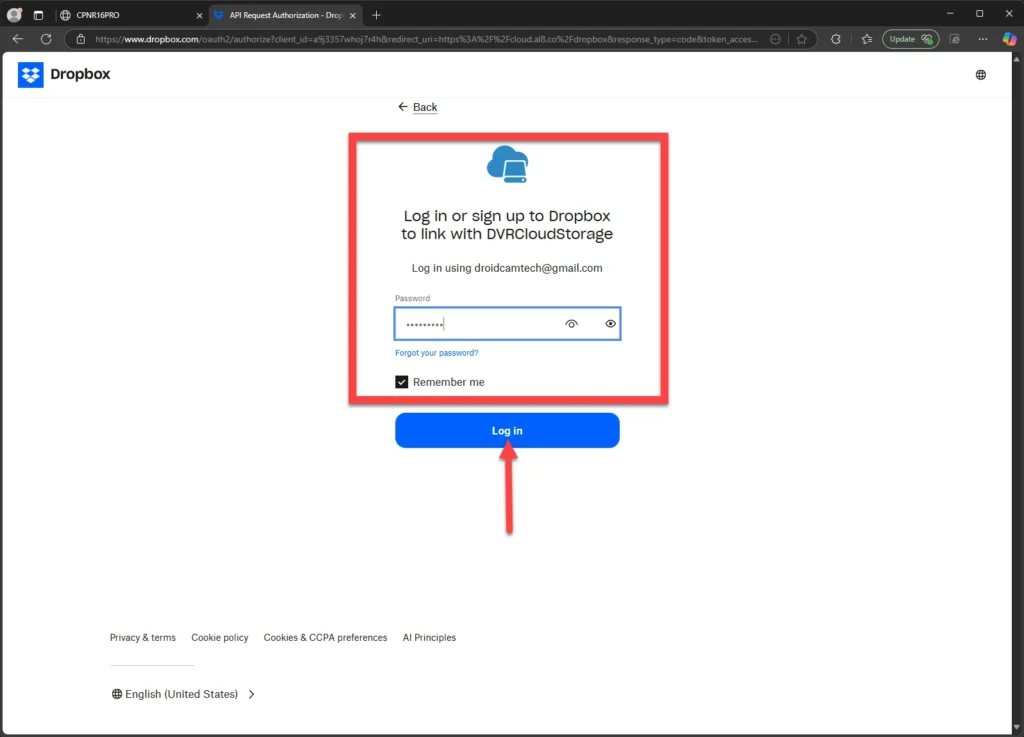
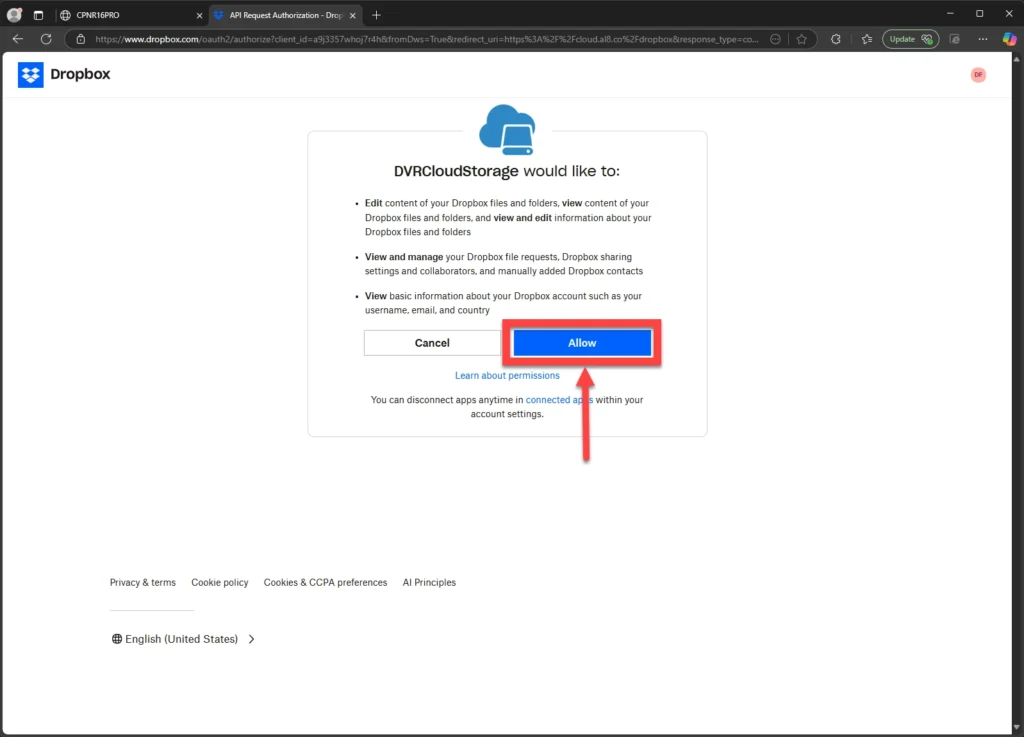
- Click the Activate Cloud button.
- Log in to your Dropbox account, if you are not already logged in.
- Click Allow to allow your DVR or NVR to upload to the Dropbox cloud.
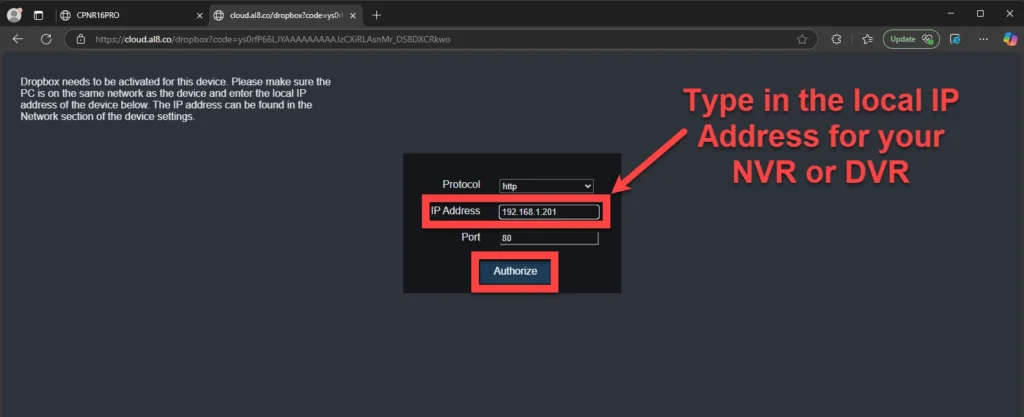
- On the next page, you will need to enter the local IP address for your recorder in the authorization page.
Type the current local IP address for your DVR or NVR into the text box, leaving the other two settings as default.
- Click Authorize.
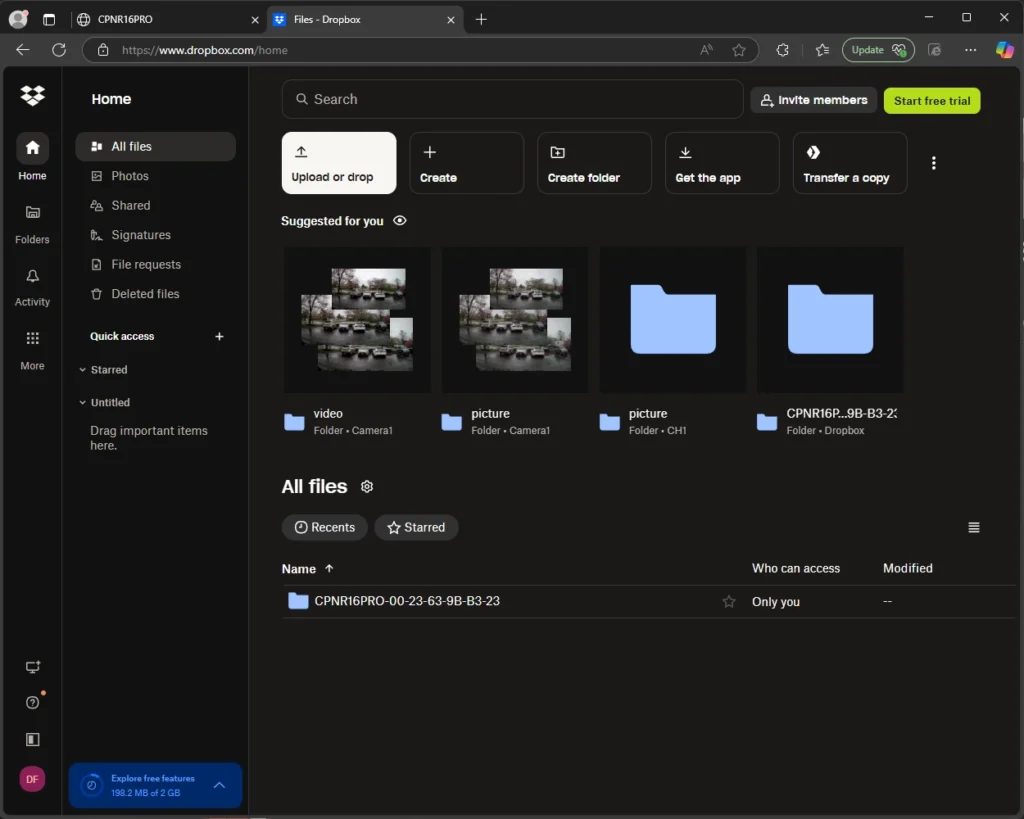
- If you’ve entered the correct local IP address and your Dropbox account is accessible, you should receive an “Authorization succeeded!” message with a timer.
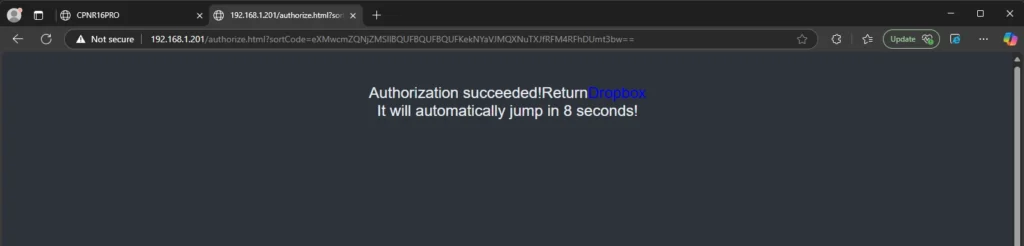
When the timer expires, the web browser will automatically redirect you to your Dropbox account.
- After the success confirmation, you can return to the recorder’s web interface to verify that the cloud status now shows as activated, along with the available space in your Dropbox account.
You can also try to trigger a motion event to test if your system uploads a video clip like the example in our example section below.
Optional: Enable AI Detection for Cloud Uploads
To use AI event-detection methods (e.g., human/vehicle detection, perimeter intrusion, or line crossing) with your Security Cameras Inc™ Camera System, navigate to the AI Setup menu. Set up the AI rule, then enable Cloud Video as you would for motion detection.
How to Backup your Security Camera System to the Cloud for Free to Dropbox - Video

