

Email Motion Alerts Guide for Security Camera Systems

CCTV Camera World provides all of their security camera systems with standard features that include video-based motion detection and email alert notifications. Although setting up video recording based on motion detection is straightforward, configuring email alerts and integrating email accounts may be daunting for users who are unfamiliar with our system interface. In the following guide, we illustrate how to set up email notifications on your Surveillance DVR using the web service menu. While the menu may not be identical depending on the year and model of your recorder, this guide should still be easy enough to follow.
Important Update:
- Microsoft Outlook/Office365 email accounts can no longer be used for DVR/NVR email alerts.
- Microsoft has discontinued basic SMTP authentication and does not offer app passwords for Outlook.com accounts.
- Please use an alternative email provider such as Gmail (with an app password), your ISP’s SMTP server, or a dedicated SMTP relay service. The setup process is similar using Gmail with an app password. If you need help setting up a Gmail account with an app password follow our guide by clicking the link above.
The video below provides thorough instructions on how to set up email alerts using a free Outlook account. At the time of writing of this post, we found restrictions on Gmail accounts that prevent them from being used to send email alerts from devices such as IP cameras or security camera recorders.

These instructions assume that:
- You already registered for a free Outlook email account by visiting Microsoft's sign up page for a free email account.
- You're using a Premium Series System, DVR, or NVR from CCTV Camera World
If you are unable to watch the video due to corporate firewall restrictions, we have a brief summary of where to enter your email account credentials on the recorder by using the web interface.
Now that you've watched the video above, you may be wondering why bother with setting up email alerts from your security camera system. Especially when our systems also offer the option to receive push notifications for motion events, why bother with email alerts?
Email-based motion alerts are useful for several reasons
- Easy to access: Email-based motion alerts are easy to access and can be viewed from any device with an internet connection, including smartphones, tablets, and computers. This means that you can quickly review the screenshot of the event that triggered the motion alert and take appropriate action, even if you're not at home or not near a smartphone.
- Customizable: Our systems feature analog security DVR or NVR recorders that allow you to customize settings such as motion sensitivity, or use AI based smart motion detection to fine tune event detection based on your preferences and environment. This means that you can tailor the alerts to your specific needs and reduce the risk of false alarms.
- Record-keeping: Most importantly email-based motion alerts also provide a record of all activity on your property, which can be useful in the event of a security incident or other legal matter where the recorder may be stolen or damaged. The snapshots can be used as evidence to support insurance claims or legal/criminal cases. Push notifications do not get stored on your phone, and rely on the recorder being accessible from the internet.
- Overall, email-based motion alerts are a useful tool for homeowners as they provide instant notification of any activity on your property, are easy to access and customize, and can provide a record of all activity for future reference.
How to setup email alerts on your security system recorder
Step 1) Click Setup
Login to your DVR or NVR using Internet Explorer so you can access the Web Service of the DVR. Then click Setup.

Step 2) Go to Email Settings
Navigate to the Email Settings page by clicking NETWORK -> EMAIL, and you should see the page similar to the one below.
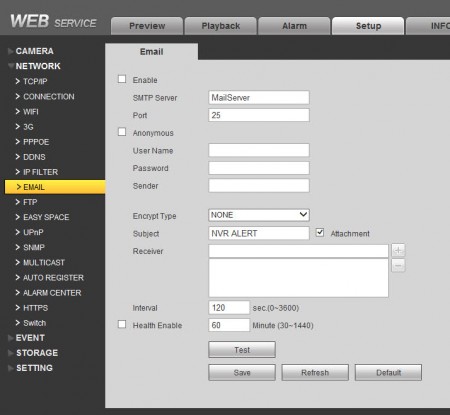
Step 3) Enter Email Address Settings
On this page, enter your email account information that will be used to send email notifications. Here is what our email settings page looks like after all the settings are applied and tested:
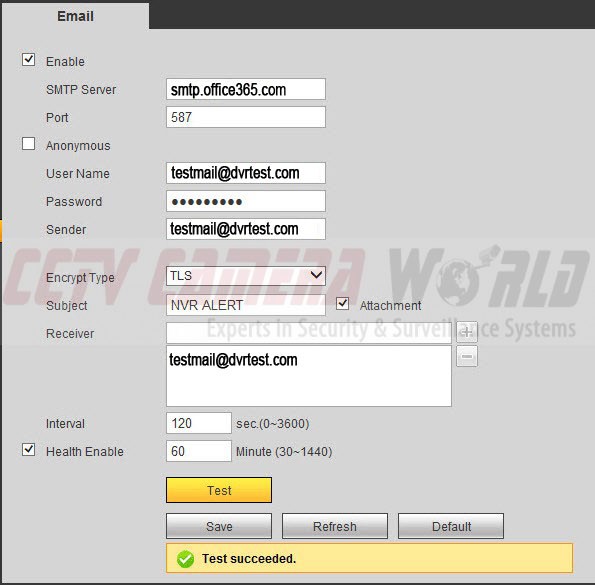
Required Settings Explained
Here is a quick explanation of the configuration settings entered above. First, so you don't forget, check the Enable box.
SMTP Server: smtp.office365.com - this is the outbound email server as noted by Office.com
Port: 587 - be sure to use this port for encrypting outbound email
User Name: [enter your Office365 email address in full]
Password: [enter your Office365 email account's password]
Sender: [enter your Office365 email address in full] - same as User Name
Encrypt Type: TLS
Subject: NVR ALERT or any other subject line you'd like
Attachment: *Be sure to check Attachment if you want to send a picture snapshot as well with the text alert
Receiver: Enter the email address you would like to send the email alert to. In our case it is the same as the sender.
Interval: 120 sec - this is the default time in seconds that you want to wait between alerts
Health Enable: Check this setting if you would like update health alerts sent to you at the specific time intervals (in minutes) about the health and operation of your recorder
Remember to click on the SAVE button, and then click on the Test button to check whether the settings you used are working. If all works well, you should get a Test Succeeded message on the page.
Step 4) Enable email notifications in the Video Detect settings
Navigate to EVENT -> VIDEO DETECT and make sure that the following check boxes are checked:
- Enable - to enable motion detection in the video for that chosen Channel or Camera number
- Record Channel - to make sure you are recording video on motion for this Channel
- Snapshot - to record and email a snapshot on motion detection for this Channel
- Send Email - to enable email notification on motion for this Channel
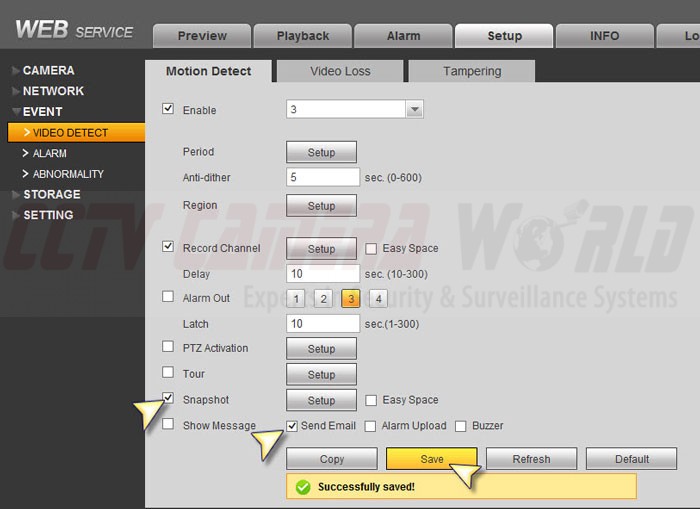
Notice the settings on this page are per Channel or Camera. You need to enable these settings for each channel you would like to enable motion detection and email notifications for. In our case we enabled them for Channel 3.
Step 5) Enable Motion Detection Recording for Snapshots
Up to this point you have configured email notifications to be sent, however a snapshot will not be included with each notification until you enable Motion Detection Recording for Snapshots.
- Navigate to STORAGE -> SCHEDULE
- Select the Snapshot tab
- Click Setup
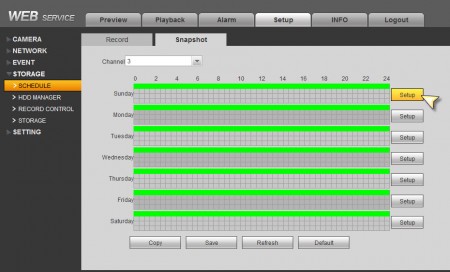
Select Motion as the recording method for Snapshots
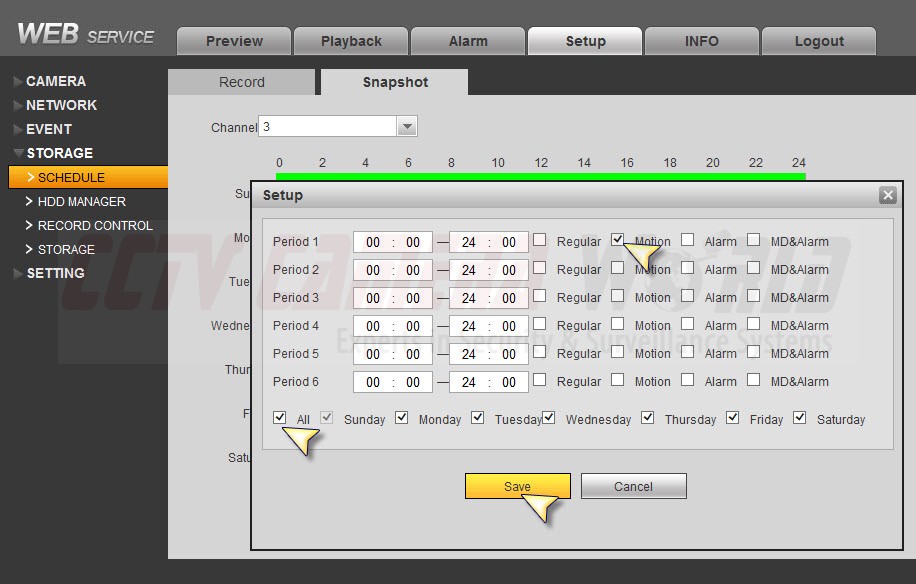
1) Uncheck Regular to disable snapshots from being recorded all the time.
2) Check Motion to enable motion activated snapshot recording.
3) Check All to enable this method for all days of the week
Remember to Save Your Settings
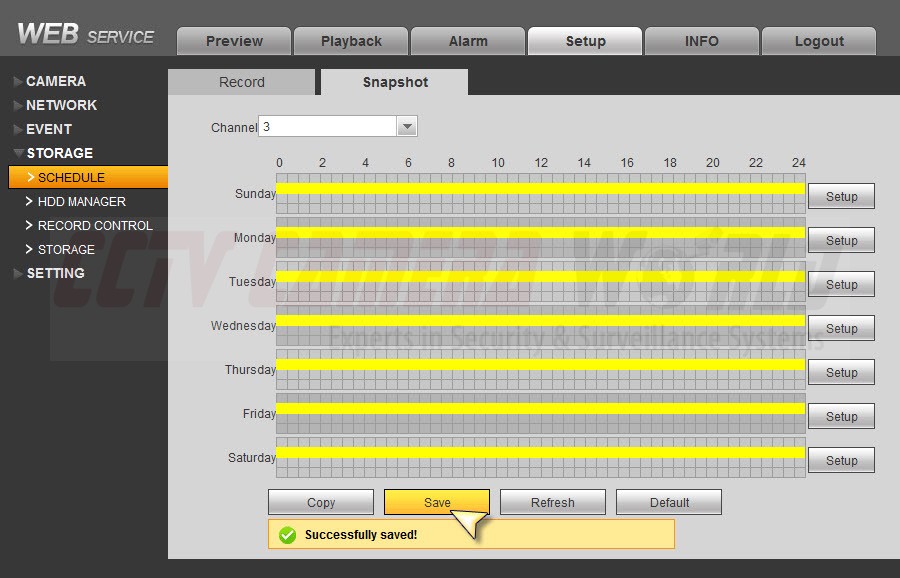
Press SAVE to make sure your settings are saved and applied. In our example above, we show how to enable motion detection, email notification on motion with snapshot for Channel 3. Steps 4-5 needs to be repeated for each Channel you would like email notifications for.
Success - Email Notifications
Here is a snapshot from our GMAIL account showing what the email notifications sent from the DVR look like.

It is important to note that the process is identical for configuring email notifications on motion when using our PoE security cameras. If you have any questions how to configure these settings on your DVR or NVR, feel free to contact us using our contact form.