

How to Use a Security Camera as Standalone

You may be thinking of using a security camera for purposes other than security and safety. On a daily basis, we receive inquiries about how to use our cameras for observation-related uses, such as watching after animals in a zoo or animal sanctuary, live streaming a sporting event, or a time-lapse capture of a construction project. Whether you want to capture video or snapshots, our cameras can handle almost any task. This guide will assist you in starting your standalone camera project with one of our Premium Series IP cameras.
What is an IP camera?
An IP camera, aka network camera or PoE (power over Ethernet) camera, is a digital security camera that uses IP address-based computer networks to send data. Transmitting digital data over a network gives IP cameras the ability to pack video, sound, alarm, and motor movement controls into a single digital stream while receiving power through the same cable. By using a single network cable, IP cameras simplify the equipment needed to set up a security camera system while also providing the added benefit of digital control of features inside the camera. The features encompass image enhancements and the ability to control on-board hardware, including infrared LEDs, microphones, speakers, and SD card storage, if installed within the camera.
Why use an IP camera as a standalone security camera?
IP cameras, better than HD security cameras over Coax, have small computer chips that significantly expand their capabilities. They can operate independently without a centralized recorder or integrate with other cameras and a network video recorder (NVR) to create a comprehensive security camera system. At CCTV Camera World, our IP cameras have internal web servers accessible via web browsers, mobile apps, and PC or Mac software, allowing for direct remote viewing without recurring cloud storage costs. Our professional network cameras, unlike cloud-based cameras from home consumer brands, function as standalone devices on a local network for sensitive applications, avoiding third-party servers.
For remote access, you can view, manage, and playback recorded footage over the Internet by adding the camera to the app or software. Our security cameras with SD cards have a microSD slot for internal storage, making them an economical choice for standalone surveillance. Depending on the storage capacity of the SD card, it can store a few days of video or several years of snapshots. For more details on recording snapshots, refer to our guide, How to Record Pictures and Snapshots on a Security Camera. Cost-conscious projects that do not require an NVR for long-term video storage can greatly benefit from standalone cameras.
IP Cameras in action
To provide an overview of the benefits of using an IP camera from CCTV Camera World, we prepared a quick introduction video that is available for you to watch below. The video shows how simple it is to use one of our network cameras in standalone mode. You can access a camera using either our free smartphone app or our PC/Mac client monitoring software. With our free smartphone app, you can access live and recorded video, or still snapshots.

Direct Streaming to YouTube and Twitch
Another potential use for a standalone surveillance camera is to stream a video feed over the web. With built-in RTMP streaming, some of our PoE cameras can stream directly to the most popular online streaming services. We recommend using Twitch because it is free and only requires a Twitch account. You can also use YouTube Live with a YouTube account, but it doesn’t perform as well as Twitch for continuous, long-term streaming. For more information, browse our selection of Live Streaming Cameras and check out our Live Streaming to Twitch and Live Streaming to YouTube guides.
How to setup a Standalone Security Camera
This guide will show you how to use a PoE IP camera purchased from CCTV Camera World as a standalone recording device. We break down the setup process into easy-to-follow steps:
- Powering a PoE camera
- Accessing the camera
- Viewing an IP camera from a web browser
- Viewing an IP Camera from an iPhone or Android Phone
- How to set a recording schedule
- Viewing video from a PC or Mac
- Video playback using a PC or Mac
- Download video using a PC or Mac
Step 1. Powering a PoE Camera
There are multiple ways to power PoE cameras, all of which we cover in detail in our Three Ways to Connect an IP Camera article. The recommended method, which is also the simplest, is to use a PoE injector. A PoE injector is a device that powers a single PoE camera and requires two Ethernet cables to connect. You need to connect one cable to the camera and another to a computer or network router. We recommend using a PoE injector to power a single PoE camera for the following reasons:
- Simplicity in the type of cable being used.
- Troubleshooting the power source is easy.
Using a PoE Injector
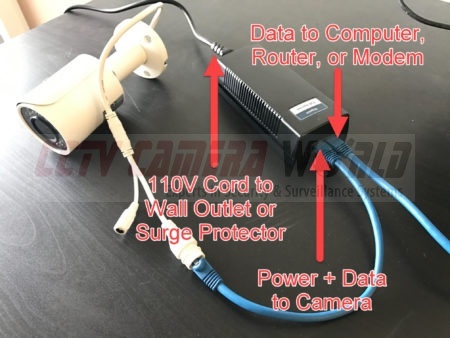
Using a PoE (Power over Ethernet) injector is the easiest way to connect and provide power. A PoE injector allows you to power the camera from anywhere there is a 110V AC socket. Simply plug your PoE injector into a 110V AC wall socket using the power cord.
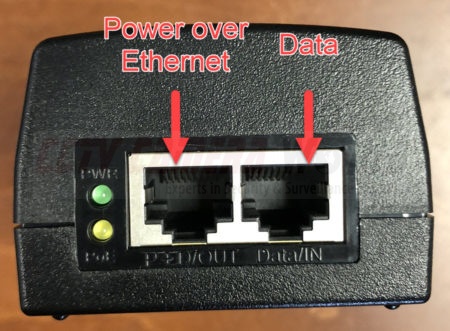
A PoE injector has two ports: a Power+Data port and a data port. A single Ethernet cable from the injector's Power+Data (P+D/OUT) port to the camera will provide power and data connectivity. The Data/IN port is what connects to your network router or directly to a computer with a second network cable. You can use either CAT5E or CAT6 cables.
Step 2. Accessing the camera
Requirements
The following is a brief list of requirements for connecting to an IP camera:
- IP camera that you want to connect to
- PoE injector or PoE switch that is 802.3af/at compliant
- Two CAT5e or CAT6 network cables that are known to be good
- Network router
- Windows PC computer that is connected to the same router
If you have purchased a Chrome-compatible camera model and emailed our tech department to have it set to an IP address that is compatible with your network, you can use a Mac computer; otherwise, we recommend using a Windows computer for camera and software compatibility. To proceed to the next steps, it is important that the network camera is receiving power and connected to your local computer network. The power source must be a PoE injector or PoE switch that is 802.3af/at compliant. If this is all new to you, we suggest purchasing the PoE switch or injector from us to ensure compatibility.
Pre-configured from CCTV Camera World
Our technicians usually pre-configure IP cameras with an IP address, username, and password during shipping to streamline the setup process for customers. There should be a label on top of the camera box that states the IP address and login credentials for that camera. In some cases, check your email, as our technicians may send the information directly to you.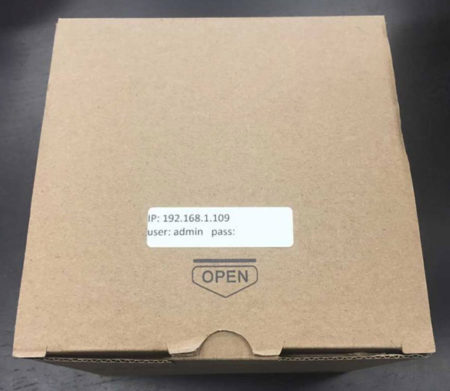
Step 3. Viewing an IP camera from a web browser
Using Microsoft Edge Internet Explorer Mode to get the most out of your IP camera
Microsoft Edge still has an Internet Explorer mode, making it the best web browser for accessing professional network cameras and systems over a local network or the Internet, despite its official death in June 2022. You can toggle or tweak numerous features of professional cameras with the built-in web server by logging into the product's web server. By allowing the installation of plugins from the camera's web server, Internet Explorer provides access to all the settings, live view, and playback features. The newer HTML5 interface, while convenient, sometimes does not support all of our cameras' functions, like digital zoom or two-way audio. Installing the necessary plugins simplifies the process of logging into the camera and exploring the web interface. The video below demonstrates how to use Microsoft Edge's Internet Explorer mode to access a network security camera.
Chrome, Firefox, and Edge browser support
Depending on the camera model and its firmware, it may support access from Chrome, Firefox, or Edge web browsers. They make it convenient to watch surveillance cameras through a web browser without installing a plugin, especially for non-professional users or those with limited administrative access to a computer in a corporate environment. For security reasons, Chrome, Edge, and Firefox do not allow additional plugins to install and require camera systems to use the HTML5 web player to display video, just like YouTube doesn't need extensions to play videos. However, this comes at a sacrifice, as certain functions are unavailable through HTML5 due to limitations. To access all the features, you can always use Internet Explorer. Feel free to watch our demonstration video below that shows how simple it is to view our IP cameras using Google Chrome. You can also view any of our PoE cameras that support Chrome from a Mac, Ubuntu, or other Linux distro. Please be sure to check the product description of the camera to confirm what browsers it's compatible with.

If you try to access the camera from any of the HTML5 browsers and you receive a message to download a plugin, it means your camera does not support these browsers. See the section above to learn more about accessing cameras with Microsoft Edge Internet Explorer mode.
Step 4: Viewing an IP Camera from an iPhone or Android Phone
Our free mobile app allows you to view all of our IP cameras and security systems. You can download the app on your phone from the App Store or Play Store using one of the following picture links (tap right on the picture if you're on a phone):
Viewing using an IP address or Domain name
Our IP cameras also allow access using a mobile device over the Local Area Network (LAN) or the Internet with an IP address or DDNS domain. We recommend using a router or modem to connect the camera and its PoE power source to the Internet or local network. You can connect to the camera over the local network by entering its local IP address into the app, eliminating the need to place the camera on the web. The video below shows how to add a camera to our free mobile app using an IP address or domain name.

Viewing using the Dummies method
To simplify the process of connecting to our cameras, we developed our Dummies’ method, which involves downloading our free mobile app and scanning a QR code from inside the camera's web interface. You can view the camera on your phone from anywhere, as long as you connect it to an Internet router or modem. In order to set up remote viewing on your camera, you will need to access its web interface, like we show in the section above. Using the web interface, you can enable the camera's P2P remote connection and scan the QR code for the serial number into the remote viewing app.

How to use the remote viewing app
You will probably want to know how to use the app once you have it connected to the camera. Be sure to watch the videos below that show how to use some of the features available in our remote viewing app. The interface looks the same for both iOS and Android versions.


Step 5: How to set a recording schedule
Make sure to set up a recording schedule on your IP camera if you purchased a microSD card camera. In the following video, we show how to properly set a schedule to ensure the camera functions as a standalone recording device.

The camera's web interface allows for complete control over when to record, optimizing storage space on the internal microSD card. Unlike home consumer-type cameras, our cameras provide a variety of recording methods:
- Scheduled recording based on day of the week and time
- Video based motion detection
- Smart detection video analytics like Tripwire or Intrusion Box
- Alarm input based recording if the camera has optional alarm inputs to tie in a hard wired sensor
- Combine any of the above event triggers to record video or snapshots
- Interval based snapshot recording
Step 6: Viewing from a PC or Mac
For professional use, we provide free Client Monitoring Software (CMS) for both PC and Mac that allows you to connect to our products. Video guides on how to use the Free CMS can be found here, and you can download them by clicking on one of the following links:
There are different connectivity methods available, depending on the type of internet security required by your organization.
Viewing from a PC or Mac over LAN
If you don't want to place the camera on the Internet, then all you need is the camera's local IP address. The label on top of the camera box states the IP address we set the camera to, as we mentioned in Step 2. In the video below, we show how to connect to our network cameras using an IP address. The camera and computer must be on the same network, and the camera’s IP address must be compatible with the network. This video does not aim to teach you how to perform networking tasks. It simply demonstrates how to add a camera to the CMS software using a local IP.

Viewing from a PC or Mac over the web
As long as the camera has access to broadband Internet, our cameras offer a Dummies' method for the PC software as well, which simplifies the web connection process to just a few clicks.

In the video below, we show how quick and easy it is to connect to our security cameras or video recorders. Make sure to activate the P2P method in the camera’s network settings. Here's a brief outline of the steps detailed in the video:
- Access the camera's web interface to enable P2P
- Make sure the P2P method states connection was successful
- Copy the Serial Number (SN) of the camera stated on the right side
- Open the CMS software on your PC or Mac
- Add a new camera by entering the SN, username, and password
Step 7: Video playback using a PC or Mac
If you have a camera and a microSD card, you can even playback video and snapshots from the card, as shown in the video below, using our CMS software.

Step 8: Download video from a PC or Mac
Exporting a clean clip for sharing or evidence is straightforward with Smart PSS. In the video below, we walk through the process on an Avalonix Premium Series PoE camera, starting in Playback and finishing with a saved file on your computer. The steps mirror what we recommend throughout this guide and keep expectations realistic for 4K footage.
In this video you will learn how to:
- Open Playback, select your camera as a device, and choose the mainstream recording stream
- Use the calendar and zoomable timeline to find motion events and set in/out points with the scissors tool
- Pick a save location and export format: AVI, MP4, or original DAV
- Understand why exporting short segments is more reliable than trying to pull multiple days at once
- Verify your file under the Exported tab and play it back on a Windows or Mac computer
