How to add SV3C IP cameras to the Avalonix NVR

CCTV Camera World’s NVR systems allow for the use of some 3rd party IP cameras to record and detect motion. This is highly dependable on the manufacturer of the IP camera, and the firmware that is currently installed on the camera. Compatibility falls under the ONVIF protocol that does not guarantee that a camera from one manufacturer will work with a recorder from another company. We gladly test IP cameras for compatibility with our equipment before selling an NVR to a potential customer. One of the home consumer brands that does work over the ONVIF protocol with our equipment is SV3C that is commonly found from online retailers. In this guide we show you how to connect an SV3C camera to the Avalonix NVR. It is important to note that ONVIF compatibility may change at any time due to firmware updates by the camera manufacturer.
The model numbers that were tested from SV3C for this article include:
- B08POE-3MPL-A
- B08POE-5MPL-A
- B08POE-8MPL-A
You can connect SV3C Cameras two different ways:
Using an SV3C IP Camera over a network
Using a Security Camera over a network can be an easier way to operate an IP camera system. This allows for cameras to be placed anywhere where there is local network access. NVRs can capture IP camera streams over a local network if they do not have PoE ports, or it is easier to connect a camera through the network. This setup requires the following:
- SV3C IP Camera
- PoE switch or PoE injector to power and network the camera
- NVR from CCTV Camera World
1) Connect the SV3C camera to your PoE Switch
This step involves connecting and providing power to the camera. Make sure that you know the IP address, username, and password that is set on your camera before attempting to connect it to the NVR. Ensure that the PoE switch is connected to the local network, or the uplink port on the NVR.
2) Login to the SV3C Camera to verify its IP address
Using Internet Explorer or software that SV3C offers, ensure that your camera is on the same network as the NVR. Our NVRs ship with a default IP address of 192.168.1.108 and your camera must be on that same network. For example we set our camera to 192.168.1.106 as shown below. It is important to know that two cameras cannot use the same IP address. If you want to change the password on your SV3C Camera make sure that it is an alphanumeric password otherwise the NVR will not be able to connect.
3) Add the SV3C Camera as an ONVIF device to the NVR
a) Access the web interface of your NVR
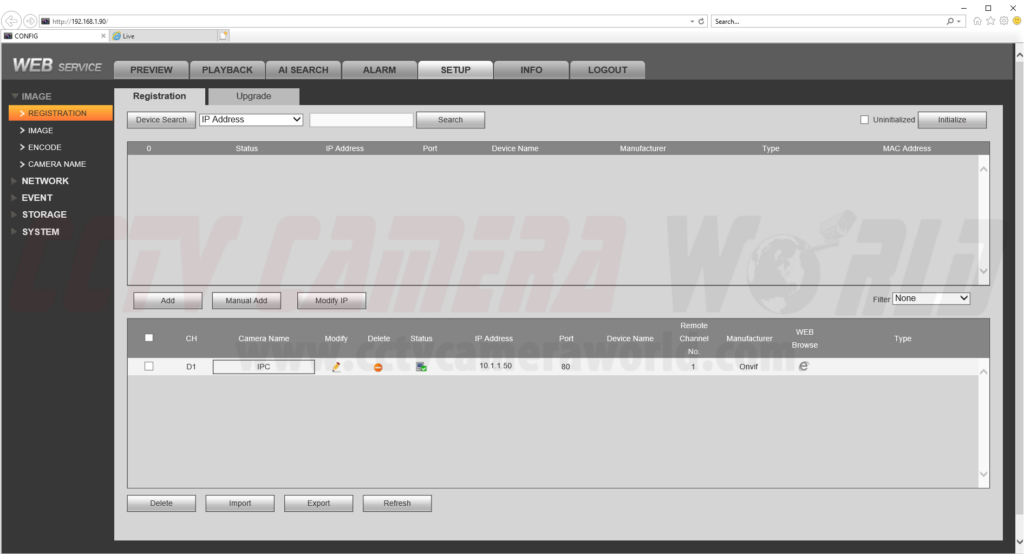
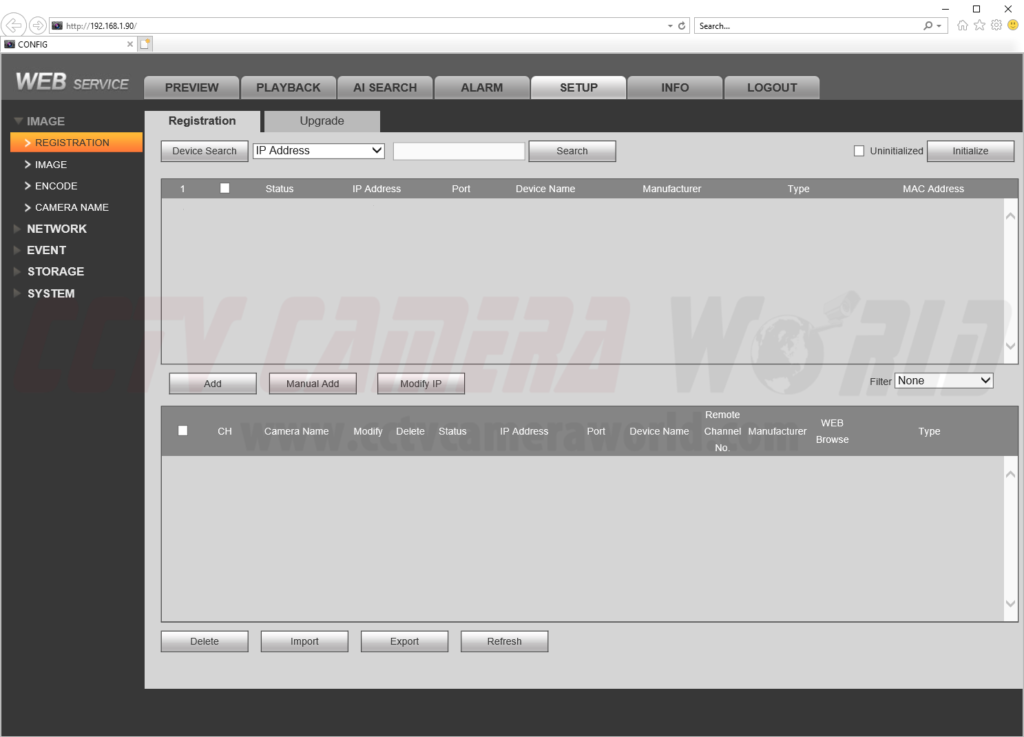
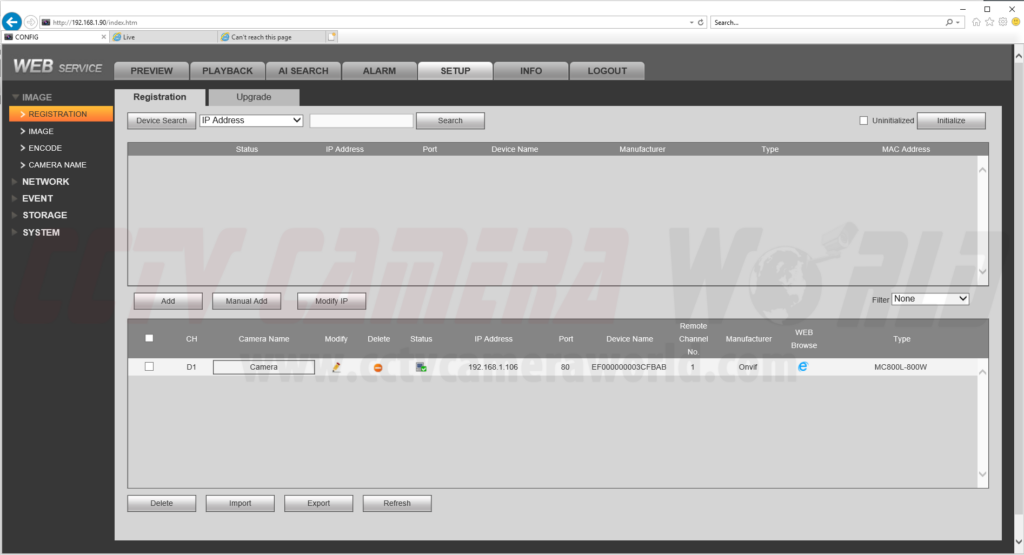
In this step you are required to login to the web interface of your NVR. The process is similar to using Internet Explorer to access a camera. Open Internet Explorer and type in http:// and the IP address for your NVR. Once logged in, navigate to the Registration screen shown below. It is found in Setup > Image > Registration or Setup > Camera > Registration.
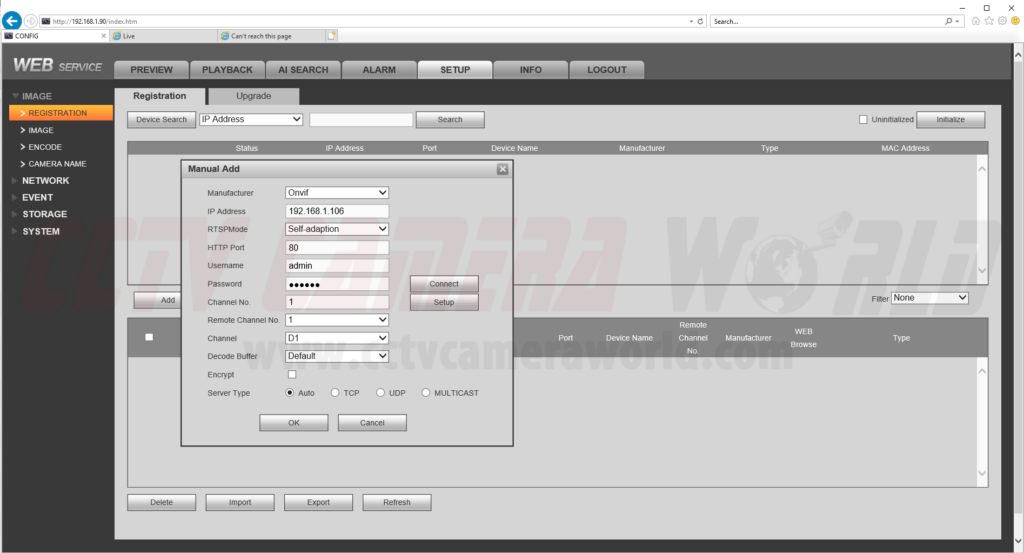
b) Add the Camera using a Manual Entry
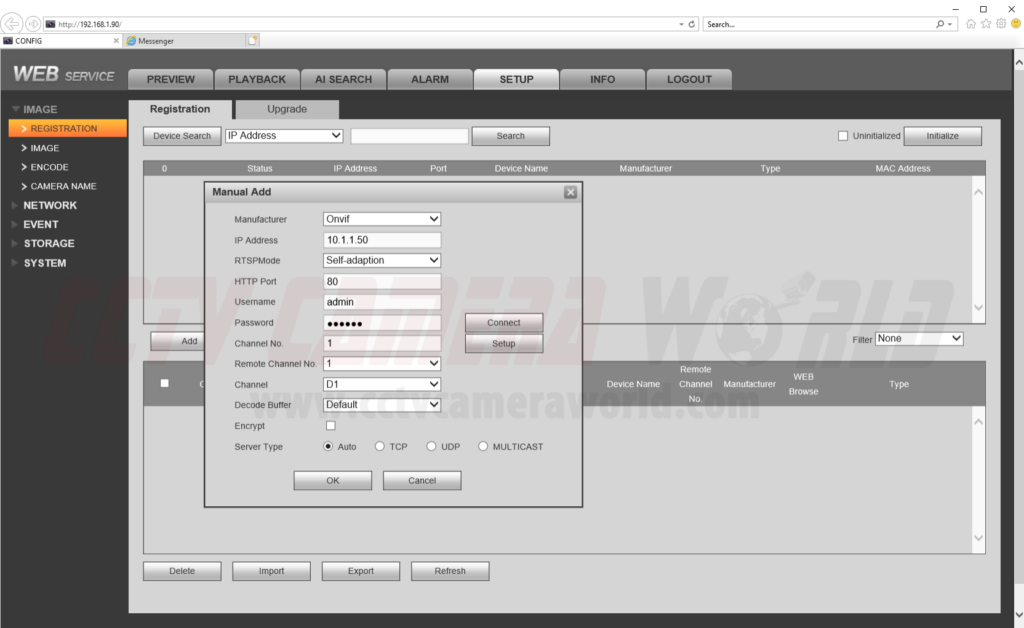
Now you can add your camera to the NVR using the IP address, username, and password that is set on the camera. Make sure to select the ONVIF protocol. If your camera does not have ONVIF Authentication enabled then you may not need to use a password to connect to the camera. To do this, use the Manual Add button on the Registration screen.
c) Ensure that the camera was added successfully
After you have added your device entry you can verify that the camera connected by checking the status for the camera on the device registration screen. A green checkmark icon shows that the connection was successful. A red icon means you will need to recheck the IP address, username and password and make sure that the NVR and Camera are on the same network.
Using an SV3C IP Camera with NVR PoE ports
Connecting an ONVIF IP camera over the built-in PoE ports of a standalone NVR can introduce another layer of uncertainty when connecting cameras. You can never be sure that the ONVIF camera will be compatible to the plug-and-play ports of the PoE NVR. Fortunately in our testing we found that by setting an SV3C IP camera to an IP address that matches the internal PoE network they can be connected with some initial setup. This setup requires the following:
- SV3C IP camera
- Power supply or PoE injector to access the camera locally
- Network Router or computer with a configurable Ethernet port
- PoE NVR
1) Provide power and connect the SV3C Camera
This step involves connecting and providing power to the camera so that you can configure it. This requires a computer with an ethernet port or a local network to connect to the camera. Reach out to SV3C support to find out which IP address is set on your camera, or how to find which IP address you should use to access the cameras. In our testing the cameras were set to DHCP so we used our router to find the IP addresses.
2) Login to the SV3C Camera to modify the IP address
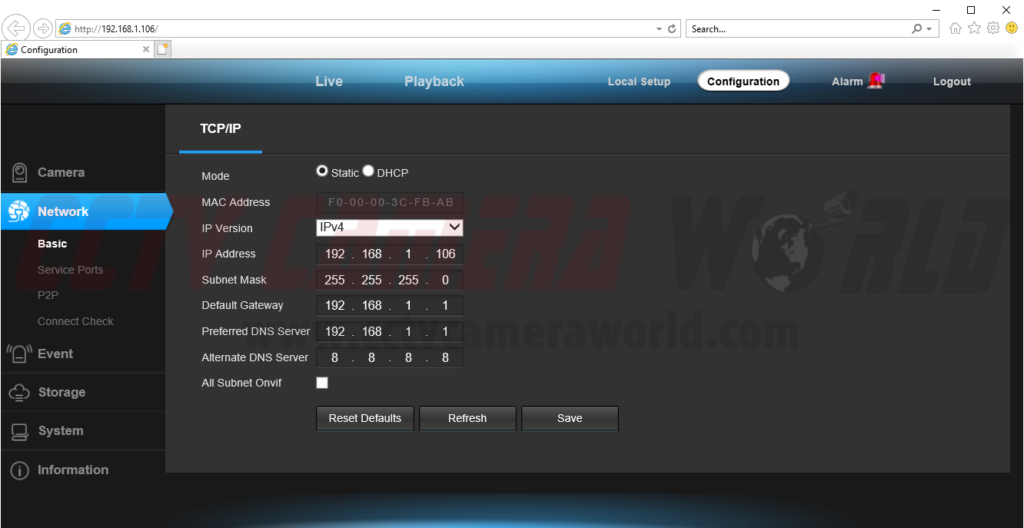
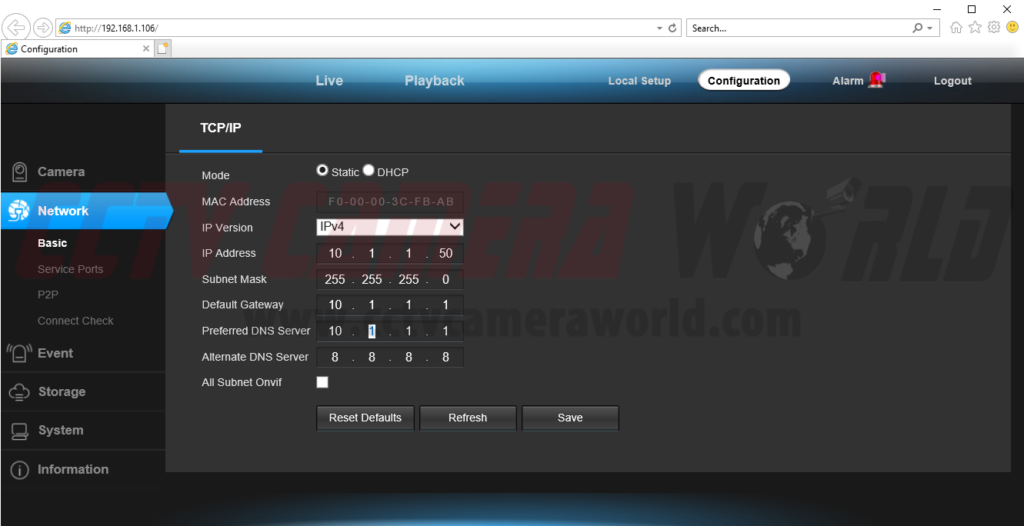
Using Internet Explorer or compatible browser for the SV3C IP camera login to the camera and modify the IP address setting. This setting should be found in the “Configuration” tab and then “Network” and “Basic” as shown in the photo below.
3) Change the IP Address of the SV3C Camera to fit the scheme of the Internal PoE switch
Avalonix NVR systems internal PoE switch comes with a 10.1.1.X network by default. The SV3C camera must be set to the same network in order for it to communicate with the NVR directly. Modify the IP address to something like 10.1.1.50. Also change the Default Gateway to the internal IP address of the NVR or 10.1.1.1 for Avalonix NVRs. The below picture is an example of what to set. Be sure hit the Save button. Please note that this will prevent you from accessing the camera unless you reach out to SV3C for their configuration tool to change the IP address. If you want to change the password on your SV3C Camera make sure that it is an alpha-numeric password otherwise the NVR will not be able to connect.
Important Note: Two cameras cannot have the same IP address so be sure to assign one per port that you intend to use on the NVR. For example: Port 1: 10.1.1.50, Port 2: 10.1.1.51, etc.
4) Add the SV3C Camera to the Avalonix NVR System
a) Access the web interface of your NVR
In this step you are required to login to the web interface of your NVR. The process is similar to using Internet Explorer to access a camera. Open Internet Explorer and type in http:// and the IP address for your NVR. Avalonix NVRs ship with a default IP address of 192.168.1.108. Once logged in, navigate to the Registration screen shown below. It is found in Setup > Image > Registration or Setup > Camera > Registration for some NVRs.
b) Add the Camera using a Manual Entry
Now you can add your camera using the IP address, username, and password that is set on the camera. Make sure to select the ONVIF protocol. If your camera does not have ONVIF Authentication enabled then you may not need to use a password to connect to the camera.
c) Ensure the camera is connected
Once you have created the manual device entry then you can verify the camera has connected by looking under the Status. If there is a green check mark icon then the connection was a success. If there is a red icon then you will need to double check your manual camera entry.