


Using IP Cameras with Blue Iris - Setup & Troubleshooting Guide
IP cameras from CCTV Camera World work with Blue Iris because they support ONVIF and RTSP, the two main standards Blue Iris uses for third-party camera integration. Most Avalonix Premium Series, AvaEye, and Security Cameras Inc (SCI) IP cameras can be added to Blue Iris as network IP cameras, then configured with the proper stream settings for stable live viewing and recording.
Whether you're a hands-on DIY user, a system integrator, or a business owner expanding an existing system, this guide walks through the full setup process from network prep and static IP addressing to RTSP stream testing, Blue Iris configuration, and common troubleshooting steps.
This article is written specifically for users who want a clear path to getting one of our IP cameras working reliably in Blue Iris, without wasting time on trial and error.
In this guide, we cover:
- Camera compatibility and ONVIF/RTSP support
- Network setup and IP addressing requirements
- The exact RTSP URL patterns our cameras use
- How to add the camera inside Blue Iris
- How to set up the mainstream and substream
Contents
- Recommended Cameras to Use With Blue Iris
- Blue Iris Compatibility at a Glance
- Quick-Start Overview
- Supported Cameras & Compatibility Overview
- Recommended Hardware Specifications for Blue Iris
- Recommended Camera Settings for Blue Iris
- Prerequisites Before Setup
- Step-by-Step: Add Our Cameras to Blue Iris
- Troubleshooting & Next Steps
- Conclusion
- Frequently Asked Questions
What Types of CCTV Camera World Cameras Work Best With Blue Iris?
If you're shopping specifically for a camera to use with Blue Iris, the easiest path is to choose a IP camera with ONVIF support, RTSP streaming, and clean mainstream and substream implementation. The best choice depends less on the brand name and more on the job you need the camera to do. We recommend cameras from our Security Cameras Inc (SCI) line for Blue Iris because they strike a strong balance between affordability, useful features, and dependable performance.
Our Picks
Resolution: 5MP (3K) |
Features: Smart Detection, Audio, IR 100ft, Wide 110deg view |
Best for: Balanced Blue Iris performance |
Facial Distance: 35 feet
Resolution: 8MP (4K) |
Features: Smart Detection, Audio, IR 100ft |
Best for: 4K detail in Blue Iris |
Facial Distance: 45 feet
Resolution: 8MP (4K) |
Features: Dual Light Illumination, IR 100ft, White LED 82ft, Wide 110deg view |
Best for: Low-light Blue Iris recording |
Facial Distance: 45 feet
Resolution: 5MP (3K) |
Features: AI Detection, Audio, IR 100ft |
Best for: Budget recording |
Facial Distance: 35 feet
Resolution: 4MP (2K) |
Features: AI Active Deterrence, Two-Way Audio, IR & White Light, 80° view |
Best for: Active Deterrence on a budget |
Facial Distance: 30 feet
Resolution: 8MP (4K) |
Features: Motorized Zoom, 2-way Audio, IR 100ft, Active Deterrence |
Best for: Active monitoring |
Facial Distance: 45 feet - 150 feet (daytime)
Why We Picked These Cameras for Blue Iris
Best overall camera for Blue Iris
The SCI 5MP Turret Camera (SC5T) is our best overall pick for Blue Iris because it offers a strong mix of image quality, wide coverage, built-in audio, and practical day-to-day performance without a big pricetag.
Best 4K camera for Blue Iris
The SCI 4K Bullet Camera (SC4KBL) is our top 4K pick for Blue Iris because it gives you the extra resolution needed for more detail at an affordable price.
Best low-light camera for Blue Iris
The SCI Full Color 4K Turret Camera (SC4KTFC) stands out for low-light use in Blue Iris because it is built for better nighttime visibility and color video in darker scenes.
Best budget camera for Blue Iris
The SCI 5MP Bullet Camera (SC5BL) is our budget pick for Blue Iris because it keeps the price low while still offering solid 5MP video, audio, and dependable everyday performance.
Best budget Active Deterrence camera for Blue Iris
The SCI 2K Active Deterrence Bullet Camera with Mic & Speaker (SC2KADBL) is our budget Active Deterrence pick for Blue Iris because it keeps the price low while still offering solid 4MP video, two-way audio, and motion activated deterrence functions including a strobing red/blue light and audible siren. Plus you can choose whether you would like the camera to use IR light at night or its white light LEDs for full color night vision.
Best PTZ camera for Blue Iris
The SCI 8MP PTZ Camera (SC4KPTZAD) is our PTZ pick for Blue Iris because it gives you the flexibility to move, zoom, and actively monitor larger areas from one camera position.
Blue Iris Compatibility at a Glance
- Compatible with Avalonix Premium Series, AvaEye, and Security Cameras Inc (SCI) IP cameras
- Uses ONVIF for discovery and control, plus RTSP for video streaming
- Supports mainstream and substream setup for better performance
- Supports PTZ control on compatible PTZ models
- Supports H.264 and H.265, though H.264 is usually the safer choice for stability
- Supports audio on select models with built-in microphones
- Best results come from using a static local camera IP, testing the stream in VLC, and confirming proper Blue Iris stream settings
Who This Guide Is For
- Owners of Avalonix, AvaEye, or Security Cameras Inc (SCI) IP cameras
- Users running Blue Iris on a Windows PC
- Anyone comfortable logging into a camera, changing network settings, or adjusting stream settings
Who This Guide Is Not For
- Users needing support for cameras not purchased from CCTV Camera World
- Users looking for help with Blue Iris licensing, account access, or unrelated software issues
Quick-Start Overview
If you’re already familiar with IP camera networking or have used Blue Iris before, this quick-start section gives you the fastest path to getting one of our cameras connected.
- Connect the camera to either a PoE switch or a PoE injector, and then confirm that the link lights show activity.
- Locate the camera on your network using its current IP address, whether it is set by DHCP or already assigned a static IP. Check the label on top of the box if you got it from our website.
- Log in to the camera’s web interface and verify that video loads correctly in the browser.
- Test the RTSP stream in VLC using the appropriate URL format for your camera model.
- Open Blue Iris and add a new camera using “Network IP” as the connection type.
- Enter the camera’s IP address, username, and password, then run Find/Inspect to allow Blue Iris to detect supported streams.
- Select the mainstream for motion detection and the substream for continuous recording and CPU efficiency.
- Save your settings and confirm that the video stream is stable for several minutes before adding another camera.
Do CCTV Camera World IP Cameras Work With Blue Iris?
All IP cameras sold by CCTV Camera World are fully compatible with Blue Iris. Whether you're using a turret, bullet, dome, or PTZ model from our Avalonix Premium, AvaEye, or Security Cameras Inc (SCI) lines, integration is simple thanks to standards like ONVIF and RTSP. These protocols allow Blue Iris to detect the camera, stream live video, record footage, and control PTZ or motorized zoom functions where supported.
If you're still comparing camera types or want a deeper explanation of ONVIF compatibility, see our ONVIF Cameras: How to Choose the Right IP Camera guide.
Camera Brands & Model Support
The following product lines are verified to work with Blue Iris:
Protocol Support
All supported cameras include the following features for integration with Blue Iris:
| Feature | Support |
| ONVIF Video | Yes |
| RTSP Streaming | Yes |
| PTZ Control (via ONVIF) | Yes (PTZ models only) |
| H.264 & H.265 Video | Yes |
| Audio Support | On select security cameras with audio |
Blue Iris Features We’ve Tested
Our cameras have been tested with the latest version of Blue Iris, including:
- ONVIF-based stream discovery
- Live video preview and recording
- Full PTZ and motorized zoom control
- Sub-stream support for multi-view layouts and storage savings
- Audio playback on cameras with built-in microphones
Whether you're starting fresh with a custom security camera system or adding one of our cameras to an existing Blue Iris system, you’ll have access to all core features without needing custom drivers or advanced configuration.
What PC Specs Do You Need for Blue Iris?
Blue Iris handles all decoding and processing on the PC, so the right hardware makes a noticeable difference in performance, especially compared to using a dedicated NVR built for video encoding and decoding. The recommendations below provide a solid baseline for most small and large setups.
Hard Drive Tip: For the best performance, we recommend using different drives for the operating system and video storage to reduce I/O bottlenecks.
For basic setups (1–4 cameras)
- Quad-core CPU (Intel i5 or Ryzen 5 equivalent)
- 16 GB RAM
- Gigabit Ethernet Network Card
- Dedicated surveillance-rated hard drive for recordings
For larger setups (5+ cameras or 4K streams)
- 6-core or higher CPU (Intel i7, Ryzen 7, or server-grade Xeon/Threadripper)
- 32 GB RAM
- Gigabit or 10-Gigabit NIC (depending on total camera bandwidth)
- Multiple surveillance-rated HDDs if you need long retention
- Optional: Intel Quick Sync or a supported GPU for hardware decoding
Note: Blue Iris is CPU-intensive and relies on efficient video decoding. Hardware acceleration (Intel Quick Sync or a supported GPU) can significantly reduce CPU usage.
LAN and Bandwidth Considerations
IP camera streams use significant local bandwidth. As a general rule:
- A 1080p IP camera uses 2–6 Mbps
- A 4MP IP camera uses 4–8 Mbps
- A 4K PoE camera uses 6–10 Mbps or more
Always use Gigabit Ethernet between PoE switches, and the Blue Iris PC.
For large deployments (8 or more 4K cameras):
- Consider segmenting camera traffic using a dedicated VLAN
- Use a 10G Ethernet card in the Blue Iris PC
- Avoid chaining cheap, unmanaged switches that often cap at 100 Mbps
What Camera Settings Work Best in Blue Iris?
Blue Iris works well with all of our IP cameras, but choosing the right stream settings makes a big difference in video smoothness, CPU usage, and long-term reliability. These recommendations provide a solid starting point for most 1080p, 4MP, and 4K setups using Avalonix, AvaEye, or SCI cameras.
Mainstream vs. Substream (and How To Use Them in Blue Iris)
Our cameras provide two useful RTSP streams:
- Mainstream: Highest resolution, frame rate, and bitrate ideal for recording and live viewing.
- Substream: Lower resolution and FPS are ideal for lower storage requirements, mobile access, and multi-camera views.
In Blue Iris, we recommend you:
- Use the mainstream for event-based recording and live viewing.
- Use the substream for continuous recording.
This setup reduces CPU load and optimizes storage usage, especially when running several cameras.
H.264 vs. H.265
Blue Iris supports both video codecs, but their performance differs:
- Use H.264 for best overall compatibility and stability.
- Use H.265 only if your PC is relatively strong and supports hardware decoding (Intel Quick Sync, NVIDIA, or AMD GPUs).
- Avoid enabling Smart Codec or SVC enhancements because they can introduce compatibility and decoding problems in third-party VMS software such as Blue Iris.
Codec, Bitrate, and FPS Recommendations for Blue Iris
These values balance quality and performance:
1080p (2MP)
- Bitrate: 4096–5120 Kbps
- FPS: 15–20
- Keyframe Interval: Double FPS (e.g., 15 FPS = keyframe 30)
4MP cameras
- Bitrate: 6144–8192 Kbps
- FPS: 15–20
- Keyframe Interval: Double FPS
4K (8MP) cameras
- Bitrate: 8192–12288 Kbps
- FPS: 12–15
- Keyframe Interval: Double FPS
Why these values?
Higher bitrates improve clarity in motion and low light, while moderate FPS keeps CPU usage in check. Doubling the keyframe interval to FPS gives Blue Iris a stable and efficient stream and prevents stuttering during scrubbing or playback.
Performance Tip
Lower the camera resolution or frame rate settings if your CPU exceeds 70–80 percent while recording or if you see a large number of dropped frames.
Do You Need ONVIF, RTSP, or Both for Blue Iris?
Blue Iris works best when you understand the difference between ONVIF and RTSP, because they do two different jobs. ONVIF helps Blue Iris discover the camera on your network and can also enable features like PTZ control on supported models. RTSP is the video stream itself, which Blue Iris uses to display and record live footage. In most cases, you will use both.
For most Avalonix Premium Series, AvaEye, and Security Cameras Inc (SCI) IP cameras, the easiest setup method is to add the camera in Blue Iris as a Generic/ONVIF network IP camera and run Find/Inspect. That usually allows Blue Iris to detect the correct connection details automatically. If that works, Blue Iris will fill in the stream information for you and get you connected faster.
If automatic detection does not work, that does not always mean the camera is incompatible. In many cases, the camera is still fully usable, but you may need to enter the RTSP stream path manually. That is why it is helpful to test the stream in VLC first. If the camera’s RTSP feed works in VLC, then the camera is usually streaming properly, and the issue is more likely related to the Blue Iris configuration rather than the camera itself.
Will Blue Iris Use the AI Detection Features Built Into the Camera?
Blue Iris works very well with our IP cameras, but it is important to understand that camera-side AI features do not carry over into Blue Iris. Blue Iris can receive the video stream, audio on supported models, and basic ONVIF functions such as PTZ control, but analytics like smart motion detection, human and vehicle filtering, IVS rules, face detection, and similar camera-side events are typically processed inside the camera itself.
This does not make the camera any less compatible with Blue Iris. It just means users should not expect Blue Iris to mirror every smart event exactly the way one of our NVRs or the camera’s own interface would. If you want to take advantage of the camera’s built-in analytics, those features are still useful for on-camera recording with an SD card or when the camera is used with an NVR or software that directly supports those events.
What Should You Do Before Adding a Camera to Blue Iris?
Before jumping into Blue Iris, it’s important to thoroughly prepare your camera and network environment. Skipping these steps is one of the most common reasons users experience issues like failed connections, dropped video, or cameras that randomly go offline.
The guidance below is based on years of real-world experience helping customers get our cameras working reliably with Blue Iris and other third-party software.
1. Assign a Static IP Address
For Blue Iris to maintain a stable connection to your camera, the camera’s IP address must stay the same. If the address changes, which can happen with default DHCP settings, Blue Iris will lose access and stop recording.
You have two options for assigning a static IP:
- Option 1: Reserve a static IP in your router or DHCP server using the camera’s MAC address. This method offers the most control but may require some networking knowledge.
- Option 2: Set a static IP directly in the camera’s web interface or using the applicable configuration software. This is often easier and can be done during the initial camera setup process.
In either case, make sure the IP address is valid for your network and sits outside your router’s DHCP range to avoid IP conflicts.
2. Verify Camera Login Credentials
All of our IP cameras require a username and password to access the video stream. You’ll need these credentials when connecting the camera to Blue Iris.
- The default username is admin.
- Each camera is initialized and tested before shipping. The password we set can be found on the top of the box or inside the IP camera pamphlet included with your shipment.
We recommend logging into the camera using a web browser first to confirm that the credentials work before entering them in Blue Iris.
3. Test Network Access From the Blue Iris PC
Next, confirm that the computer running Blue Iris can communicate with the camera over your network.
- Open a Command Prompt and run:
- ping 192.168.1.109 (replace with your camera’s current IP; 192.168.1.109 is a common default IP for our cameras.)
- If you're using antivirus or firewall software, verify that it isn’t blocking Blue Iris or the camera's IP.
If the ping is successful, the PC and camera are on the same network.
- Make sure antivirus or firewall software isn’t blocking Blue Iris or the camera’s IP.
- Ideally, your cameras and Blue Iris PC should be on the same unrestricted LAN.
- While VLANs can work when properly configured, they are not recommended for inexperienced users.
4. Know How to Test the RTSP Stream
RTSP (Real Time Streaming Protocol) is how Blue Iris receives video from your camera. In most cases, Blue Iris can detect this stream automatically via ONVIF. Still, it’s useful to know how to test the RTSP feed manually, especially when troubleshooting.
We’ll list specific RTSP paths for Avalonix and AvaEye cameras later in this guide. For now, you can test the stream using VLC Media Player.
Try entering the following in VLC:
rtsp://192.168.1.109
VLC will prompt you to enter the camera’s username and password. If the stream doesn’t load, double-check your login credentials or continue to the section below on stream formats.
This step confirms whether the camera is broadcasting video before you try configuring it in Blue Iris. For more information, refer to our What is RTSP? article.
5. Update Blue Iris to the Latest Version
Before adding any new cameras, verify that your Blue Iris software is up to date. Older versions may not detect newer ONVIF or RTSP streams properly, and they may struggle with H.265 video.
- Open Blue Iris and go to Settings > About to check your version.
- Install any available updates.
If you're running multiple high-resolution cameras or 4K streams, make sure:
- Your PC meets or exceeds Blue Iris’s hardware requirements.
- All network switches in your system are gigabit-rated. Slower switches can cause bottlenecks that affect video performance.
Blue Iris is CPU-intensive, especially when handling many streams or higher resolutions. Optimizing both software and hardware at this stage will save time later.
How Do You Add an IP Camera from CCTV Camera World to Blue Iris?
You can add your camera to Blue Iris once you've powered it on, connected it to your network, and assigned it a static IP address. The process is straightforward, but there are a few key settings to verify to ensure a reliable connection and smooth performance.
These instructions apply to all current IP cameras sold by CCTV Camera World, including Avalonix, AvaEye, and Security Cameras Inc models.
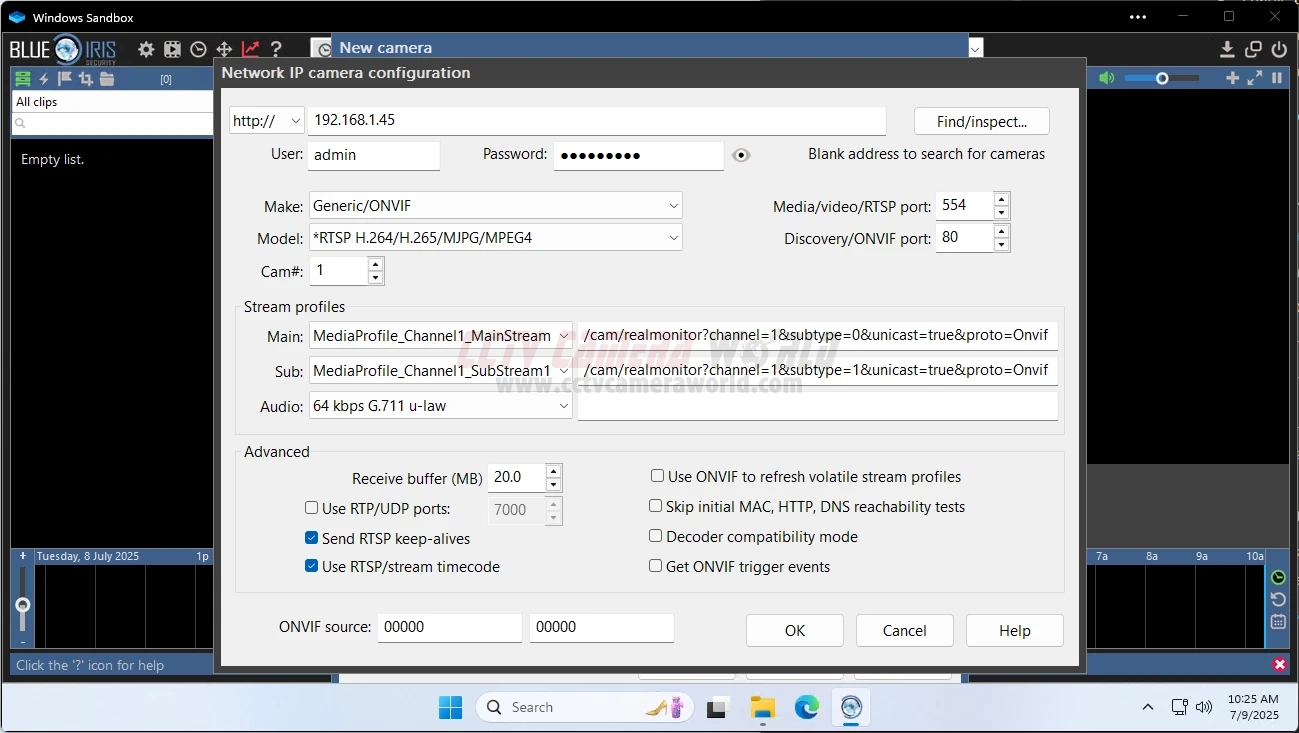
1. Open Blue Iris and Add a New Camera
- Launch Blue Iris.
- Click the + icon in the main interface to create a new camera connection.
- Enter a full name and short name for the camera.
- Example: Avalonix Camera / AvaCam1
- For Type, select Network IP, then click OK.
If you’re just testing the setup, it’s fine to leave most settings at their defaults. You can fine-tune them after the video stream is confirmed.

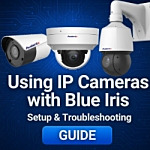
2. Enter Network Settings
In the Network IP Camera configuration window:
- In the http:// field, type your camera's IP address.
- Input the username and password you found and verified earlier.
- Under Make, choose Generic/ONVIF.
- For Model, select RTSP.
- Click Find/Inspect… to let Blue Iris scan for the stream path and connection details.
Blue Iris will use ONVIF to discover and pull the stream and port settings. Let the scan finish before proceeding.
3. Confirm RTSP Stream
Once the scan completes, Blue Iris should auto-populate the main stream URL. Click OK twice to return to the main window and check the live video feed.
You can leave the advanced options below the stream profile fields at their defaults unless you’re troubleshooting.
Typical RTSP formats for our brands:
- Avalonix: rtsp://[IP]/cam/realmonitor?channel=1&subtype=0
- AvaEye: rtsp://[IP]/media/video1/
- SCI: rtsp://[IP]/ch1/0
If the video does not load or the auto-generated URL is unsuccessful, manually enter the correct RTSP stream in the Stream profile section and try again.
Tip: If you see a black screen or error, test the RTSP stream in VLC Player. If it works there, the issue is likely due to your settings or a bug within Blue Iris.
4. Double-check the Sub-Stream profile
If you plan to use motion detection or want to reduce CPU usage, you can configure Blue Iris to analyze the substream while reserving the main stream for recording.
- Leave the Mainstream RTSP path as is.
- In the Sub-stream field, verify that it matches the expected format for your camera:
- Avalonix: ...?channel=1&subtype=1
- AvaEye: .../media/video2/
- SCI: .../ch1/1
This dual-stream configuration reduces the load on your computer’s hardware while keeping high-quality video for events.
5. Configure PTZ (If it doesn’t work right away)
For PTZ-capable models:
- Go to the PTZ/Control tab.
- Make sure Pan/Tilt/Zoom is enabled. It’s usually checked by default.
- Under Control Type, select Network IP and choose ONVIF (OXML).
- Adjust the options as needed.
Use the arrow buttons in the preview window to test movement. If PTZ doesn’t respond:
- Double-check that the camera’s ONVIF user account has control privileges.
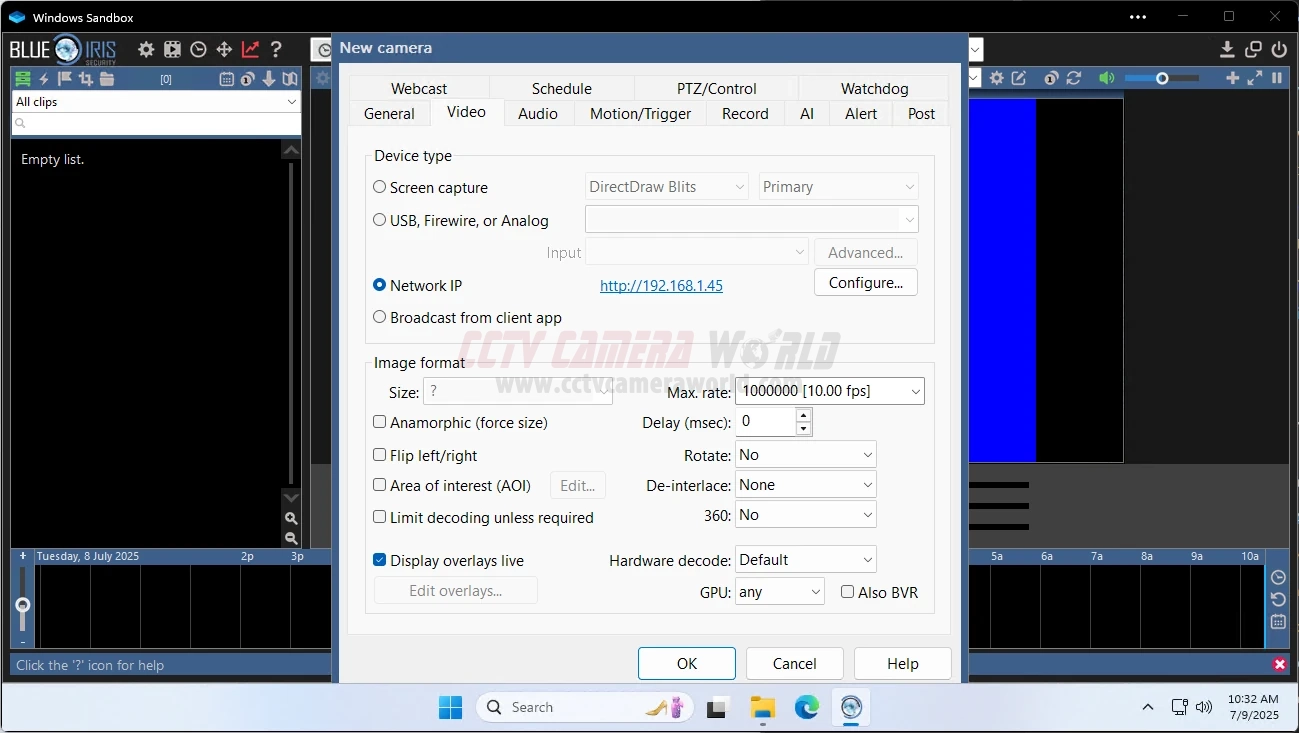
6. Save and Confirm
When you're satisfied with the settings:
- Click OK to save and exit the camera configuration window.
- A live video feed should appear in the Blue Iris interface within a few seconds.
- If motion detection was left enabled, Blue Iris will begin recording events automatically.
- You can also manually record by clicking the camera icon at the top left of the interface.
Why Is My Camera Not Working Properly in Blue Iris?
After adding your camera to Blue Iris, it’s important to confirm that everything is working as expected. A stable video feed, working audio, and responsive PTZ controls are all signs of a successful setup. Incorrect IP settings, incorrect RTSP URLs, leaving the Smart Codec on, or inconsistent keyframe intervals are the most common causes of problems in Blue Iris. If something isn’t behaving correctly, the table below can help you identify the issue quickly.
| Symptom | Likely Cause | Quick Fix |
|---|---|---|
| No Signal / Black Screen | a. Incorrect RTSP URL b. Wrong username/password c. Firewall blocking Blue Iris d. Smart Codec enabled in camera e. Keyframe interval set too high | a. Test RTSP URL in VLC first b. Verify credentials in web interface c. Add a firewall exception for Blue Iris d. Disable Smart Codec e. Double keyframe interval to FPS |
| Choppy, Laggy, or Delayed Video | a. CPU overloaded b. Resolution or FPS too high c. H.265 decoding overhead | a. Lower resolution by one tier (e.g., 4MP to 2MP) b. Set FPS to 10 or 15 c. Reduce bitrate d. Switch to H.264 |
| Stream Drops After a Few Minutes | a. DHCP lease renewal b. IP conflicts c. Unstable Wi-Fi if using wireless security cameras d. 100 Mbps switch in network chain | a. Assign a static IP or DHCP reservation b. Improve WiFi signal strength or use a stronger access point c. Upgrade to Gigabit PoE switches |
| PTZ Not Responding | a. Compatibility issue b. ONVIF permissions disabled c. Blue Iris using wrong control channel | a. Some PTZs may not be compatible with Blue Iris b. Enable ONVIF in camera settings c. Rerun the Blue Iris Find/Inspect tool to re-add the cam |
| Audio Not Working | a. Audio disabled in camera b. Unsupported audio codec c. Blue Iris audio input disabled | a. Enable audio in the camera b. Use PCM or G.711 instead of AAC c. Enable audio in Blue Iris Camera Properties Audio tab |
| High CPU Usage | a. Too many high-FPS or 4K streams b. H.265 without hardware decoding c. Direct-to-disk misconfigured | a. Lower FPS b. Switch to H.264 encoding c. Enable hardware decoding (GPU required) d. Verify streams are fluid Reduce camera count or upgrade CPU |
At this stage, your camera should be fully operational within Blue Iris and ready for advanced configuration, such as setting motion zones, adjusting recording modes, or enabling remote viewing through the Blue Iris mobile app.
If issues persist, test the camera’s RTSP feed directly in VLC to isolate the problem. You can also refer to our support documentation or contact us with your order number for assistance. We only offer support for cameras purchased from us.
Conclusion
Using Blue Iris with our IP cameras is a flexible and powerful way to build a custom surveillance system tailored to your specific needs. Whether you're adding a single camera to an existing setup or managing a full site with multiple video streams, our ONVIF-compatible cameras integrate smoothly with Blue Iris without locking you into proprietary hardware or software.
We’ve tested our cameras extensively with Blue Iris to ensure reliable performance, and the setup steps in this guide reflect the same process we recommend to integrators and customers in the field.
If you're just starting out, we also offer a comprehensive range of PoE switches, cabling, and accessories to help you complete your system. And if you encounter any issues not covered in this guide, our support team is ready to help troubleshoot and ensure your cameras are working exactly as expected.
To find the right camera or confirm compatibility with Blue Iris, contact our support team or browse our IP camera selection for models we’ve verified to work with third-party VMS platforms like Blue Iris.
Blue Iris FAQ for CCTV Camera World Cameras
Do CCTV Camera World IP cameras work with Blue Iris 5?
Yes. All current Avalonix Premium Series, AvaEye, and Security Cameras Inc (SCI) IP cameras support ONVIF and RTSP, so they can be added to Blue Iris 5 as network IP cameras. Your PC and network just need to meet Blue Iris' basic requirements, and the camera must be reachable on the LAN.
How many of your cameras can I run on one Blue Iris PC?
Blue Iris itself supports up to 64 cameras per full license, but the real limit is your hardware. A modern Intel i5 or AMD Ryzen 5 can usually handle a small system of 4-8 cameras. Systems with 8 or more high-resolution cameras, or many 4K cameras, benefit from having an i7/i9 or Ryzen 7/9 CPU and plenty of RAM (32 GB or more). If CPU usage exceeds 70-80 percent, you may want to consider upgrading.
Should I use H.264 or H.265 with your cameras in Blue Iris?
For most systems, H.264 is the safest choice because it is easier for Blue Iris to decode and works well on older PCs. H.265 reduces bandwidth and storage, but you should only use it if the computer running Blue Iris has reliable hardware decoding (Intel Quick Sync or a supported GPU). If you see stuttering, high CPU usage, or "No signal" errors with H.265, switch it back to H.264.
What RTSP URL should I use for Avalonix, AvaEye, and SCI cameras in Blue Iris?
Often, Blue Iris will discover the stream automatically when you choose Generic/ONVIF and run Find/Inspect, but knowing the typical patterns helps. For example:
- Avalonix: rtsp://[IP]/cam/realmonitor?channel=1&subtype=0
- AvaEye: rtsp://[IP]/media/video1/
- SCI: rtsp://[IP]/ch1/0
If auto-discovery does not succeed, please enter the correct URL into the stream profile fields using the example for your camera series and try again.
Why does Blue Iris show "No signal" even though the camera works in the web interface?
Usually, "No signal" means Blue Iris is not getting a valid RTSP stream. Common causes include an error in the RTSP URL, an incorrect username or password, H.265 on a system that cannot decode it, Smart Codec being left on, or firewall rules blocking traffic. Always test the RTSP URL in VLC first; if it works there, the problem is almost always in your Blue Iris configuration rather than the camera.
Can I use WiFi cameras with Blue Iris, or do I need PoE?
Blue Iris can connect to both wired and WiFi IP cameras, including our wireless models, as long as the camera supports ONVIF or RTSP. However, for 24/7 recording and multi-camera systems, we strongly recommend wired PoE to avoid drops during peak congestion and increased latency. WiFi is better suited for light-duty or difficult-to-run-cable locations, not as the backbone of a large Blue Iris system.
Will Blue Iris use the AI events, SMD, or IVS analytics from your cameras?
No. Blue Iris receives video, audio, and basic ONVIF control, but our AI events (smart motion detection, human/vehicle filters, IVS rules, face detection, etc.) are processed internally by the camera and do not come through as Blue Iris events. Those features still work on the camera itself and can be used for on-camera recording with SD card storage, but Blue Iris will rely on its motion detection engine.
Do you provide support for using Blue Iris with non-CCTV Camera World cameras?
No. We only provide support for Blue Iris setups that use cameras purchased directly from CCTV Camera World. If you add third-party cameras to the same Blue Iris system, they may work, but we cannot troubleshoot those devices or guarantee their behavior with Blue Iris.
Can I mix your cameras with other brands in the same Blue Iris system?
Yes. One of the advantages of Blue Iris is that it can connect to many different camera brands that support ONVIF or RTSP. You can mix our cameras with other manufacturers in the same Blue Iris layout. Just keep in mind that we only provide support for cameras purchased from CCTV Camera World.
How do I reduce high CPU usage when using your cameras with Blue Iris?
Start by lowering frame rates to around 10-15 FPS, especially for 4K cameras, and make sure you are using H.264 instead of H.265. Enable and correctly configure substreams so Blue Iris uses a lower-resolution stream for motion detection and viewing multiple cameras. Using a modern Intel i5/i7 or Ryzen 5 CPU, a surveillance-rated hard drive, and gigabit networking will also help.
Do I still need an NVR if I use Blue Iris with your IP cameras?
Not necessarily. Blue Iris plus a strong PC can replace an NVR for many small and medium systems, especially if you want flexibility. However, for large systems or users who do not want to manage a Windows PC, a dedicated PoE NVR is simpler to set up, more efficient, and easier to maintain. Some customers run both: the cameras feed into Blue Iris running as a PC client, while the NVR provides a backup, or vice versa.