


Using IP Cameras with ZoneMinder: Setup & Troubleshooting Guide

ZoneMinder is a free, open-source video surveillance platform that lets you turn a regular PC or Linux server into a full-featured security system. People seeking control, flexibility, and privacy, rather than a proprietary security camera system or cloud subscription, may find it appealing.
In this guide, we will walk through how to use ZoneMinder with professional IP cameras from CCTV Camera World, including our AvaEye, Avalonix Premium Series, and Security Cameras Inc lines. You will learn how to connect our cameras over RTSP, choose the right stream settings, and avoid common pitfalls that can waste storage or cause issues with recording.
If you are still deciding what type of camera to use, our Guide to ONVIF cameras explains what to look for in a flexible IP camera for third-party software like ZoneMinder.
Whether you are building a small system for a home lab or a multi-camera setup for a business, the goal of this guide is to help you get a stable, reliable ZoneMinder installation using cameras that are designed for 24/7 recording, not just casual home use.
Table of Contents
- Watch: How to Add IP Cameras to ZoneMinder
- Best IP Cameras for ZoneMinder
- Are CCTV Camera World Cameras Compatible With ZoneMinder?
- Who Should Use ZoneMinder With Our Cameras
- What is ZoneMinder?
- What You'll Need Before Setting ZoneMinder Up
- Choosing the Right Stream Settings for ZoneMinder
- How to Add an IP Camera to ZoneMinder
- Configuring Recording
Watch: How to Add IP Cameras to ZoneMinder

Key Takeaways from the Video
- ZoneMinder can connect to CCTV Camera World IP cameras using each camera's RTSP stream.
- Use the correct RTSP path for your camera line: AvaEye, Avalonix Premium Series, or Security Cameras Inc.
- Set the ZoneMinder Source Type to Ffmpeg when adding the camera as a new monitor.
- Use TCP as the connection method for a more stable RTSP stream.
- Match the capture resolution in ZoneMinder to the camera's actual resolution, such as 1920 x 1080, 2592 x 1944, or 3840 x 2160.
- If the camera does not load, test the RTSP stream in VLC first to confirm the camera path, username, password, and IP address are correct.
Best IP Cameras for ZoneMinder
While ZoneMinder supports any camera with RTSP, these camera models below offer the best performance with its CPU-based recording engine. These recommendations from our AvaEye line focus on cameras with customizable bitrates, solid low-light clarity, and stable H.264/H.265 encoding across both main and substreams. Whether you're building a custom home camera server or a large installation for a business camera system, these affordable NDAA-compliant ZoneMinder-compatible cameras provide reliable 24/7 performance and problem-free integration.
For most ZoneMinder builds, PoE cameras are the most practical choice because they carry power and video over one network cable, stay online more reliably than WiFi cameras, and are easier to manage in a wired surveillance network.
Our Picks
Resolution: 5MP (3K) |
Features: Smart Detection, Audio, IR 100ft, Wide 110deg view |
Best for: Balanced ZoneMinder performance |
Facial Distance: 35 feet
Resolution: 8MP (4K) |
Features: Smart Detection, Audio, IR 100ft |
Best for: 4K detail in ZoneMinder |
Facial Distance: 45 feet
Resolution: 8MP (4K) |
Features: Active Deterrence, IR 100ft, White LED 82ft, Wide 110deg view |
Best for: Low-light ZoneMinder recording |
Facial Distance: 45 feet
Resolution: 5MP (3K) |
Features: AI Detection, Audio, IR 100ft |
Best for: Budget recording |
Facial Distance: 35 feet
Resolution: 8MP (4K) |
Features: Motorized Zoom, 2-way Audio, IR 100ft, Active Deterrence |
Best for: Active monitoring |
Facial Distance: 45 feet - 150 feet (daytime)
Are CCTV Camera World Cameras Compatible With ZoneMinder?
Yes. Our AvaEye, Avalonix Premium Series, and Security Cameras Inc. IP cameras are fully compatible with ZoneMinder through their built-in RTSP video streams.
We have tested multiple models across 2MP, 4MP, 5MP, and 8MP resolutions, and all stream reliably into ZoneMinder using standard H.264 or H.265 RTSP formats. Because our cameras follow established ONVIF and RTSP conventions, no special firmware or steps are usually required. In rare cases, you may need to test alternate RTSP paths or settings if a camera does not connect on the first try.
If you are coming from lower-end consumer brands like Reolink, Annke, or Amcrest, you will notice that our cameras offer more bitrate customization, better performance at night, and stable 24/7 streaming, all of which matter when working in video management software like ZoneMinder.
Who Should Use ZoneMinder With Our Cameras
ZoneMinder is a good fit if you:
- Are comfortable working with Linux or willing to learn
- Want a self-hosted system that does not depend on cloud accounts
- Prefer to own and control your recordings on local PC storage
- Do not mind spending time tuning camera streams, storage, and motion detection
ZoneMinder is not ideal if you:
- Want something you can plug in and use with minimal setup
- Do not want to maintain a Linux server or troubleshoot network issues
- Prefer an interface that feels more like a consumer DVR or NVR
For nontechnical users or those who want a reliable system that does not require ongoing maintenance, it usually makes more sense to invest in a wired IP camera system that is designed to work out of the box with our cameras.
What is ZoneMinder?
ZoneMinder is an open-source video management system (VMS) for Linux that turns a PC or server into a full surveillance recorder. Once installed, it provides live monitoring, motion detection, event tagging, and multi-camera playback through a web browser. Unlike commercial NVRs, ZoneMinder is highly customizable and does not require licensing fees or proprietary hardware.
It is best suited for users who appreciate full control over their system and do not mind configuring Linux services, network settings, or camera stream parameters. While the interface is more pragmatic than aesthetic, it is powerful once properly tuned and has an active community behind it.
Key Features:
- Live camera monitoring and playback via a web browser
- Motion detection and event-based recording
- Remote access through mobile apps like ZMNinja
- Camera support through RTSP
- Open-source with active community development and forums
Keep the following in mind:
- ZoneMinder only runs on Linux (Ubuntu is recommended for simpler installation)
- Setup requires knowledge of networking and a good understanding of Linux
- The interface is functional but less polished than commercial options like Synology or Blue Iris
Despite the learning curve, ZoneMinder is a reliable option for users who want a private, flexible surveillance setup with no licensing fees or recurring costs.
What You’ll Need Before Setting ZoneMinder Up
System Requirements Overview
Before connecting any IP cameras to ZoneMinder, ensure that your computer and network are ready. For help with camera setup, visit our How to Set Up a PoE IP Camera - Beginner's Guide. These are the baseline requirements for a stable system:
- A PC or server running Ubuntu (24.04 LTS recommended)
- ZoneMinder is successfully installed and accessible through a web browser. We followed iConnor’s official guide here:
https://zoneminder.readthedocs.io/en/latest/installationguide/ubuntu.html
- At least one ONVIF compatible IP camera from CCTV Camera World (AvaEye, Avalonix Premium Series, or Security Cameras Inc)
- The camera’s IP address, username, and password
- A wired Power over Ethernet connection
Recommended Hardware Specifications
For smaller setups (1–4 cameras):
- Quad-core CPU (Intel i5 or Ryzen 5 equivalent)
- 8GB RAM minimum
- Gigabit network card
For larger setups (5+ cameras or 4K streams):
- 6-core or higher CPU (Intel i7/Ryzen 7 or server-grade Xeon/Threadripper)
- 16GB+ RAM
- 10-Gigabit network card
Note: ZoneMinder relies heavily on CPU decoding. GPU acceleration is optional and limited, so plan for CPU load accordingly.
Tip: For either setup, consider using separate internal drives for the operating system and video storage to reduce I/O bottlenecks.
LAN and Bandwidth Considerations
IP cameras can consume significant local bandwidth. As a general guideline:
- A 1080p camera at 15 FPS uses ~2–4 Mbps
- A 4K camera at 20–30 FPS uses ~8–12 Mbps
For smooth recording and live viewing:
- Use gigabit-capable network cable everywhere possible
- If you have five or more 4K cameras, consider segmenting your camera network into a VLAN and using a dedicated NIC in your ZoneMinder server
Choosing the Right Stream Settings for ZoneMinder
ZoneMinder can work with any of our cameras using their RTSP video streams, but selecting the right settings makes a big difference in CPU usage, motion detection accuracy, and storage consumption.
This section explains the key settings you should understand before adding a camera to your ZoneMinder system.
Mainstream vs. Substream (What They Are and When to Use Them)
Most AvaEye, Avalonix Premium Series, and SCI cameras provide two RTSP streams:
- Mainstream: Highest resolution and bitrate; ideal for recording.
- Substream: Lower resolution; ideal for motion detection or live previews when CPU resources are limited.
In ZoneMinder:
- Use the substream for the “Analysis” or motion detection feed.
- Use the mainstream for recorded footage and high-quality review.
This approach drastically reduces CPU load, especially with 4MP or 4K cameras.
Recommended Bitrate and FPS Settings
These values will give you an idea of what your cameras are capable of and what ZoneMinder handles well. You can adjust these three values in your camera’s encoding settings page before adding the RTSP stream to ZoneMinder.
For typical indoor or outdoor surveillance:
- 1080p (2MP):
- Bitrate: 2048–6144 Kbps
- Framerate (FPS): 15–20
- Keyframe Interval: 30-40
- 2K (4MP) cameras:
- Bitrate: 4096–8192 Kbps
- Framerate (FPS): 15–20
- Keyframe Interval: 30-40
- 4K (8MP) cameras:
- Bitrate: 6144–12288 Kbps
- Framerate (FPS): 15–20
- Keyframe Interval: 30-40
Why these bitrate values?
Choose a higher bitrate to improve clarity, especially for motion or low light. Lower bitrates result in more efficient storage usage.
Why not 30 frames per second?
Lower FPS reduces CPU decoding load on ZoneMinder without harming detail significantly.
Why is the keyframe interval double the frame rate?
Welcome to video encoding 101. The keyframe interval is typically set to twice the frame rate. For example, at 15 FPS, you would use a keyframe interval of 30; at 20 FPS, you would use a keyframe interval of 40. A keyframe is a full, uncompressed frame or image. “Delta” frames, on the other hand, show the changes that happen between each keyframe. ZoneMinder performs better when keyframes arrive at predictable intervals because it reduces how much decoding work it has to do.
Storage Planning Basics
Storage use depends on bitrate, FPS, motion sensitivity, and how many hours contain movement. As a rough guide:
- A single 4K camera at ~8 Mbps uses around 2.8 TB per month if recorded continuously.
- A 1080p camera at ~4 Mbps uses about 1.2 TB per month continuously.
Using motion detection (Modect) instead of 24/7 recording can drastically reduce storage requirements, up to 40–60%, depending on the environment.
A Note on H.264 vs. H.265 in ZoneMinder
ZoneMinder supports both H.264 and H.265, but CPU decoding requirements and overhead for H.265 are higher. For systems with limited CPU resources, H.264 is often the safer choice, especially when recording multiple 4K cameras.
How to Add an IP Camera to ZoneMinder
Before You Start: Quick Setup Checklist
- The camera is powered and connected to your network or PoE switch
- You can access the camera’s web interface from a browser
- The camera has a static IP address or DHCP reservation
- You have verified the username and password
- RTSP streaming is enabled (on most models this is enabled by default)
- ZoneMinder’s web console is reachable
- Your system time, and camera time are aligned with NTP set (prevents timestamp issues)
Step 1: Access the ZoneMinder Console
Open a web browser and navigate to your ZoneMinder server’s IP address. For example:
http://192.168.1.100/zm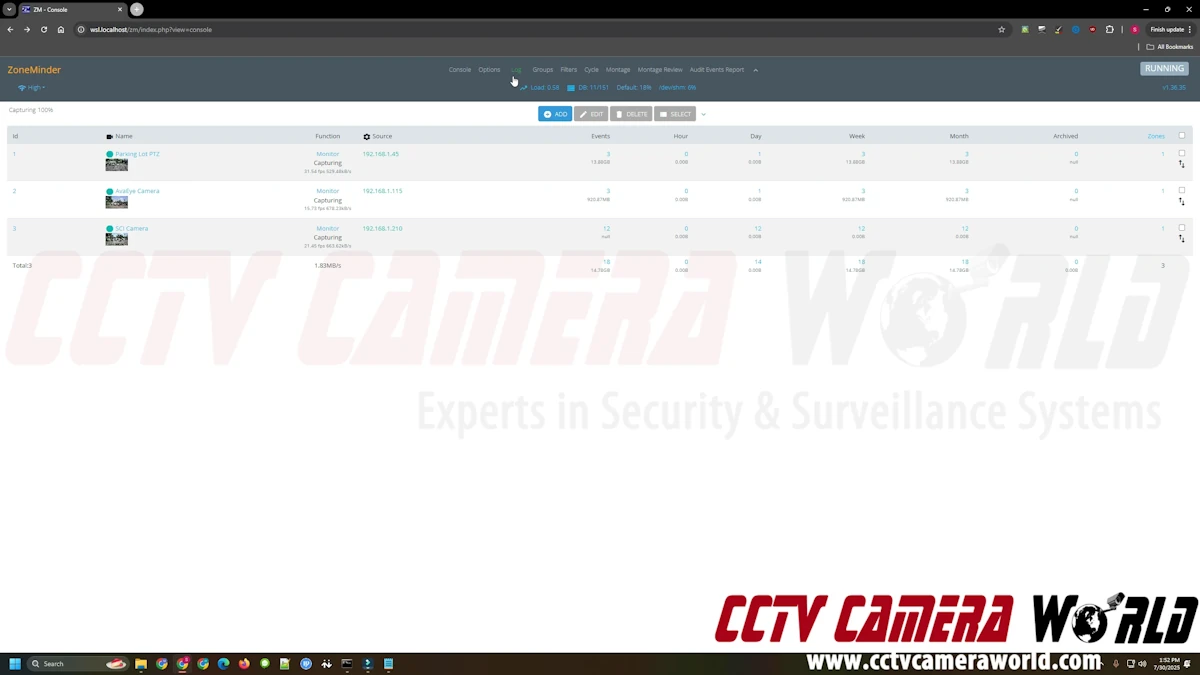
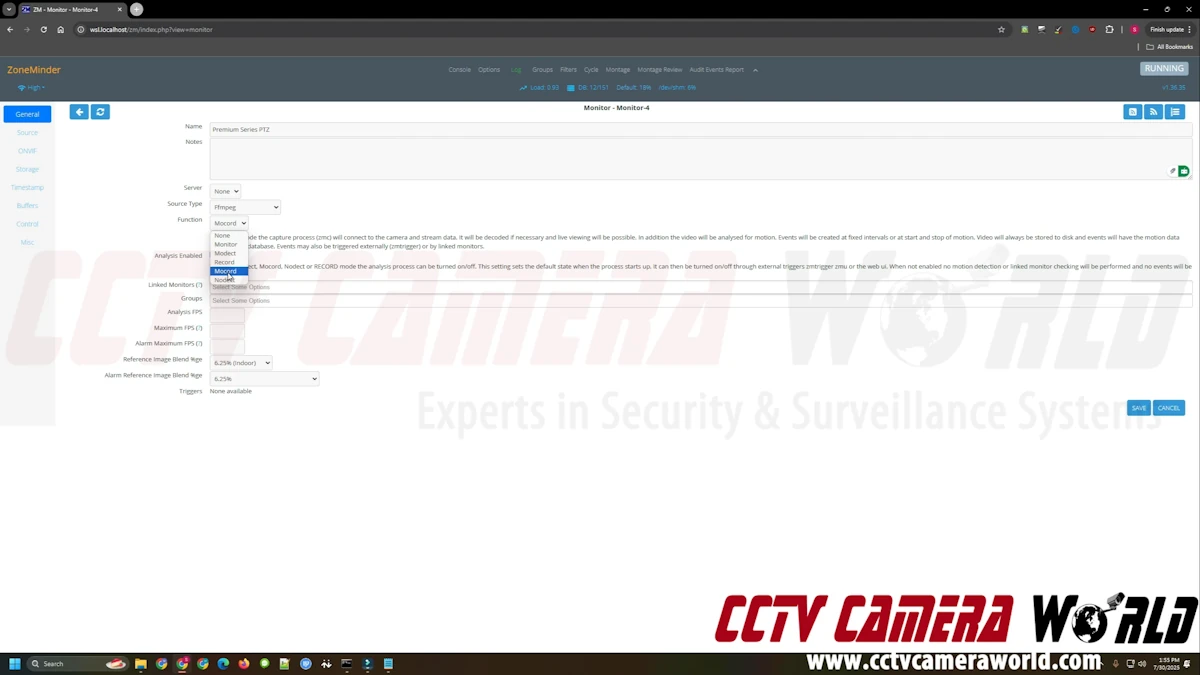
Step 2: Add a New Monitor (Camera)
- Click Add to create a new monitor. In ZoneMinder, a monitor is simply a camera.
- Under the General tab:
- Set the Name (e.g., Front Door)
- Set the Source Type to Ffmpeg
- Set the Function to one of the following:
- Monitor (live view only)
- Modect (motion detection and recording)
- Mocord (continuous 24/7 recording with motion events)
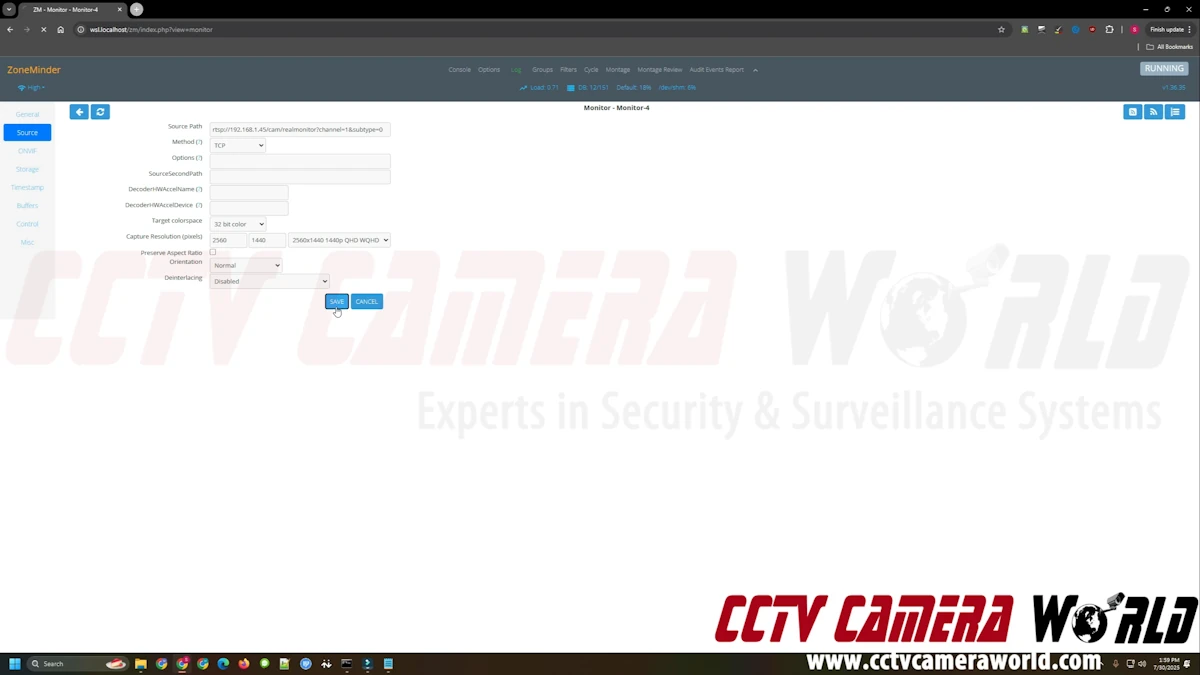
Step 3: Configure the Source
Switch to the Source tab and enter the camera’s RTSP connection details.
Use the following format, and refer to the references below for help with determining what to enter.
Only the following fields are required:
- Source Path: [RTSP URL for your camera]
- Method: TCP
- Target colorspace: 32-bit color
- Capture Resolution (pixels): [Resolution of your camera]
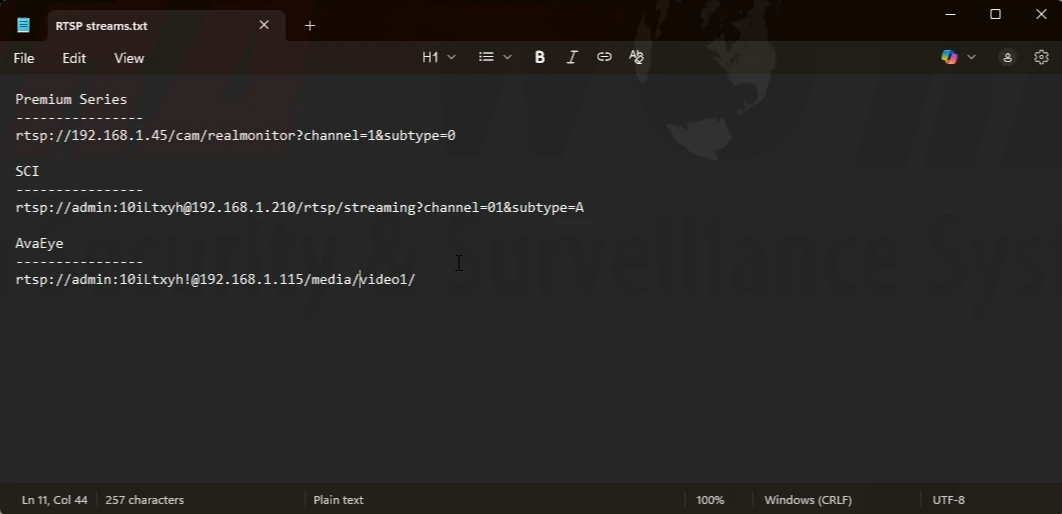
Avalonix IP Camera RTSP Stream Templates
Use the template that corresponds to your camera series for the RTSP path. Replace the text and brackets with the information specific to your camera. For a more thorough explanation of RTSP URL streams, watch the video in this guide.
Avalonix Premium Series
rtsp://[Username]:[Password]@[IP Address]/cam/realmonitor?channel=1&subtype=0
AvaEye
rtsp://[Username]:[Password]@[IP Address]/media/video1/
Security Cameras Inc
rtsp://[Username]:[Password]@[IP Address]/rtsp/streaming?channel=01&subtype=A
Avalonix IP Camera Resolution Quick Reference
If you’re unsure what resolution to choose but know what the megapixel rating of your camera is, refer to the following table or use the dropdown menu within ZoneMinder.
| Megapixel Rating | Resolution in ZoneMinder |
| 2MP | 1920 x 1080 |
| 4MP | 2560 x 1440 |
| 5MP | 2592 x 1944 |
| 8MP | 3840 x 2160 |
Step 4: Save and Test
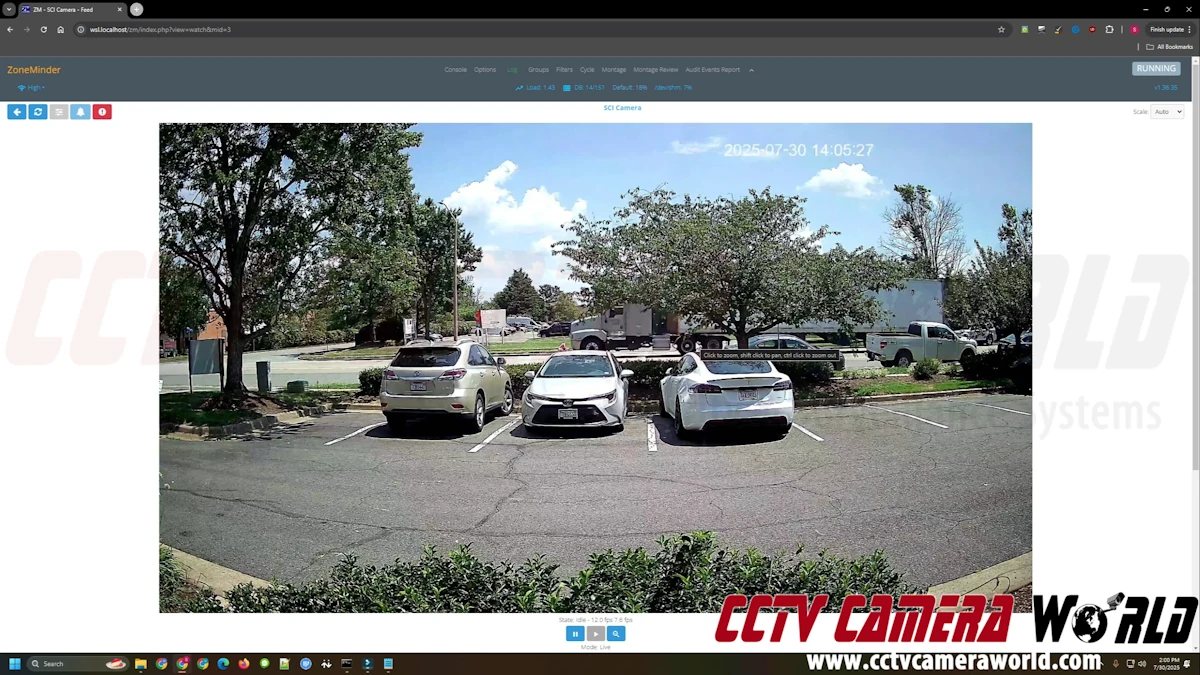
Click Save to add the monitor. Return to the main console and verify the camera feed by clicking the preview thumbnail. It may take a few seconds for the connection to complete and an image to appear.
If the feed does not load:
- Double-check the IP address, credentials, and RTSP URL
- Confirm that the camera is on the same subnet and reachable from the ZoneMinder server
- Open the RTSP stream in VLC Media Player to confirm it's working
- Ping the camera from the server to ensure network connectivity
Configuring Recording
ZoneMinder supports multiple recording modes, including motion detection, continuous recording, and combinations of the two. For most users, Modect (motion detection) offers the best balance between storage usage and event coverage.
Choosing a Recording Mode
When you create or edit a monitor, you can choose its Function under the General tab. Here’s what each option does:
- Monitor: Live view only with no recording.
- Modect: Motion detection recording only occurs when motion is detected.
- Record: Continuous recording saves all footage, regardless of activity.
- Mocord: Continuous recording along with motion detection tags, providing 24/7 video surveillance and marking motion events for easy review.
- Nodect: Like Modect, but without motion zones.
We recommend starting with Modect and fine-tuning from there.
Tips for Motion Accuracy
- Ensure the scene is well lit, as low light will increase false positives.
- Do not place the camera behind glass if you’re using infrared to prevent IR reflection and overexposure.
- For outdoor scenes, exclude areas with a lot of movement, like trees, roads, or water.
Frequently Asked Questions about ZoneMinder
Does ZoneMinder support two-way audio with IP cameras?
ZoneMinder does not support two-way audio cameras. Some cameras may send an audio channel over RTSP, but playback and compatibility vary. For reliable two-way talk, use an NVR security camera system.
Can ZoneMinder record to a camera’s SD card?
No. ZoneMinder records only local storage on the computer running the software. If your camera has a microSD slot, it will continue recording locally during a network outage, but ZoneMinder cannot automatically sync or backfill that footage.
How do I test my RTSP stream before adding it to ZoneMinder?
You can test any RTSP stream using VLC Media Player. In VLC, navigate to the Media > Open Network Stream menu, enter your camera’s RTSP URL, and verify that the video plays smoothly.
Is ZoneMinder better than using an NVR?
It depends on your goals.
- ZoneMinder is flexible, open, and ideal for users who want full control and have experience with Linux (or are curious to learn).
- A wired NVR system offers plug-and-play setup, two-way audio with supported cameras, polished mobile apps, lower maintenance, and other built-in features.
- ZoneMinder is powerful, but an NVR is usually the better choice for anyone who wants a simpler, more predictable experience.
Can I use WiFi cameras with ZoneMinder?
Yes. WiFi security cameras that receive an IP address on your local network can be added to ZoneMinder using RTSP just like wired cameras. For best reliability, we recommend wired connections, but WiFi models can work well for hybrid setups or locations where running cable is not practical.
What happens if my network goes down?
If your camera has a microSD card, it can continue recording locally during a network outage. However, ZoneMinder will not automatically back-fill that video. You will need to access the footage from the camera.