

How to Stream an IP Camera to Twitch
The internet has emerged as the predominant platform for most people to access entertainment, news, and cultural content that matters to them. The live streaming video market has expanded significantly due to the contributions of industry titans such as Amazon's Twitch, Google's YouTube Live, and Meta's Facebook Live. There are countless creators in this digital realm who stream a variety of activities, including video gaming, "Just Chatting," and hosting TV-style events.
At CCTV Camera World, we are proud to offer a game-changing solution — security cameras with built-in streaming capabilities. Utilizing RTMP (Real-Time Messaging Protocol) technology, our Live Streaming Camera models can directly broadcast video to platforms like Twitch without a computer or separate encoder. Keep reading to learn how to get your camera up and streaming to Twitch!
Table of Contents
- Requirements
- Bench Test and Access the Camera
- Crafting the RTMP URL
- Starting the Stream to Twitch
- Video Tutorial
- Embedding your Twitch Stream to your Website
- Choosing the Right Resolution for Livestreaming with IP Cameras
-
-
-
-
 4K PTZ Camera with Auto Tracking, 25X Zoom, Smart AI Detection, Active DeterrenceSKU: IRPTZ4KAD$999.99 $1,299.99 23% off
 -

Requirements
- Live Stream Camera from CCTV Camera World
- Windows PC for setup
- PoE injector or PoE switch (Power over Ethernet)
- Reliable Internet with Fast Upload Speed. Static external IP preferred, and a fiber internet connection is recommended, especially for 4K livestreaming.
- Twitch Account (click this link for more information on how to create a Twitch account)
Bench Test and Access the PoE Streaming Camera
Before you can begin streaming with the camera, you'll need to power it up, connect it to your network, and access the camera's web interface. We recommend conducting a 'bench test' to test and connect the camera before permanently installing it at its final streaming location. Fortunately because it is a PoE camera it is very simple to connect and quickly bench test.This approach not only helps you become more familiar with the camera's features and functionality but also ensures that it successfully connects to your Twitch account.
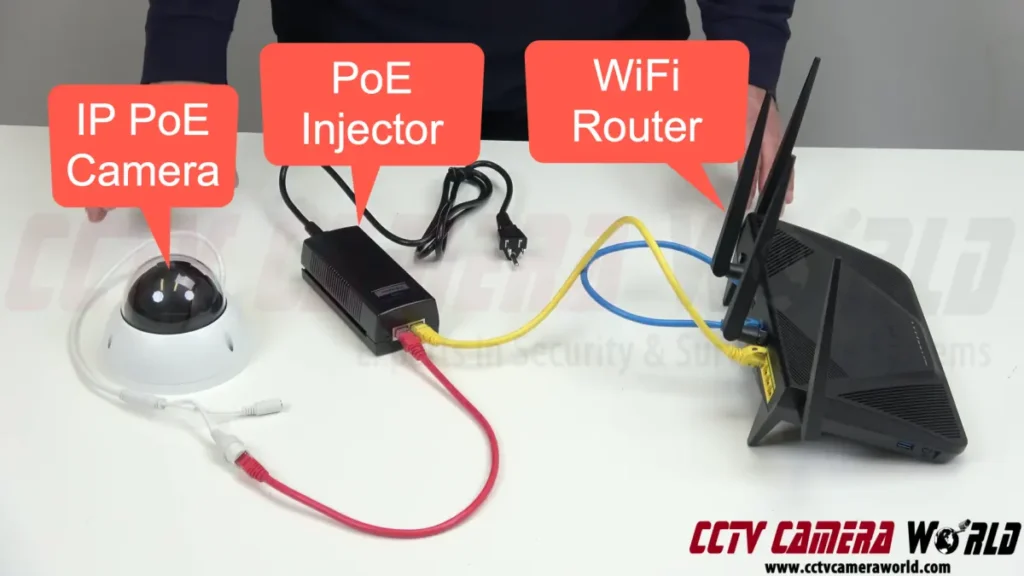
- Begin by powering the streaming IP camera: connect it to the PoE injector using an Ethernet cable. Check the labels above the ports on the PoE injector to understand their functions. Ensure that the PoE injector is plugged into a power outlet and is operational; most models have a status light indicating if they are receiving power. Typically, our injectors use the label “P+D” (Power and Data) for the port that connects to the camera. The other port, usually labeled "Data," should be connected to your router or modem.
To access the camera’s web interface, open your preferred web browser (like Chrome, Microsoft Edge, Firefox, etc.) and enter the camera’s IP address in the address bar. You can initiate the search by clicking your browser’s “Go” button or pressing Enter on your keyboard.
The IP address is generally found on a label on the camera’s box. You will need to use the ConfigTool software to find the camera on your local network if it lacks a label or if you did not provide our shipping team with a specific IP address for your local network.
- As long as the camera is correctly configured for your network and you’ve entered the right IP address, you should be able to access the camera's web interface and proceed with the rest of this guide!

Crafting the RTMP URL
If you've successfully accessed your camera's web interface, you've conquered the most challenging part of setting up your video stream on Twitch! The following steps will guide you through accessing your Twitch account and crafting an RTMP URL. This URL will be entered into your camera to start the stream. Before proceeding, ensure that you have an active Twitch account and have fulfilled all their streaming prerequisites.
- You’re going to need to create a string of text known as an RTMP URL to copy and paste into your camera. Open up your preferred notepad or text editing software, or better yet, use Microsoft’s aptly named Notepad!
- To obtain the second part of the RTMP URL, open Twitch in another browser tab or window and log into your Twitch account. Don’t worry, you’ll get the first part of the URL soon.
- On the Twitch homepage, click your account icon on the top-right side of the website. In this menu, select the “Creator Dashboard” option.
- Within the Creator Dashboard, click the “Stream Manager” option in the left-hand menu.
On the Stream Manager page, click the “Edit Stream Info” button on the right-hand side under “Quick Actions.” The Quick Actions menu may be at the bottom of your Stream Manager page.
This pop-up window allows you to set your title, “going live” notification, category, tags, and stream language. Remember to click “Done” to save your changes.- Next, locate your stream key within your Twitch account.
- While in the Creator Dashboard, click the “Settings” option in the main left-hand menu. This opens a submenu where you should click the “Stream” option.
Your stream key is hidden in the Settings and Stream page until you click the “show” button.
As the warning states: “Never share your stream key with anyone or show it on stream! Twitch Staff, Admins, or Global Moderators will never ask you for this information.”
Click “I Understand” to reveal your stream key.
You can copy the stream key by clicking the Copy button or by highlighting it, right-clicking, and selecting Copy. Alternatively, for the tech-savvy, use the CTRL+C and CTRL+V keyboard shortcuts.
Paste your stream key into the notepad you opened in step 1.Now, determine the best 'ingest' server for your video stream. Typically, the 'best' server is the one closest to you. In our video, ours is in Ashburn, Virginia, a hotspot for data centers.
This step is simpler than it sounds. Visit the following URL and copy the #1 recommendation into your notepad:
Finally, to complete your stream RTMP URL, append your stream key to the end of the stream ingest server. Here’s an example of what a correct stream key looks like:
rtmp://iad05.contribute.live-video.net/app/live_661156169_GAlAQIGv4zRndJMOM117X4toAD5BIi


Starting the Stream to Twitch
With the RTMP stream URL ready in Notepad and your camera's web interface open, you're all set to bring your stream online! To start this section and your stream, ensure you're back in your camera's web interface.
- Log into your camera using the username and password found on the label on the camera’s box.
- Click on the “Settings” button located at the top right of the web page.
- Navigate to the “Network” menu on the right-hand side to access the Network submenu.
- Within the Network submenu, select the “Access Platform” option.
- You should now see three tabs in the middle of the Access Platform page: “P2P”, “ONVIF,” and “RTMP.” Click on the “RTMP” tab.
- Tick the “Enable” checkbox.
- Choose the “Custom” option under Address Type.
- Copy and paste the RTMP URL you created earlier into the Custom Address text box.
Hit the “Save” button. You might see a notification about streaming; click “OK” to proceed. The camera will then start transmitting the video stream to Twitch.
If your RTMP URL is entered correctly, your stream should begin in just a moment!

Video Tutorial

As of 2025, Twitch requires viewers to be logged in to a Twitch account to watch streams above 1080p resolution (e.g., 1440p or 4K), whether on the Twitch website or in embedded players. Streams at 1080p or lower remain publicly viewable without login. If your plan is to embed your stream on a website or you expect a high number of public viewers, consider setting your camera to 1080p to maximize accessibility.
Embedding your Twitch Stream to your Website
After your Twitch stream is up and running and you’re watching it on the Twitch website, you can quickly embed the stream right on your website. Check out the Live Streaming Camera Sample on our blog, where one of our customers is hosting a real-time livestream! For a guide
- From the Twitch front-end webpage for your stream, click the share button at the bottom right. It looks like an up arrow with an underline.
- Click the Embed option from the “Share via” menu.
The next step depends on if you are a web developer, have one, or are a novice website owner. For more advanced users, consider using the Javascript embed option. For those with less experience, the iframe option is a more compatible and straightforward choice.
Regardless of the option you chose, you will want to copy the example code that Twitch creates. You can copy by right-clicking and clicking Copy or using the CTRL+C keystroke combination.
- Paste the example code in a text editor or directly into your webpage file (HTML, PHP, etc.).
- Replace the “parent=” placeholder URL if you are using the iframe option.
- If you used a text editor, paste the iframe into your live webpage and enjoy your newly embedded Twitch stream!


