

How to View a Security Camera from the Web

IP-based security cameras are becoming increasingly popular because they are easy to use and can be set up in many different ways. CCTV Camera World is an expert in surveillance cameras and systems that let you view what's going on in a number of different ways. There are three different ways that a user can watch their cameras: 1) using our free smartphone app; 2) using PC or Mac software; or 3) using a web browser on a PC or Mac computer. All of these methods allow for easy access to real-time and recorded video and can be used while at the location of the camera or away. Whether you want to install a new security camera or already have cameras from CCTV Camera World, this article will help you understand how you can use your computer or smartphone to view our IP security cameras.

This guide is for viewing a single or multiple IP cameras without a recorder. If you have a complete security camera system with a DVR or NVR and want to connect using the phone app, please visit our Dummies Guide for Remote Viewing guide.
Contents
- 3 Ways to View Security Cameras
- How to View Security Cameras While Away
- How to View Security Cameras While On Location
3 Ways to View Security Cameras by CCTV Camera World
The Premium Series of Avalonix cameras sold by CCTV Camera World are professional-grade items that let both new and experienced users enjoy a great, easy-to-use viewing experience. As mentioned in the introduction, there are three ways that our customers can view cameras. Each method has its own benefits, but they are all easy to set up by following our helpful guides, regardless of your level of experience with technology.
1. iPhone, iPad, Samsung, Android, and Tablet App
Viewing Avalonix surveillance cameras has never been more convenient, and best of all, it’s completely free of charge with the purchase of cameras or a complete security camera system. The app is available on most smartphones and tablet devices that have the Apple App Store or Google Play Store. It can be used while at the location of the system using the local WiFi or while away using cellular data or WiFi at another location. Multiple cameras and systems can be viewed and managed using a single app. Feel free to download the app using the buttons below to preview it, or use it to follow this guide!
2. PC and Mac Camera Monitoring Software
The second most popular option is the free PC or Mac camera monitoring software. While the software is typically used at the location of the system, it can also be used remotely. The PC software is a powerful way for Windows and Mac users to keep an eye on their cameras. It offers a greater variety of views and more management options than the phone app. The PC software is best for power users and people who spend lots of time at their computer and want to check on their cameras with a few clicks.
Compatible with MacOS Monterey or Catalina
Minimum PC Requirements (subject to change w/o notice):
OS: Windows 7, Windows 8, Windows 10
CPU: Intel i5 Quad Core 1.8GHz or higher
Graphics Card: Independent GPU that supports DirectX 8.0c or higher
Memory: 4GB or higher
Resolution: 1280x1024 or higher
Hard Drive: 512GB or more
Click here for M1 Mac
Minimum Mac Requirements:
CPU: M1 7 core or higher
Memory: 8GB RAM
HDD: 256GB or more
3. Web Browser
Last but not least, cameras can also be viewed using web browsers. You no longer need to install annoying and sketchy plugins for Internet Explorer. The Premium Series products by Avalonix work without a plugin with popular web browsers like Google Chrome, Apple Safari, Microsoft Edge, and Mozilla Firefox. Web browser access, similar to the PC client software, is usually used while at the location of the system. Web browser based viewing can also be done remotely through port forwarding or with the Camera Monitoring Software’s convenient “Link to Web” feature.
![]()
How to View Security Cameras While Away
To watch your camera while away from the location of the camera, a high-speed wired Internet connection is required. In the past, you had to set up complicated port forwarding on your Internet router in order to see your cameras while away. Now that technology has improved, all you have to do to connect to our cameras over the internet is scan a QR code for the camera. Once you have installed the correct smartphone app or PC/Mac software, you simply have to scan or enter the QR code of the camera and type in the login credentials.
This method uses a technology called P2P, or peer-to-peer, that uses the serial number of the camera to automatically connect the app to the device over the internet. It’s important to mention that this method also works to view an entire system while you are at the location of the system.
Outline of Steps
- Get Started
- Finding the QR code SN for a camera
- Adding a camera to the phone app using the QR code SN
- Adding a camera to the PC software using the QR code SN
1. Get Started by Connecting your Camera
- Connect the camera to your modem or router using an Ethernet cable.
-
Power the camera using a 12V DC power supply. Or, if you have a PoE switch or injector, connect the camera to the switch, and then make sure the PoE switch is connected to your modem or router via an Ethernet cable. Or, if it is a WiFi camera, first join it to the WiFi network by following our How to Use Wireless Security Cameras with a WiFi Router guide.

- The next steps involve finding the QR code to scan into the phone app and use for the PC software. You will want to have the QR code ready for the next steps that are about the smartphone app. The QR Code, or QR SN, is the private serial number for your camera. Do not share the QR code or password with anyone that you do not want to access your camera.
2. Finding the QR code SN for a camera

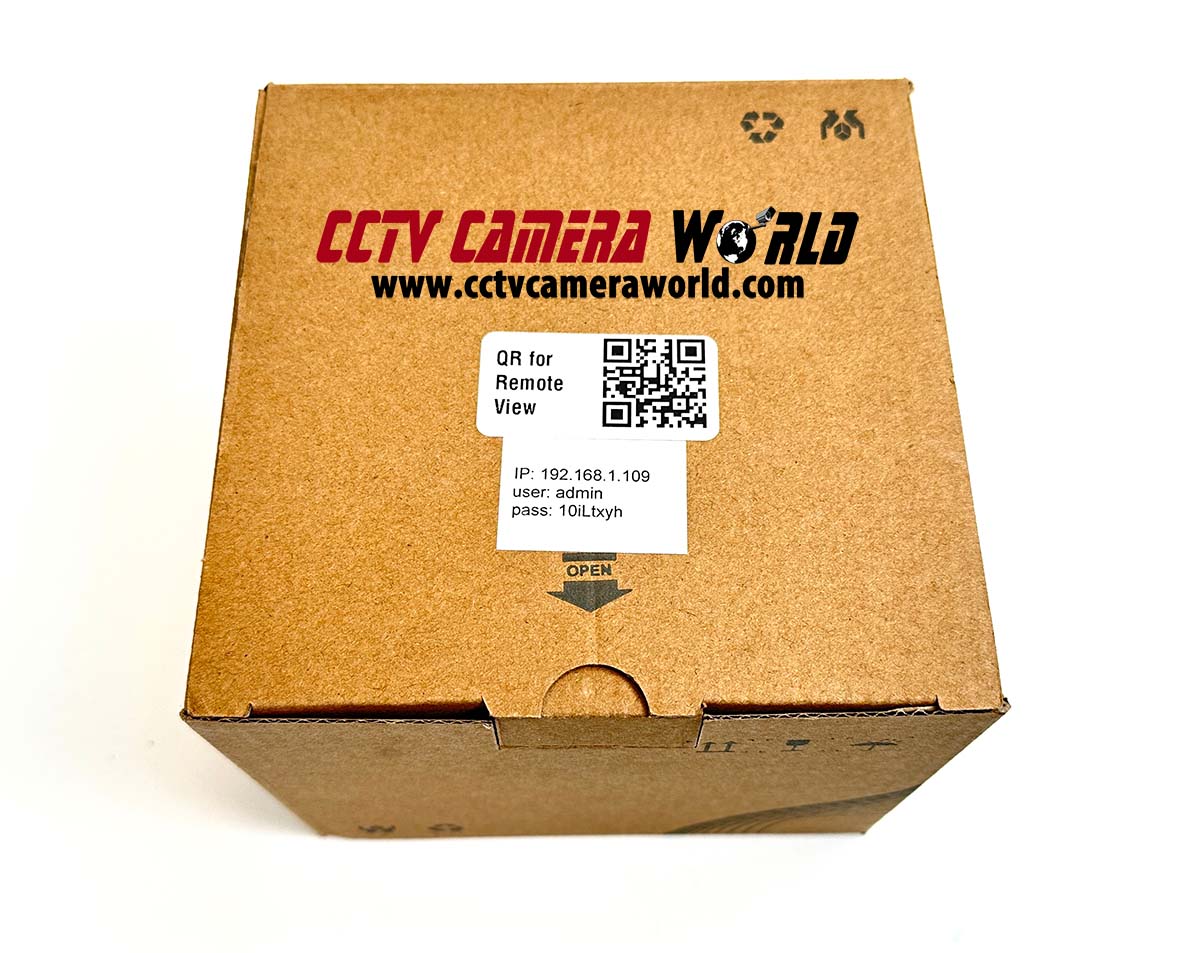
We typically don’t add the QR code to the camera’s box unless it is requested. If you’re interested in purchasing a camera for viewing from the app and want us to print the QR code for you, make sure you request it.
- When we ship orders with one IP camera, we usually request IP addresses for the customers local computer network. We set the camera to a static IP address which means it will not change unless it is changed by the customer.
- If we set a static IP address for your camera, you will find a label located on the camera's box with the IP address, username, and password information.
- A static IP address makes it as simple for the customer to locate and access the camera's web interface as possible. The QR code which allows an easy connection to the camera can be found in the web interface of the camera.
- To access a camera's web interface, type the camera's IP address into a web browser and press Enter. If you’re unsure what the camera’s IP address is, we recommend following our How to Find Your IP Camera on the Network guide to learn how to download and use the ConfigTool software. The software lets you change the IP address and has a browser button that, if the IP address of the camera is compatible with your network, automatically connects to the camera using Microsoft Edge. If you still can't get into the camera's web interface, we can help you with networking over a remote desktop support session if you purchase a networking support appointment. Appointments must be scheduled at least 24 hours in advance and are available Monday through Friday from 10 am to 4 pm EST.
- The QR code can be found by navigating in the web interface through the Setting menu. The order of action to find the QR code is: Click Setting > Click Network > Click Access Platform. The QR Code and SN is in the P2P tab of the Access Platform page.
After you’ve found the QR code SN for your camera it’s time to scan it into the phone app or add it to the PC software. These steps assume you have successfully installed the app to your phone or computer software to your PC or Mac using the links at the top of this guide.
3. Adding a camera to the phone app using the QR code SN
If you have a complete security camera system and are adding a DVR or NVR to the phone app, please visit our Dummies Guide for Remote Viewing guide for easy-to-follow video tutorials, as this guide is for a single or multiple IP cameras without a recorder.
- Open the App and navigate to the Home screen. If this is your first time opening the App, you can skip through the intro screens and decline to make an account. Making an account will bind the camera to the email address you enter, which makes it difficult to add a camera to more than one phone.
- Tap the plus (+) icon at the top right of the app.
- Tap the SN/Scan button. The App may ask you for permission to use your phone’s camera. Tap Allow.
- Position your phone’s camera to place the QR code SN in the view of the scanner. If you’re unable to scan the QR code, you can tap the “Manually Enter SN” button to manually type the SN listed under the QR code. You do not need to enter a security code. Tap “Next.”
- Select the appropriate device type. The device types are: Wired Camera, or Wireless Camera. Choosing an incorrect device type may prevent the app from connecting.
- Type in a Device Name. The name can be anything like “Office Cam”, “Home Cam”, “My Cam”, etc.
- Tap on the Password field and type in the password for your camera. The password can be found on a label on the camera’s box.
- Tap the Save button at the top right.
- Tap the Completed button at the bottom. Voila! You’ve successfully added your camera to the app. To learn more about using the app visit our iPhone iPad App for Remote Viewing your Security Cameras guide.
4. Adding a camera to the PC software using the QR code SN

You can also add an IP camera to the PC software using the QR code SN. This method is flexible because it does not rely on IP addresses, so the software can be used on a laptop anywhere there is an Internet connection. These steps assume you have installed the Camera Monitoring Software for your Mac or PC and gotten to the home or devices screen.
- If you’re not on the “New” tab page click the “+” icon at the top of the software. It will open the “New” tab page, also known as the home page. However, if you’re already in the “Devices” tab when you open the software, you can skip to Step (c) below.
- Click the “Devices” button in the “Configuration” section at the bottom. This opens the “Devices” screen where you can add cameras to the software.
- Click “Add” at the top of the Devices page.
- Enter in a “Device Name”. You can enter whatever you would like such as “Office Cam”, “Jim’s Cam”, “Home Cam”, etc.
- Click the drop-down “Method to add” and click “SN(For Device Support P2P)”
- Enter the P2P QR SN that you found in Step 2.
- Leave “Group Name” as the Default Group option.
- Enter the User Name: admin
- Enter the password for the camera. If you don't know the username or password, look at the label on the top of the camera’s box.
- Click the “Add” button to finish adding the camera to the software. Repeat steps c) through i) if you have more than one IP security camera that you want to add to the software.
- Follow the tutorials in our How to use the Camera Monitoring Software guide to learn more about using the software.
How to View Security Cameras While On Location
There are two ways that you can view cameras while at the location of the cameras. The method you choose will depend on whether you have an internet connection or not. IP cameras and PoE security camera systems do not require an internet connection to work over a local network router.
You can still view your cameras over local WiFi without an internet connection from a modem as long as the camera and your phone or PC are connected to the same local network.
The internet is only required to view the system when you’re not at the location or to add the cameras using the QR code serial number method. The QR code-based connection method is the easiest way to quickly connect to your camera or system via our free mobile app and PC software.
We've added a list of instructions and a tutorial video to this guide to make it as complete as possible. Make sure you read the instructions and watch the videos for a comprehensive understanding. The instructions below assume you know how to and already have installed the app on your phone or software on your PC or Mac.
Outline of Steps
- Adding a Camera Using the QR Code Serial Number - Requires Internet
- Adding a Camera Using the Local IP Address - Internet Not Required
- Get Started
- Adding a camera to the phone app using the local IP address
- Adding a camera to the PC software using the local IP address
- Accessing a Camera Using the Local IP Address in a Web Browser
1. Adding a Camera Using the QR Code Serial Number - Requires Internet
The easiest way to add a camera to the app or software is by using the convenient QR code method. This method uses a technology called P2P, or peer-to-peer, that uses the serial number of the camera to automatically connect the app to the camera over the internet.
This method requires that the cameras have an internet connection, but you don't need to know anything about port forwarding or computer networking to use it. It’s important to mention that this method also works to view the system while away, as explained in the above section titled “How to View Security Cameras While Away.”
To learn how to add the camera to the app or software using the QR code, click the link below to be taken to the video and instructions.
How to Add a Camera to the Phone App Using the QR Code
How to Add a Camera to the PC Software Using the QR Code
2. Adding a Camera Using the Local IP Address - Internet Not Required
If you plan on watching your camera(s) or system while you’re on site, or if you don’t have an internet connection but do have a local network, then you can add cameras using their local IP address.
It is important to note that this section is difficult for people who do not understand computer networking or what an IP address is.
If you are not familiar with computer networking and do not feel like learning about it, we recommend relying on the QR code method; however, the QR code method requires an internet connection. This method needs a router that sets up a local computer network even without an internet connection from a modem.
Get Started
- Connect the camera to your modem or router using an Ethernet cable.
-
Power the camera using a 12V DC power supply. Or, if you have a PoE switch or injector, connect the camera to the switch, and then make sure the PoE switch is connected to your modem or router via an Ethernet cable. Or, if it is a WiFi camera, first join it to the WiFi network by following our How to Use Wireless Security Cameras with a WiFi Router guide.
- The next steps involve finding the IP address to put into the phone app and use for the PC software.
- When we send cameras we usually request an IP address from the customer before it ships. This makes it as easy as possible for the customer to locate the camera in the network, or use the IP address right away to add it to the app or software. The IP address we set it to can be found by looking at the label on the top of the camera’s box.
- If you don't know the IP address for your camera, there are many ways to find the IP address of cameras that are connected to a local network, but the easiest way is to use the ConfigTool software. We recommend following our How to Find Your IP Camera on the Network guide to learn how to download and use the ConfigTool software. Keep in mind that you will need to download a copy of the ConfigTool software while you have an internet connection. You could also copy the installation files from a computer with internet access to a USB thumb drive and then copy them to the computer at the remote location.
- After you’ve found the IP address for your camera, it’s time to add the camera into the phone app or add it to the PC software using the address. These steps assume you have already installed the app to your phone or computer software to your PC or Mac from the links at the top of this guide.
- Open the app and navigate to the Home screen. If this is your first time opening the app, you can skip through the intro screens and decline to make an account. Making an account will bind the device to the email address you use, which makes it difficult to add a camera to more than one phone.
- Tap the plus (+) icon at the top right of the app.
- Tap IP/Domain.
- Tap the appropriate device type. The device types are: wired camera, or wireless camera. Choosing the wrong device type may prevent the app from connecting.
- Leave the Port field as the default 37777.
- In the Address field type the IP address that the camera is set to.
- Type in a Device Name. The name can be anything you want like “Office Camera”, “Home Cam”, “Backyard Camera”, etc.
- Tap on the Password field and type in the password for your device. For cameras, the password will be found on a label on the camera’s box.
- Tap the Save button at the top right. Voila, you’ve successfully added your device to the app using it’s IP address. You can learn more about using the app to live view and watch recorded video by visiting our iPhone iPad App for Remote Viewing your Security Cameras guide.
- If you’re not on the “New” tab page click the “+” icon at the top of the software. This will open the “New” tab page, also known as the home page.
- Click the “Devices” button in the “Configuration” section at the bottom. This opens the “Devices” screen where you can add cameras to the software.
- Click “Add” at the top of the Devices page.
- Enter in a “Device Name”. You can enter whatever you would like such as “Office Cam”, “Parking Cam”, “Home Cam”, etc.
- Make sure the “Method to add” has the option “IP/Domain” selected.
- Enter the IP address that you found in Steps 2D or 2E above.
- Leave “Group Name” as the Default Group option.
- Enter the User Name (usually admin)
- Enter the password. The password for the camera can be found on the label on the camera's box.
- Click the “Add” button to finish adding the camera to the software. Repeat steps R) through X) if you have more than one camera that you want to add to the software.
- Follow the tutorials in our How to use the Camera Monitoring Software guide to learn more about using the software.
- Last but not least, after you’ve confirmed the camera is connected to the network and you’ve found the IP address, you can use the address in a web browser.
- Simply type the IP address into the address bar of the web browser and hit Enter on your keyboard.
- The web browser should automatically redirect to the web interface for your camera. If it doesn't, then you may need to add http:// before the address.
- For example, a common web address for a camera is: http://192.168.1.109. Replace the 192.168.1.109 with the IP address for your camera if it is different.
Adding a camera to the phone app using the local IP address

Adding a camera to the PC software using the local IP address
Since the PC software is typically used on a local network anyway, this is how cameras are added to the PC software using the camera’s IP address.

3. Accessing a Camera Using the Local IP Address in a Web Browser

Viewing Using Linux Operating Systems
For our more tech-savvy customers you can also easily view our cameras and systems from most Linux distros. The HTML5 interface works with Firefox and other browsers commonly found within Linux operating systems.
