

Xfinity Router Port Forwarding

This article will take your through the process of port forwarding your Xfinity router. Port forwarding is a necessary process of establishing port rules within your router to allow internet traffic outside your home network to access your security system. This in turn allows you to view your live camera feeds from wherever you are, on your phone or through your internet browser.
This is a very straightforward process that consists of establishing port rules within your router. The ports you are making the rules for are your HTTP and TCP ports. Our DVRs ship out with the following defaults. IP address of 192.168.1.108, port number 80 for HTTP and 37777 for TCP.
If you need help finding your network information, follow this guide located here: https://www.cctvcameraworld.com/port-forwarding-for-dvr-and-nvr/
To properly configure your router, you need to know a few pieces of information regarding the network you are on. You must find your network's "Default gateway." You also must make sure your DVR is under the same default gateway. What this means is that if your default gateway is 192.168.0.1, then your must change your DVRs IP address to reflect this, such as 192.168.0.108. Also, there is a chance that port numbers 80 and 37777 are being used by another service on your network, or possibly blocked by your ISP. In this event, you must change the port number to something that isn't being used and change the associated port number in your DVR's networking section to reflect this change.
Step 1) Access your router
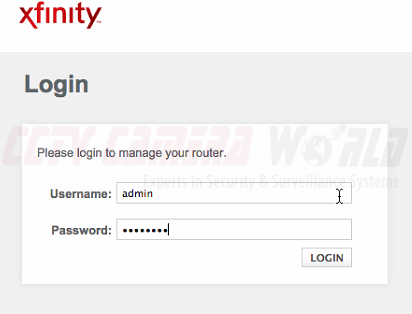
The first step is to access your router. You do so by typing the default gateway of your network into your internet browser. In this scenario, our default gateway was 10.0.0.1, so we changed our DVR's IP address to 10.0.0.45. Keep this in mind when we are creating our port rules. Once you type in your default gateway, this will bring you to the login screen of your router where you will type in your login credentials. If you do not know the login information of your router, then you can try searching online for the defaults, or contacting your ISP for this information.
Step 2) Find the appropriate networking section
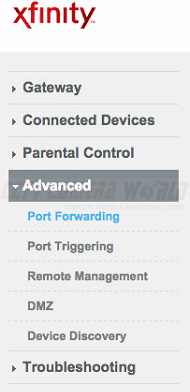
The next step after accessing your router is to find the appropriate port forwarding section of your router where you will make the port rules. On the left tab, you select the option "advanced" to open the drop down menu. Then you select the option "port forwarding."
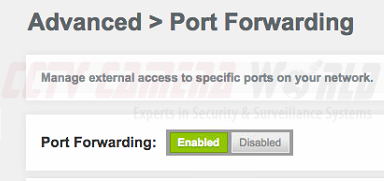
This will bring you to the appropriate port forwarding section. You will see an option to enable or disable port forwarding. You must click "enable" to allow the rules you are about to create take effect.
Step 3) Create the port rules
Now you should see a button for "Add Service." Click this to begin the first port rule.

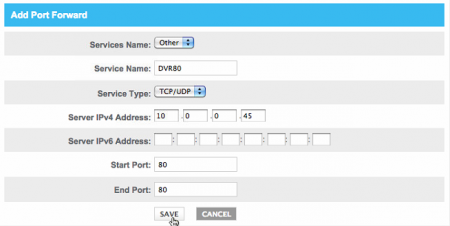
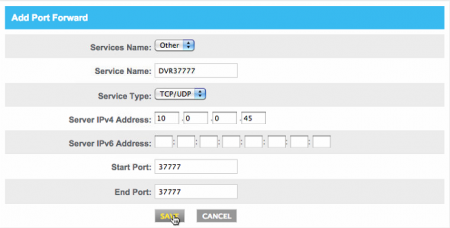
Under "Services Name" click "other" from the drop down menu, then under "Service Name" name the port rule something relevant like "DVR80." Service type should be "TCP/UDP." Where it asks for "Server IPv4 Address", type in the DVR's IP address, for us it is 10.0.0.45. Skip "Server IPv6 Address" and finally for "Start Port" and "End Port" type in the port number of the associated port, again for this rule it is 80. Click save to finalize this rule.
Now that you have created your first port rule, you must then complete this process again for port number 37777. Go through all these steps again, but where you typed 80 before you now use 37777. Once you are finished hit save. Once you are brought back to the menu for port forwarding, you should see the different port rules have been created.
Step 4) Testing the ports
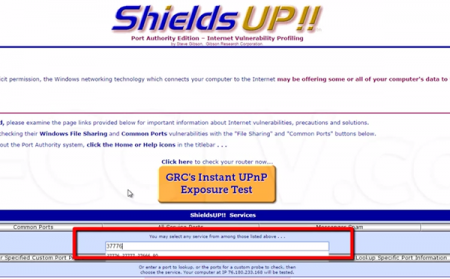
Once you have created both port rules, you will want to test these ports to see if they are in fact open or closed. To do this, we suggest using a service like GRC scan, found here: https://www.grc.com/shieldsup
Click "proceed" to go on to the next page. Here you will have a bar that you will type in the port numbers of the ports that you would like to scan. Type in 80 and 37777 separated by a comma. Click "user specified custom port probe" to initiate the port scan.
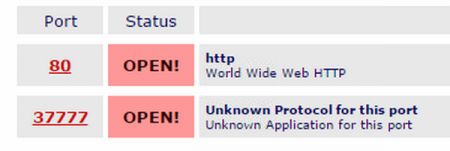
On the following page, you will see the results of the port scan on your network. This results range from "open", "closed", and "stealth." If the rules were created properly and there are no other complications, than every port should say "open." If both ports read "open", then you should be done and ready to connect to your DVR remotely.
However if the port rules say "closed" then more than likely the port rules were created inappropriately and you will have to go back into your router to determine what went wrong. If the port read "stealth", then this points to a possible issue with your ISP. Your ISP could be blocking these ports for whatever reason and you will more then likely have to contact them to resolve the port issue.
Once you determine if your ports are open, you will be able to connect to your DVR via your phone or online. If you need help on how to access your DVR in these ways, we suggest our written guide located here: https://www.cctvcameraworld.com/port-forwarding-router/#howtoaccessdvr