

How to Use Premium Security Systems by Avalonix

This guide contains everything you need to know about the Avalonix Premium Series Systems and Recorders. Whether you're a novice setting up your first Avalonix security system or an advanced user looking to expand your knowledge of these systems, this guide is for you. Discover the many ways to harness the power of your Avalonix Premium Series recorder and cameras for enhanced security and peace of mind.
Contents
- Bench Test Before You Install
- Making Cables
- Get the Most Out of Your Security Cameras
- Logging In and Using the NVR or DVR
- Remote Viewing from a Smartphone or Tablet
- Viewing Cameras from a PC
- Troubleshooting
Bench Test Before You Install
Before installing any cameras, it's crucial to bench-test the equipment. This process will help you familiarize yourself with the equipment and ensure that both the recorder and cameras are operational.
We rigorously test all our products before shipping to guarantee they arrive in working condition. If you encounter issues with your cameras and have skipped the bench test, the problem is likely due to your cabling, power supply, or mishandling.
Making Cables
If you're purchasing a roll of cabling and connectors, it's essential to understand proper crimping standards and techniques.
Depending on your equipment, you'll use one of two types of cabling.
- IP PoE cameras require ethernet network cables with RJ45 connectors, such as CAT5e or CAT6
- Analog security cameras should be used with RG59U Siamese Coaxial cable with BNC connectors and power connectors.
For more on cable types and crimping tips, see our guide: Security Camera Cable: How to Choose.
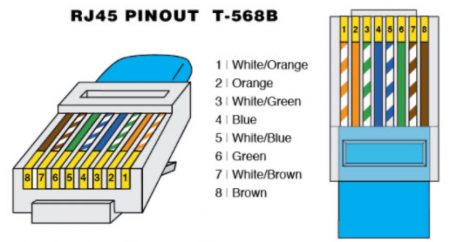
Ethernet Network Cable for IP PoE Cameras
Ethernet cables comprise 8 color-coded wire leads, grouped into 4 pairs of solid and striped colors. Most devices, including PoE security cameras, use the T568B Ethernet standard for crimping. Refer to the graphic below for the correct T568B crimping method. Using an incorrect crimping method will damage the cameras, PoE switch, or NVR.
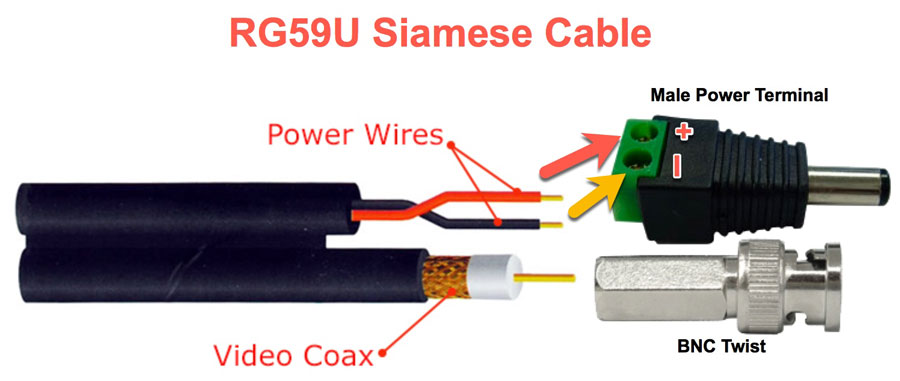
BNC Siamese Coaxial Cable
Coaxial cable consists of two distinct cables, one for video and one for power. The video cable is a single line conductor featuring a black or white jacket, a plastic insulator, and either a copper or copper-clad aluminum core. The power cable is a two-lead conductor, generally colored black and red, for DC power transmission. It is standard to use the red wire for positive, and black wire for ground or negative.
Three methods exist for terminating BNC cables: Twist-on, Crimp, and Compression. The simplest method is the twist-on, requiring a twist-on connector and coax wire stripper.
If you’re using a 12V DC analog CCTV Camera, in addition to the BNC connector, the 2 lead power wire has to be terminated with a male power terminal.
Get the Most Out of Your Security Cameras
High-quality security cameras aren't cheap. Protect your investment during installation. For IP PoE cameras, use the provided weather grommet. Regardless of the camera type, shield the connectors. Consider purchasing optional camera brackets or junction boxes. Remember, UV rays can damage video image sensors, so avoid directing cameras towards sunlight.
For more advice, see our guide: How to Get the Most Out of Your Security Cameras
Logging In and Using the NVR or DVR
Even before you install your cameras, it is a good idea to bench test and get yourself acquainted with the equipment. All of the security camera recorders we sell at CCTV Camera World are standalone systems. They do not require the Internet to connect to the cameras that are wired on the back.
You can turn on the DVR or NVR, connect it to a HDTV or computer monitor, and access settings by logging in as the system's admin user.
We print the pre-set password in multiple places, including the recorder's top, and the "Getting Started" pamphlet.
For tutorials on how to login and adjusting various settings, view our guide on How to Use Your Security Camera System
Remote Viewing from a Smartphone or Tablet
Remote viewing is a frequently asked feature by our customers. All of the Avalonix Premium Series NVRs and DVRs offer easy remote viewing capability as long as they are connected to the main internet router. All you have to do is download and install the free remote view app on your iOS or Android Smartphone or Tablet, and scan the QR code from the recorder into the App. For best results, we recommend having a fast wired broadband internet connection with at least 5mbps of upload speed at the location of the recorder.
Before shipping your recorder, our technicians enable the remote viewing settings. On the top of the recorder you will find 2 QR codes: one for downloading the app and another to link your system to the app.
For an introduction and setup guide to remote viewing these systems from your mobile device, see the Dummies Guide to Watching a Security Camera System From The Internet.

For additional tips and tricks on how to use the App, be sure to read our guide about the iPhone and iPad App for Remote Viewing Your Security Cameras.
Viewing Cameras from a PC
Though the phone-based remote viewing app is more popular, the free Camera Monitoring Software for Windows PCs is invaluable for many business customers. This software offers a streamlined interface for managing and monitoring the Premium Series Avalonix cameras and recorders. One of its primary benefits is the capability to view cameras from multiple systems simultaneously. If remote viewing is enabled on the recorders and you've linked them using their P2P code, you can monitor the systems, no matter their global location.
Web Browser Access
Modern web browser technology has revolutionized the way we interact with security camera and recorder interfaces, offering a seamless and intuitive experience right from the web browser—without the hassle of installing plugins. This plug-in-free approach simplifies access, ensuring that you can monitor and configure your security camera systems with just a few clicks. Whether you're adjusting settings or viewing live feeds, HTML5 compatibility means these tasks are more streamlined, reducing potential compatibility issues and security concerns associated with third-party plugins. By leveraging modern browsers, users can enjoy a more robust, responsive, and user-friendly interface that enhances the overall efficiency and convenience of managing their security systems.
Web Browser Access using a Windows PC

Web Browser access using Linux
Although it is not as popular as other operating systems, Linux is used by many IT professionals and computer hobbyists. Linux generally offers more security and customization, as well as better performance in some tasks. In the video below, we showcase how our professional security cameras and systems are accessible on a Linux operating system. In the video, we show Ubuntu, which is one of the more popular and easy-to-setup distributions; however, it’s worth noting that web access is available from any computer that has an up-to-date HTML5-enabled web browser installed.

PC Software
For links to downloading the PC software and tutorials on its use, please see our guide on How to Use the Camera Monitoring Software.

Troubleshooting
Occasionally, customers face challenges when setting up their surveillance system. While problems are rare, they can arise for a variety of reasons,
As stated earlier, we ensure all products are in perfect working order before shipping. So if something seems amiss, it's likely an issue with the customer's existing setup, cabling, or an inadvertent mistake.
NVR and DVR Troubleshooting
NVRs and DVRs, which are essentially specialized computers, seldom need troubleshooting. Two primary issues might arise:
- The recorder doesn't boot up, with only a power light indicating life.
- The recorder starts but does not display a picture on the TV or monitor.
For either scenario, our Security Camera System Troubleshooting walkthrough is the best reference.
IP Camera Troubleshooting
Thanks to Power over Ethernet and plug-and-play technology, IP cameras and NVR recorders are usually hassle-free. However, if a camera isn't detected, it can be perplexing. Potential issues include:
- The camera doesn't power on (no IR lights in darkness).
- A password error or blank textbox appears on the NVR screen.
- "Network Host Not Found" or another network error pops up.
Our reference for figuring out these scenarios is within our How to Troubleshoot a Security Camera article.
HD Coax and Analog Security Camera Troubleshooting
Analog CCTV cameras are slightly more complex due to their multiple components and potential failure points. Generally, issues with these cameras arise from pre-existing cables or power supplies. If you can verify the camera is powered on, problems might include:
- Flickering video, distortion, or strobing lines.
- Nighttime problems: camera shuts down, dim infrared LEDs, or a whitish glow in the image.
These topics and more are covered in our guide, How to Troubleshoot HD Security Cameras Over Coax.