

Security Camera System Troubleshooting

When your security camera system stops working it is one of those events that make you go “Now what?” There's plenty of stuff in life going wrong and the last thing you need is your camera system to stop working. Fortunately for you, as our customer, the reliability of our systems is barnone. Most of the time any issues that arise are due to user error, or misconfigured settings.
We're not kidding when we say our systems don't break down often. It may be hard to believe it but it is true. We are not in the business of selling products that take up your time or ours. We spend most of our time creating useful guides and resources such as this one so our customers have information available at their fingertips at any hour of the day or night. When we do get phone calls for support, of course some are bonafide support issues for a user needing guidance on how to use their system, but most are from customers of other companies hoping we can help them with a system they purchased from Amazon or Costco.
If you have navigated the interwebs to this page, or were directed to this page then you are in the right place if you want to figure out exactly which component in your camera system is not working.
There are multiple components to a security camera system that may make it seem like it's not working, i.e the screen is totally black. That complaint that the screen is black or blank can mean two different things:
- There is no video at all on the monitor, i.e. the display output of the NVR or DVR on the system is not displaying any video
- There is a grid screen but no camera feeds, i.e. the NVR or DVR is working, has video displaying the grid screen but you don't see any video from security cameras
There are several components to check to determine which part of your camera system is not working. We explore them below in the following order:
- Make sure the DVR or NVR is working
- How to Fix Monitor Output using a Windows PC
- Make sure security cameras are working
- Fixing Display Issues with your DVR or NVR and Monitor or TV
We begin by making sure the security camera recorder in your system is working.
Make sure the recorder is working
In this section we show how to troubleshoot the security DVR that is the brains for any security camera system. You may have an NVR camera system or DVR camera system, but the troubleshooting process for the recorder is nearly identical.
There are two most common possibilities as to what might be going on with your recorder are:
- If the recorder was working and now is not, this usually indicates a power supply or display issue.
- If you recently purchased a recorder, and it never appeared on the monitor, it means that your monitor does not support the resolution the recorder is set to.
Check the Power Supply
Before delving too much into troubleshooting, always check the recorder's power supply. To prevent against surges and brown outs, connect the power supply or power cord to a surge protector or uninterruptible power supply unit. Sometimes the power supply is simply damaged as a result of a thunderstorm, outage, or surge. If you suspect your power supply has been damaged or is no longer operating, please contact our support staff to start an RMA. Please let us know if you suspect a power outage led to the recorder not working.
Troubleshooting the Recorder - DVR or NVR
To troubleshoot a security camera recorder we go through the following steps in detail below:
- Step 1. Reboot the recorder
- Step 2. Listen for a post beep
- Step 3. Check the connections on the back of the recorder
- Step 4. Check if there is activity on the Network Port
- Step 5. How to Troubleshoot a DVR or NVR - Video
If after going through the steps above you find the DVR is working but you have no display output to your monitor, then you will need to change the resolution of the video output as explained in the section title "How to Fix Monitor Output using a Windows PC."
Step 1. Reboot the recorder
Rebooting the system allows for any odd issues to clear themselves out. This is similar to rebooting a Windows computer when it has issues.
Reboot the system manually by switching the power switch on the back of the recorder to the off position. If the recorder does not have a switch, disconnect the power cable from the recorder. This process will not harm the recorder.
Reconnect power to the recorder and if applicable, flip the switch to the ON position. Listen for the hard drive powering on and spinning up. You may also hear a case fan, or the fan for the power supply start to spin.
Step 2. Listen for a post beep
Wait 2-5 minutes for the recorder to beep. This beep means that the recorder has booted up. If the recorder beeps but you are unable to see the display on the monitor it means that a display setting is incorrectly configured or your monitor does not support the recorder’s video resolution.
Step 3. Check the connections on the back of the recorder
Disconnect power to your TV or switch it off. Make sure that the monitor cable is secure, double check that the cable is secured into your monitor or TV. Disconnect, reconnect, and verify all connections are secure. Reconnect the power back to your TV or monitor.
Step 4. Check if there is activity on the Network Port
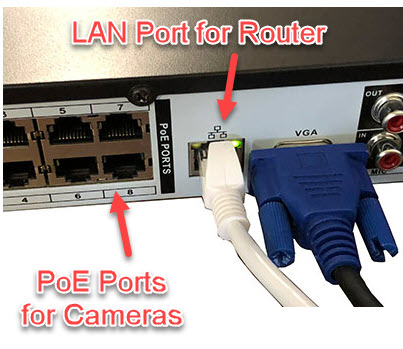
Check to see if the network port has activity. Connect a network cable from the back of the recorder to a router. Network ports have LED lights that show the status of the connection. Usually if the network port has an amber or green light it means that the recorder is working and connecting to the router.
On NVRs the network port is separate from the plug’n’play PoE ports, sometimes labeled “LAN."
Step 5. How to Troubleshoot a DVR or NVR - Video
For anyone who doesn’t like reading, watch our videos that describe how to troubleshoot a DVR or NVR below.

How to Fix a DVR displaying no video
As we mention in the section above, the most common mistake is when a customer changes their display settings to settings that their TV or monitor do not support. Other commonly misconfigured settings include enabling “Spot” mode, or “Tour” mode. Watch the videos below, and read the written instructions below to learn more about how to fix Monitor Output issues.
Step 1. Connect the DVR or NVR to a network router
If you haven’t already, connect the recorder to a router. This will allow a Windows PC to access the system over the network.
Step 2. Install the ConfigTool software on the PC
This step involves downloading and installing the configuration software available on our website.
The software can be downloaded by clicking the following link.
If prompted, extract the software before running it. If you need help installing the software it can be found in the video below, or in our Knowledge Base: Learn more about the ConfigTool software.
Step 3. Run the ConfigTool software and locate the NVR or DVR
Open the ConfigTool software after installing it. The software will scan the local network for any compatible devices. For this software to be able to scan the network make sure you don't have an antivirus or firewall software on your PC blocking it.
The device list will list the NVR or DVR and have buttons on the right hand side. One of the buttons is an E or Internet icon.
Clicking the (E) Internet icon will automatically open a web browser to the recorder interface.
Step 4. Login to the NVR or DVR web interface
After successfully reaching the web interface you will be required to login. Login to the recorder using the admin username and password. The password can be found printed on a label on the top of the recorder.
Step 5. Navigate to the Display settings

For models and recorders that have the latest 2020 interface the display settings can be found by following the steps below. For more information watch our informational video.
- After logging in, the main menu is made up of several selections. Those selections include: Live, Search, AI, Alarm, Maintain, Backup.
- Below the selection of menu options are a set of dots with arrows on each side.
- Click the right arrow to change the Menu page.
- On the second menu page you will see a Display option. Click Display to enter the Display settings menu.
- Check which resolution that your monitor or TV supports by reading it’s box, manual, or searching the model number on the internet.
- Select a supported resolution and scroll to the bottom of the web page to click the “OK” button to save the settings.
Further troubleshooting
The second component to troubleshoot is the security camera(s) in your system. To keep this series of posts simple to read, we've split further steps into different articles which you can follow in sequence by clicking below.