

How to Troubleshoot HD Security Cameras Over Coax

Unlike network based security cameras, HD security cameras over Coax use BNC RG59U siamese cable that is a combination of coax video and power wiring. Coax wire is difficult to crimp if you are using cable from a spool, which can lead to many mistakes being made when installing security cameras. It is important to understand how to properly run and crimp coax cabling to avoid careless mistakes that end up becoming time consuming. Another important factor when working with coax or BNC security cameras is power. Below we’ll cover some of the most common issues that can be investigated and resolved.
Briefly, here are the steps to troubleshooting HD over coax security cameras:
- Step 1. Make sure the camera is getting power
- Step 2. Check for video from the camera on the DVR
- Step 3. Make sure the cable is good
- Step 4. Is the issue only happening at night?
What you need to follow this guide
To troubleshoot a coax based security camera requires isolating the camera and testing it with known good components. We recommend dismounting any problematic BNC camera and bringing it indoors to test directly in front of the DVR. This process is called bench testing.
You will need the following to bench test a HD over Coax security camera:
- Camera - dismount and bring indoors
- DVR - known to be compatible with the camera
- Monitor - connected to the DVR so you can see whether the camera is producing video
- Coax cable - a short coax siamese cable that is known to be a good cable
- Power adaptor - a new power adaptor that is known to be the correct voltage and amperage for the camera
Before you start...
Oftentimes coaxial camera issues can be reduced down to one thing, the cable run. Test the camera with a short known-good cable and power adapter before going too far into troubleshooting. If the camera works with the short cable then it is easy to determine that the camera is working and the cable run or power delivery is the cause of the issue.
Ensure that the camera you are using is compatible if it was not purchased from our company. There are 5 signal types in the security camera market, and the commonly used CVI, TVI, AHD, and analog CVBS are compatible with security camera systems offered here at CCTV Camera World. Contact our support department via the support request button at the top right of the website to confirm the camera is compatible with DVR before following the troubleshooting procedures depicted in the video below, and described in further detail in the steps below.

Step 1. Make sure the camera is getting power
Just like PoE cameras the first thing to check is power. If cameras are not receiving power they will not be sending video back to the DVR. Here are some steps to take to verify your cameras are powering on:
- Make sure that the security camera power supply box or power adapter is powering on. Power supply boxes will have a LED light to indicate if the power box is powered on. Individual power adapters may or may not have an indicator. We recommend using a voltmeter to test power supplies if one is available to ensure it is supply correct 12V DC voltage.
- Double check that the power supply rating matches requirements of the camera and is providing enough amperage. All too often a customer will use a 24VAC power supply for 12VDC cameras and damage the cameras.
- Cup your hands over the lens or turn off the lights in the room to find out if the IR lights are turning on.
- After connecting a security camera to power listen for a click within 30 seconds to 2 minutes. That click is the IR cut filter. The click can be very quiet so do not rule a camera out solely based on there being no noise.
Step 2. Check for video from the camera on the DVR
As we mentioned above, bench testing with a short known good cable is the best way to troubleshoot a BNC security camera. If the camera is powered on then it should at least show video on the DVR if it is compatible with the DVR. If you never confirmed compatibility of your camera with the DVR, you’ll have to go back and do that by contacting our Tech Support Team here.
You can rule out the camera being the cause of the issue If the camera powers on and shows video with a short cable. Continue reading to learn more about cabling and power delivery problems that can cause a camera to stop working.
Step 3. Make sure the cable is good
If the bench test was successful then it is likely the cable run that is causing the issue. Take these steps to verify that your cabling going to the camera is good and provides good signal transmission.
- Check for any breaks and confirm continuity. Using a cable continuity tester will allow you to test the security camera cable and any RG59 crimps to ensure they are working properly. BNC cable testers can be found from many online retailers.
- Double check that the end BNC connectors and CCTV power connectors are not visibly damaged, corroded or loose.
- This may get old but, bench test - bench test - bench test. Bench testing with a short known-good cable is the quickest way to rule out if a bad cable run is causing the problem.
Step 4. Is the issue only happening at night?
Occasionally there are issues that seem to only happen at night. Issues at night range from the camera not powering when it gets dark, to image issues like glowing or strobing, or a bright white picture. Most of the time they are unrelated to the camera and require user intervention to reposition the camera.
Camera powers off at night time
If the camera powers off at night time but works fine during the day then it is a power delivery issue. Take the following steps to ensure the camera is receiving enough power at night time.
- Check the 2-lead power cable and terminals. Make sure the terminals are cleanly terminated with little to no excess wiring. Excess wiring can touch and short the camera or power supply.
- Make sure the cable is high quality. Solid copper coax cable offers the best power and video delivery on the market and is required for high resolution cameras like 4mp or 4K security cameras. Cheaper copper-clad aluminum (CCA) or copper-clad silver (CCS) cabling can not transmit nearly as far as solid copper cabling.
- Be realistic about power delivery and account for voltage drop along long wire runs or thin wire. Make sure that you are not trying to use a low amperage power supply for a longer run. For longer runs we suggest over compensating for power draw. Use a higher amperage power supply for any long run. For example if your camera requires 12VDC 1amp and you plan to use a 300ft wire run, you will want to use a 12V DC 2 Amp power adaptor instead.
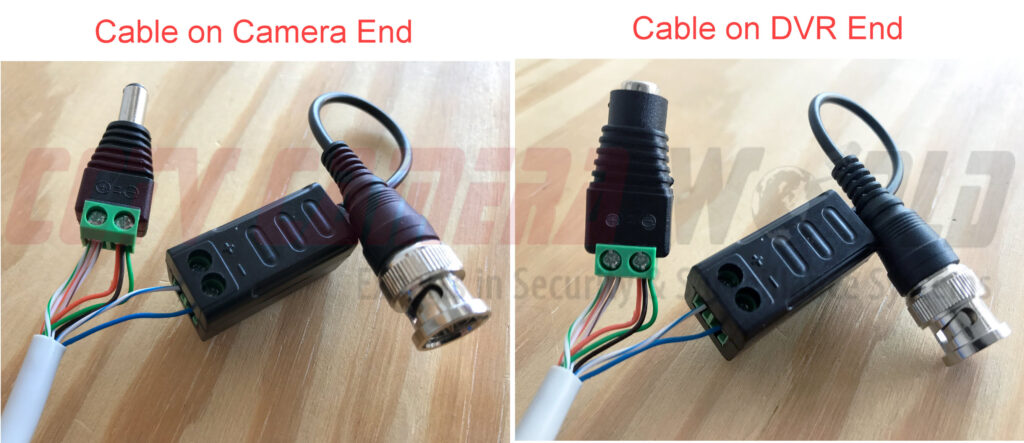
- If you are using video baluns to transmit video and power make sure you are using 3 pairs of leads from the network cable for power. A common mistake is to try and only use 1 pair of leads from a network cable which does not transmit power well. The image below shows how passive video baluns and male / female power terminals should be wired to get optimum video and power delivery.
Common image issues at night
Other issues that happen at night do not always relate to cabling or power. Sometimes it is simply how the camera is mounted, or aimed that can cause common night time problems. Read more about what some of those issues are and how to solve them below.
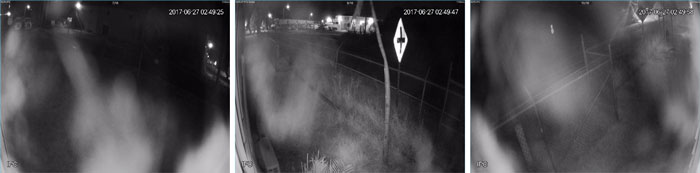
Obstructions on Camera Glass
This is caused by dirt and grime or debris like leaves that stick to the front glass or dome of a security camera. Dirty front glass or dome covers can cause IR glare, or poor IR performance due to SmartIR.
Solution - Clean the glass portion of the camera using a microfiber cloth.
Infrared Glare
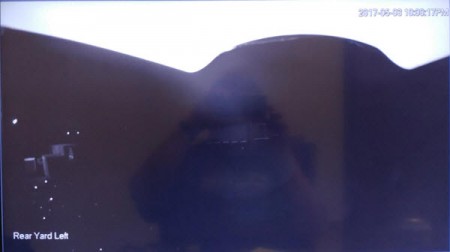
Dirty glass is not the only thing that causes IR glare. Large bodies of water, lightly colored surfaces, foliage, and vehicles are all common causes of IR glare. A camera mounted too close to an overhang, eave, or soffit can also cause IR glare.
Solution - Adjust where the camera is pointing. Aiming the camera downward will usually reduce the amount IR glare if it does not completely go away. If aiming does not help, reinstall the camera at a better location.
Smart IR Issues

Smart IR is a useful feature that reduces the amount of IR light a camera produces so that as an intruder approaches a camera the image is not over exposed. Smart IR issues are caused by objects being too close to the camera in its view. IR glare can also cause the Smart IR feature to overcompensate.
Solution - Try to avoid having anything within view that will cause Smart IR to think that an object is too close to the camera. Common culprits are bushes, trees, and vehicles.
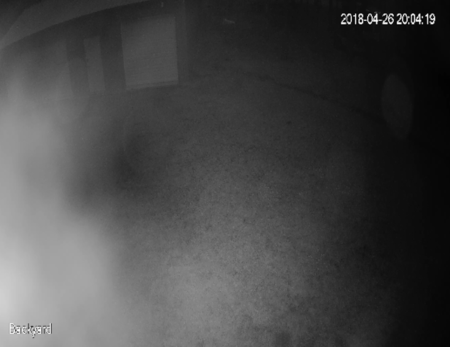
Infrared Reflection
Glare and reflection go hand in hand but severe reflections will result in completely white video or ghosting. Another obstacle that is commonly overlooked is glass. Some people are confused and believe that security cameras should be able to see through glass at night when the IR LEDs turn on. This is untrue because while the IR light does go through the camera’s front glass, the IR light cannot penetrate windows.
Solution - Do not install cameras behind windows, or near potential reflective surfaces.
For more information read and watch the video in our Common Issues with Security Camera Infrared (IR) article.