

How to View a Security Camera System from the Web

At CCTV Camera World, we focus on security camera systems that provide various ways to keep an eye on your property. There are three different ways to view cameras in our security systems: 1) through our Smartphone App; 2) through PC or Mac software; or 3) through a web browser, and are all free to use. All of these methods grant easy access to live and recorded video, whether you are at the system's location or away from it. Whether you want to set up a new camera system or already have a system from CCTV Camera World, this article will show you how to use your phone or computer to watch live video and review recorded footage.
Contents
- 3 Ways to View a Security Camera System
- How to View a Security Camera System While Away
- How to View a Security Camera System While On Location
3 Ways to View Security Camera Systems from CCTV Camera World
CCTV Camera World offers a range of professional-grade security equipment under the Avalonix Premium series. These camera systems offer a great viewing experience that is easy for both new and experienced users. As mentioned earlier, there are three different ways for customers to view our Premium Security Systems, and each method offers its own unique benefits. We have detailed guides that make the setup process easy to understand and doable, even for people who don't know much about technology. You can also watch the video below, which gives a quick overview of the three ways to view the Premium Security Camera Systems by Avalonix.
1. iPhone, iPad, Samsung, Android, and Tablet App
Accessing surveillance camera systems has never been easier, and the best part is that it comes at no extra cost when you purchase our cameras or a complete system. The app is available for most smartphones and tablets through the Apple App Store or Google Play Store. The app allows you to view the system either locally on WiFi or remotely using cellular data or WiFi at another location. You can also manage and view multiple Premium series Security Systems simultaneously using this single app. You can download the app by clicking the buttons below to preview it, or continue following this guide to add your system to the app.
2. PC and Mac Camera Monitoring Software
The free PC or Mac camera monitoring software for Premium series systems is the second option available to our customers. Even though the software is best used at the location of the system itself, it can also be used remotely. The PC software gives Windows and Mac users a robust way to keep an eye on their cameras. It has more viewing options and management tools than the phone app. The software is great for power users and people who spend a lot of time on their computers and want an easy way to watch their cameras.
Compatible with MacOS Monterey or Catalina
Minimum PC Requirements (subject to change w/o notice):
OS: Windows 7, Windows 8, Windows 10
CPU: Intel i5 Quad Core 1.8GHz or higher
Graphics Card: Independent GPU that supports DirectX 8.0c or higher
Memory: 4GB or higher
Resolution: 1280x1024 or higher
Hard Drive: 512GB or more
Click here for Intel Mac
Click here for M1 Mac
Minimum Mac Requirements:
CPU: M1 7 core or higher
Memory: 8GB RAM
HDD: 256GB or more
3. Web Browser
Lastly, systems can be accessed through web browsers without the need to install plugins. Internet Explorer required plugins that were annoying and difficult to use. Popular web browsers like Google Chrome, Apple Safari, Microsoft Edge, and Mozilla Firefox now work well with our products and without a plugin. Typically, web browser access is done while at the system location, similar to the client software. However, users can also get remote access with a web browser by setting up port forwarding rules on their router or using the Camera Monitoring Software's "Link to Web" feature.
![]()
How to View Your Security Camera System While Away
To monitor your security camera system while away from its location, you need a high-speed wired Internet connection. With the addition of P2P technology, connecting to one of our NVR or DVR recorders over the internet is now much simpler. Before the P2P method, people who wanted to see the system remotely had to set up complicated port forwarding on their internet router. By scanning a QR code for the system and installing the correct smartphone app or PC/Mac software, users can easily view the system from anywhere.
This method uses P2P (peer-to-peer) technology, which uses the system's serial number to automatically connect the app to the device over the internet. It's worth noting that this method also works when viewing the system while at its location.
Outline of Steps
- Get Started
- Finding the QR code SN for an DVR or NVR
- Adding a security camera recorder to the phone app using the QR code SN
- Adding a security camera recorder to the PC software using the QR code SN
1. Get Started by Connecting your Recorder
- Connect the NVR or DVR to your modem or router using an Ethernet cable.
- Power the NVR or DVR on using its external power supply or a 110–220V cord if it has an internal power supply. Flip the power switch to the "on" position in the back, if necessary.
- The next steps involve finding the QR code to scan into the phone app and use for the PC software. You will want to have the QR code ready for the steps that are about the smartphone app and software. The QR Code, or QR SN, is the private serial number for your recorder. Do not share the QR code or password with anyone that you do not want to access your system.
2. Finding the QR code SN for a DVR or NVR

- Option 1: All Security DVR sold by CCTV Camera World have the remote viewing QR code on a label on the top of the recorder.
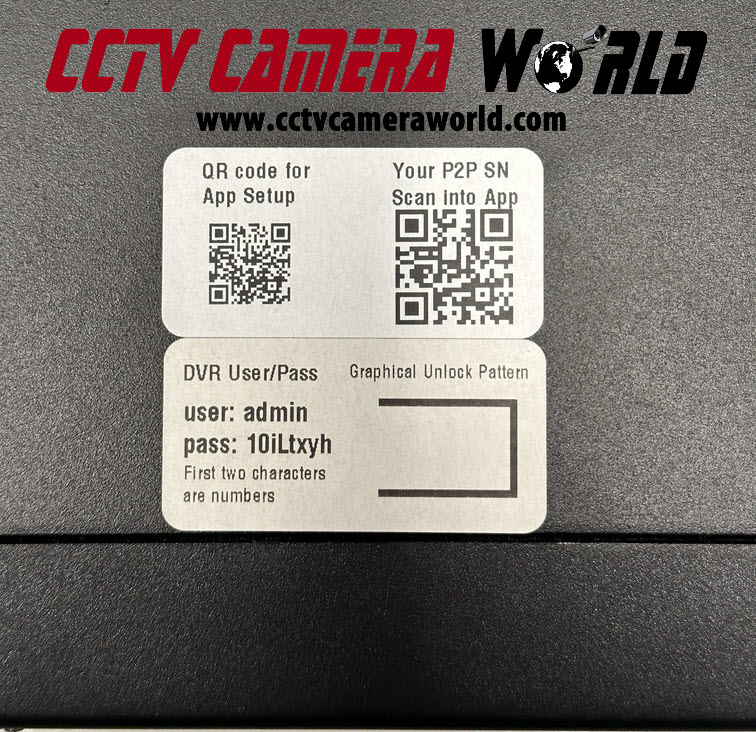
The label also has a QR code on the left-hand side that can be scanned to take you to our Dummies Guide for Remote Connection, which is a simplified version of this guide.
- Right click on the grid screen and then left click on “Main Menu”
- Log into the admin user using the graphical password. If you’re unsure what the password is refer to the label on the top of the recorder.
- Navigate to the Network settings at the bottom of the main menu.
- Navigate to the P2P tab in the Network settings. The QR code for your recorder is the one on the right hand side of the P2P page.
After you’ve found the QR code SN for your security camera recorder it’s time to scan it into the phone app or add it to the PC software. These steps assume you have successfully installed the app to your phone or computer software to your PC or Mac using the links at the top of this guide.
3. Adding a security camera recorder to the phone app using the QR code

- Open the App and navigate to the Home screen. If this is your first time opening the App, you can skip through the intro screens and decline to make an account. Making an account will bind the recorder to the email address you enter, which makes it difficult to add the recorder to more than one phone.
- Tap the plus (+) icon at the top right of the app.
- Tap the SN/Scan button. The App may ask you for permission to use your phone’s camera. Tap Allow.
- Position your phone’s camera to place the QR code SN in the view of the scanner. If you’re unable to scan the QR code, you can tap the “Manually Enter SN” button to manually type the SN listed under the QR code. You do not need to enter a security code. Tap “Next.”
- Tap the appropriate device type. The device types are: NVR, or DVR/XVR. Choosing the wrong device type may prevent the app from connecting
- Type in a Device Name. The name can be anything like “Office Cams”, “Home DVR”, “My NVR”, etc.
- Tap on the Password field and type in the password for your recorder. The password can be found on a label on the top of the recorder.
- Tap the Save button at the top right.
- Tap the Completed button at the bottom. Voila! You’ve successfully added your security camera system to the app. To learn more about using the app visit our iPhone iPad App for Remote Viewing your Security Cameras guide.
4. Adding a security camera recorder to the PC software using the QR code SN

You can also add our NVRs and DVRs to the PC software using their QR codes. This method is very flexible because it doesn't depend on IP addresses. With this feature, users don't have to remember their IP addresses or set up complicated port-forwarding settings. You can easily monitor the system from your laptop, even if you are traveling or working from a different location. The steps below assume you have installed the Camera Monitoring Software for your Mac or PC and gotten to the home screen.
- If you’re not on the “New” tab page click the “+” icon at the top of the software. It will open the “New” tab page, also known as the home page. However, if you’re already in the “Devices” tab when you open the software, you can skip to Step (c) below.
- Click the “Devices” button in the “Configuration” section at the bottom. This opens the “Devices” screen where you can add cameras to the software.
- Click “Add” at the top of the Devices page.
- Enter in a “Device Name”. You can enter whatever you would like such as “Office DVR”, “Jim’s Cams”, “Home NVR”, etc.
- Click the drop-down “Method to add” and click “SN(For Device Support P2P)”
- Enter the P2P QR SN that you found in Step 2.
- Leave “Group Name” as the Default Group option.
- Enter the User Name: admin
- Enter the password for the recorder. If you don't know the username or password, look at the label on the top of the NVR or DVR.
- Click the “Add” button to finish adding the recorder to the software. Repeat steps c) through i) if you have more than one recorder that you want to add to the software.
- Follow the tutorials in our How to use the Camera Monitoring Software guide to learn more about using the software.
How to View Your Security Camera System While On Location
There are two ways to access our Premium series camera systems while at their location, depending on whether you have an internet connection or not. NVRs, DVRs, and PoE security camera systems can work over a local network router without having to connect to the internet. You can view the system over local WiFi without an internet connection as long as your phone or PC and the system are connected to the same local network.
The system only needs to be connected to the internet when you are away from it or when adding the system using the QR code serial number method. The QR code-based connection method is the easiest way to quickly connect to the system through our free mobile app and PC software.
In this guide, we've put together a list of instructions and a video tutorial to help you understand the whole process. Please read the instructions and watch the videos carefully. Note that the instructions below assume that you have already installed the app on your phone or the software on your PC or Mac and know how to open them.
Outline of Steps
- Connecting to a Recorder Using the QR Code Serial Number - Requires Internet
- Connecting to a Recorder Using the Local IP Address - Internet Not Required
- Get Started
- Adding a recorder to the phone app using the local IP address
- Adding a recorder to the PC software using the local IP address
- Accessing a recorder Using the Local IP Address in a Web Browser
1. Connecting to a Recorder Using the QR Code Serial Number - Requires Internet
The easiest way to add a camera system to the app or software is by using the QR code method, which is applicable for NVRs, DVRs, and standalone cameras. By using P2P (peer-to-peer) technology and the device's serial number, this approach automatically connects the app to the internet.
To use this method, the camera system must have an internet connection, but you don't need any knowledge of port forwarding or computer networking. It's important to note that this method can also be used to access the system when you're not there. This was covered in the above section, "How to View Security Systems While Away."
If you want to learn how to add the recorder to the app or software using the QR code, click on the links below to access the video and instructions from earlier in this post.
How to Add a security camera recorder to the Phone App Using the QR Code
How to Add a security camera recorder to the PC Software Using the QR Code
2. Connecting to a Recorder Using the Local IP Address - Internet Not Required
If you plan to monitor your camera system while on site or have a local network without an internet connection, you can add a recorder using it's local IP address. But it's important to note that this section is hard for people who don't know much about computer networking or IP addresses.
If you are not comfortable with computer networking or are not interested in learning about it, we recommend using the QR code method instead, which requires an internet connection. The following method requires a router that sets up a local computer network even without an internet connection from a modem.
Get Started
- Connect the NVR or DVR to your modem or router using an Ethernet cable.
- Power the NVR or DVR using its external power supply or a 110–220V cord if it has an internal power supply. Flip the switch to the on position in the back, if necessary.
- The next steps involve finding the IP address of your recorder to put into the phone app and use for the PC software.
- The easiest way to find the IP address is by using a monitor or TV connected to the recorder’s VGA or HDMI ports. Use the included USB mouse to use the recorder like a computer. Log into the admin user and navigate to the Network settings and TCP/IP page. The IP address will be listed next to the “Ethernet Port” or “NIC1” in the TCP/IP page.

- Log into the web browser interface for the router and navigate to its “Connected Devices” or similar web page that will list the IP addresses of the devices connected to the router.
Check the manual for your router's model number to see if a "Connected Devices" page exists and how to get to it.
- Use the ConfigTool software to scan the network for your recorder. We have a guide How to Find Your IP Camera on the Network for learning more about using the ConfigTool to find and modify IP addresses.
- After you have found the IP address for your NVR recorder or DVR, you can add the system into the phone app or the PC software using the IP address. Please note that the following steps assume you have installed the app on your phone or the computer software on your PC or Mac from the links provided at the top of this guide. Scroll up and install them now if you have not done so already.
Finding the IP Address of a recorder
Here is a list of options to find the IP address of your recorder:
Adding an NVR or DVR to the phone app using the local IP address
- Open the app and navigate to the Home screen. If this is your first time opening the app, you can skip through the intro screens and decline to make an account. Making an account will bind the device to the email address you use, which makes it difficult to add a system to more than one phone.
- Tap the plus (+) icon at the top right of the app.
- Tap IP/Domain.
- Tap the appropriate device type. The device types are: NVR, or XVR/DVR. Choosing the wrong device type may prevent the app from connecting.
- Leave the Port field as the default 37777.
- In the Address field type the IP address that you found the recorder is set to.
- Type in a Device Name. The name can be anything you want like “Office”, “Home Cam System”, “Warehouse System”, etc.
- Tap on the Password field and type in the password for your recorder. The username and password can be found on the label on the top of the recorder.
- Tap the Save button at the top right. Voila! You’ve successfully added your system to the app using it’s IP address. You can learn more about using the app to live view and watch recorded video by visiting our iPhone iPad App for Remote Viewing your Security Cameras guide.
Adding an NVR or DVR to the PC software using the local IP address
Since the PC software is usually used on a local network anyway, this is how systems are typically added to the PC software.

- If you’re not on the “New” tab page click the “+” icon at the top of the software. This will open the “New” tab page, also known as the home page.
- Click the “Devices” button in the “Configuration” section at the bottom. This opens the “Devices” screen where you can add devices to the software.
- Click “Add” at the top of the Devices page.
- Enter in a “Device Name”. You can enter whatever you would like such as “Office Cams”, “Parking Lot Cams”, “Home Cams”, etc.
- Make sure the “Method to add” has the option “IP/Domain” selected.
- Enter the IP address that you found in Step 2C above.
- Leave “Group Name” as the Default Group option.
- Enter the User Name (usually admin)
- Enter the password. The password for the recorder can be found on the label on the top of the NVR or DVR.
- Click the “Add” button to finish adding the system to the software. Repeat steps R) through X) if you have more than one system or recorder that you want to add to the software.
- Follow the tutorials in our How to use the Camera Monitoring Software guide to learn more about using the software.
3. Accessing a Security Camera System Using the Local IP Address in a Web Browser
- Lastly, after making sure that the NVR or DVR is connected to the network and finding its IP address, you can use a web browser to access the system's web interface.
- To do this, simply enter the IP address into the address bar of your web browser and hit Enter on your keyboard. The web browser should automatically redirect to the web interface for your NVR or DVR. If it doesn't, you may need to add "http://" before the address.
- For instance, a common web address for an NVR or DVR is: http://192.168.1.108
- If your NVR or DVR has a different IP address, simply replace "192.168.1.108" with the IP address in the web address. You can watch the following tutorial video to learn more about finding your recorder's IP address and how to access the web interface from a Windows PC or Mac computer.
