Live Stream an Outdoor Camera to YouTube Live

With the rapid decline of traditional media like TV, radio, and newspapers, people now get the majority of their entertainment, news, and cultural engagement from the internet. Livestreaming video on the internet to audiences has become a massive industry thanks to major players such as Google's YouTube Live, Amazon's Twitch, and Meta's Facebook Live. This online space is filled with content creators who stream themselves playing video games, hosting TV-style events, traveling the world, and engaging in other various activities.
A popular type of livestreaming involves the real-time broadcasting of city streets, wildlife, and properties such as homes, schoolyards, sports fields, or construction sites. This type of streaming typically requires a dedicated computer to take the video from a camera and re-stream it to the internet. Having to dedicate a computer for livestreaming means that the computer needs to remain on, which involves investment in the PC hardware and higher electricity bills, especially if the computer is not energy-efficient.
Fortunately, here at CCTV Camera World, we have a selection of live feed security cameras that have built-in streaming. In other words, the cameras themselves can stream directly to a service such as YouTube Live without requiring a dedicated computer to be on constantly. The cameras encode and transmit video using RTMP (Real-Time Messaging Protocol) technology, which allows our cameras with this feature to stream to most websites with ease. In this guide, we show how to connect an Avalonix LiveCam to the internet and start the stream. While this guide focuses on YouTube Live, it can be adapted to work for most streaming platforms by modifying the RTMP stream URL based on the website’s URL requirements.
Table of Contents
- Requirements
- Security Camera with Live Streaming Capabilities
- Windows PC for Stream Setup
- PoE Injector or PoE Switch for Power and Connection
- Ethernet Network Cables
- Stable and Fast Internet Upload Speed
- Verified YouTube Account
- Compatible Local Computer Network
- What to Expect for Maintenance
- Setting up a Premium Series Avalonix Live Stream Camera
- Step 1: Create a YouTube Stream
- Step 2: Craft your Stream Key URL
- Step 3: Connect the Camera to the Internet
- Step 4: Access the Camera Using a Web Browser
- Option A: Using a Web Browser and the local IP Address (Windows or Mac)
- Option B: Using the PC Software “Link to Web” Feature (Windows Only)
- Step 5: Enter the Stream Key into the Camera and Start Streaming
- Step 6: Improve Reliability with the Schedule Stream Option
- Showcase Your Stream on a Website
- Troubleshooting
Requirements
Below are the requirements, along with some helpful information, to ensure that you have everything you need to broadcast your livestreaming outdoor camera to the world.
1) Security Camera with Live Streaming Capabilities
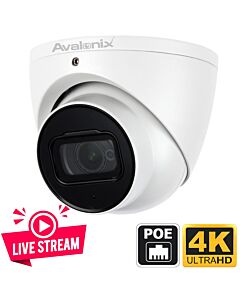
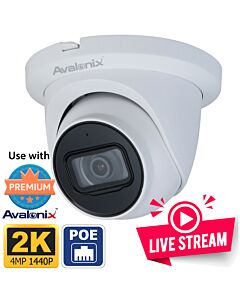
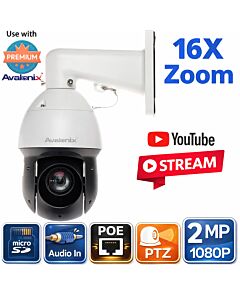
Of course, the first thing you'll need to follow this guide is a camera from our selection of Live Stream Cameras by Avalonix Premium Series. Feel free to click on one of the options below to learn more, or check out our Live Streaming Cameras store page. For help with picking the best outdoor live stream camera for YouTube, you can give us a call or reach out by email!
-
-
-
-
 4K PTZ Camera with Auto Tracking, 25X Zoom, Smart AI Detection, Active DeterrenceSKU: IRPTZ4KAD$999.99 $1,299.99 23% off
 -
2) Windows PC for Stream Setup
Although a dedicated computer is not needed to stream, one is required to set it up and to maintain it should it go down. While this process can be done from a Mac computer, we recommend using Windows to take advantage of the free central monitoring software. This software will allow you to check and manage the YouTube streaming camera and the live stream from anywhere there is an internet connection.
3) PoE Injector or PoE Switch for Power and Connection
PoE, or Power over Ethernet, technology is used in our network security cameras to provide power and data over a single Ethernet or computer network cable. A PoE injector or PoE switch is used to power and connect the camera to a router or modem. If you would like to learn more about PoE, check out our PoE Technology - What is PoE? article. Usually, customers choose to add a PoE injector when purchasing our Live Stream Cameras.
Although we do sell a wifi camera with live streaming, it requires a 12V DC power supply but can be paired with your WiFi network to connect to the internet. However, WiFi cameras do not have the reliability and stability that are the inherent advantages of using wired IP cameras for live streaming.
4) Appropriate Length and Type of Ethernet Network Cables
As you can imagine, you need to use Ethernet cabling to utilize PoE technology for power and connectivity. Any standard CAT5e or CAT6 cable will work for this purpose. However, it's worth noting that if you intend to run your cable outdoors, it should be outdoor-rated and preferably run in a conduit. A cable length of 25, 50, 100, or 150 feet can be purchased along with the camera. Keep in mind that you need to purchase and run two (2) cables: one from your modem or router to the injector, and another from the PoE power source to the camera.
5) Stable and Fast Internet Upload Speed (Minimum 5Mbps)
And with a good router that does not need reboots.
Other than physical goods, the most important thing that you need is a fast and stable internet connection to stream an IP camera to YouTube. With a fast internet connection, you may even be able to achieve 24/7 live streaming with an outdoor camera. Fiber is recommended for reliable 4K streaming and if you would like to try 24/7 streaming.
These days, the Internet Service Provider (ISP) provides a dynamic IP address along with most internet connections. Depending on the ISP, the IP address on your internet connection may change several times a week or once every few months. Every time the IP address on your internet connection changes, it will disrupt the YouTube stream and require manual reactivation of the stream from the camera. We suggest obtaining a static IP address for optimal stream stability.
In addition to stability, you need an upload speed that is adequate to continuously send large amounts of video data. Despite significant improvements in internet speeds over the past decade, streaming video services such as Netflix and Hulu have driven efforts on improving download speeds. This push has made it so that internet companies provide up to 10 times faster download speeds than upload speeds.
To reliably upload 2K or 4K live video to the internet, you need at least 5 Mbps, and optimally 10 or more Mbps. Contact your service provider or run a quick speed test at speedtest.net to determine your upload speed. Keep in mind that the constant upload bandwidth used for streaming may have an impact on other devices on your local network, and vice versa.
Also, your existing router or modem can play a large role in how successful your stream is. Most internet service companies provide their customers with low-end network equipment to save money. Your router or modem affects the speed and upkeep of your local computer network. If you have one that requires weekly or monthly reboots, that process will ultimately disrupt your stream, requiring you to reactivate it.
Alternatively, you may have an antiquated router that doesn't have the processing power or speed to transmit the stream. We recommend purchasing a new modem or router and returning the old equipment to your service provider. You might also save a few bucks on the equipment rental fees these companies sometimes sneak into service agreements.
6) YouTube Account with a Verified Phone Number (Up to 24-Hour Wait)
Since this guide is about streaming to YouTube Live, you'll need an active YouTube account with live streaming access. If you haven't done so already or if you want to create a new account for a brand or business, you should do so as soon as possible.
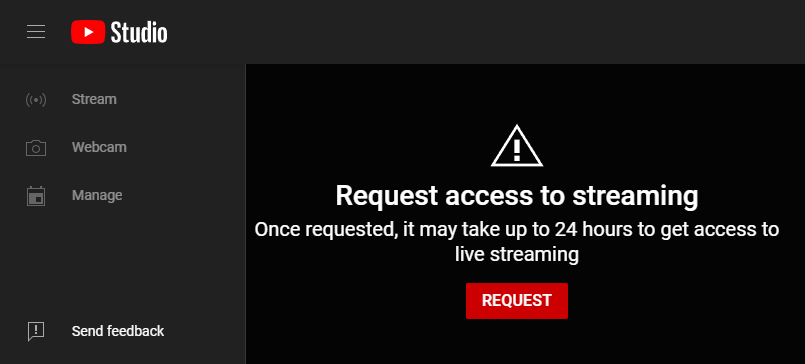
YouTube requires up to a 24-hour wait before allowing someone to stream on their platform. To request access, you must link a phone number to your account for verification purposes. This verification process helps YouTube mitigate the streaming of copyrighted, illegal, restricted, or adult content on their platform.
7) Compatible Local Computer Network
Last but not least, you need to ensure that your local computer network allows the camera to access the internet. When you purchase a camera for Live Streaming from CCTV Camera World, our team will reach out to acquire information about your local network and pre-configure the camera for it.
However, if you have any network firewalls, domain security policies, double NAT, or other restrictions on your network, these barriers can prevent the camera from accessing the internet. Make sure you check with your IT department before purchasing a camera, or have them "whitelist" the camera.
What to Expect for Maintenance
For the most part, maintenance is fairly hands-off if your internet service and network equipment are reliable. For example, we have customers who have been using our Live Stream Cameras to stream for several years, and their camera has not gone down except in extreme cases such as power outages. However, other customers with internet disconnections, slow upload speeds, or rebooting routers will experience their stream going down from time to time.
When the YouTube Live stream does go down for any reason, it requires you to manually restart the stream from the camera. Normally, this would mean you need to be on-site to access the camera using a web browser to toggle the streaming setting off and on. This is where our recommendation of using a Windows PC comes into play; you can use our PC Camera Management Software to access your camera remotely and restart the stream from anywhere you have an internet connection.
Setting up a Premium Series Avalonix Live Stream Camera
Now that you're prepared, you're ready to launch your stream into the world! If you're a novice with technology, the setup might seem a bit challenging. But don't worry! We're here to guide you with the following step-by-step instructions:

Step 1: Create a YouTube Stream
The first step is exciting: setting up your YouTube stream! In this phase, you'll create your stream title, provide a description, upload a thumbnail, and adjust other settings such as live chat, comments, and recording. Remember to be prepared for this step by requesting live stream access from YouTube in advance, as obtaining streaming access can take up to 24 hours.
- Visit www.YouTube.com and log in with the Google or YouTube account for which you requested access.
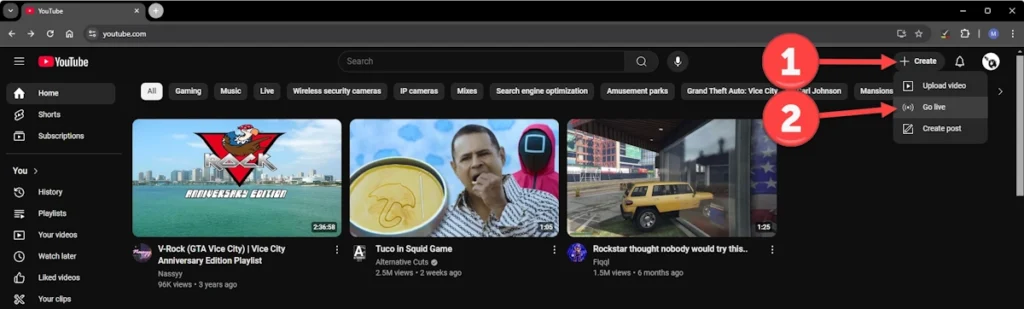
- Click on the "Camera with the Plus" icon located at the top right of the webpage.
- Choose the "Go live" option.
- As an alternative, you can access your "YouTube Studio" page by clicking on your profile icon.
- Next, select "Create" followed by "Go live".
- In the "Pick the type of stream..." window, select the "Streaming software GO" option.
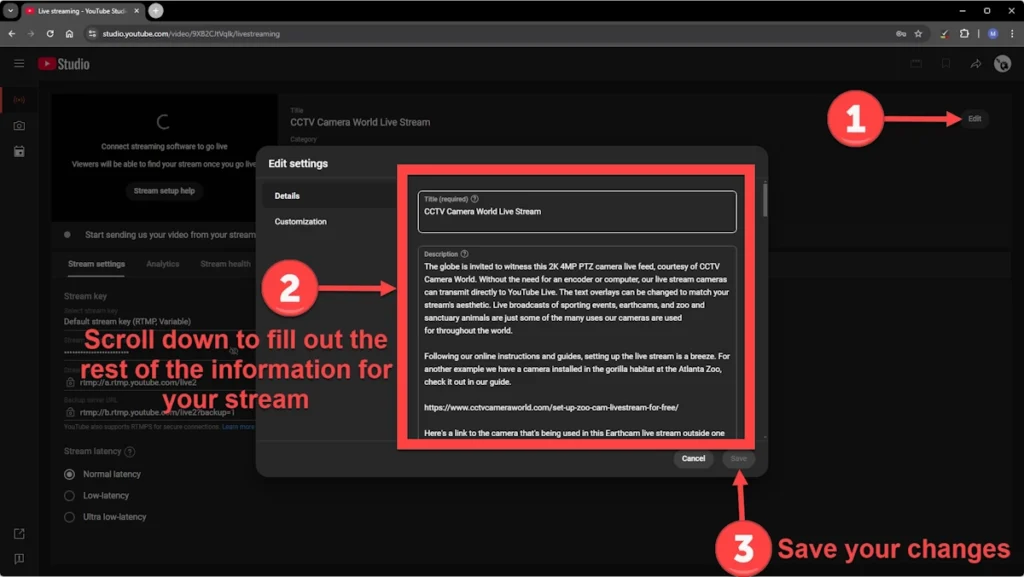
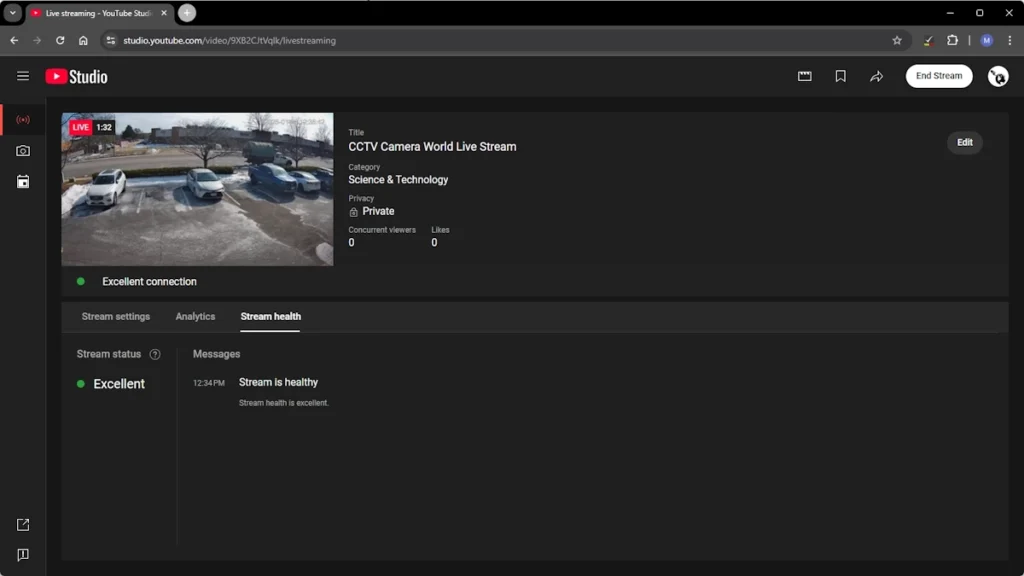
- You'll now be on your Livestream dashboard. Here, click the "Edit" button to modify the stream title, input a description, upload a thumbnail, select your category, and adjust other settings as needed. Make sure you save your changes.
Step 2: Craft your Stream Key URL
Now is where things can get a little tricky, as it’s important to pay close attention. Mistakes in your stream key will prevent the camera from accessing YouTube’s servers and uploading your stream.
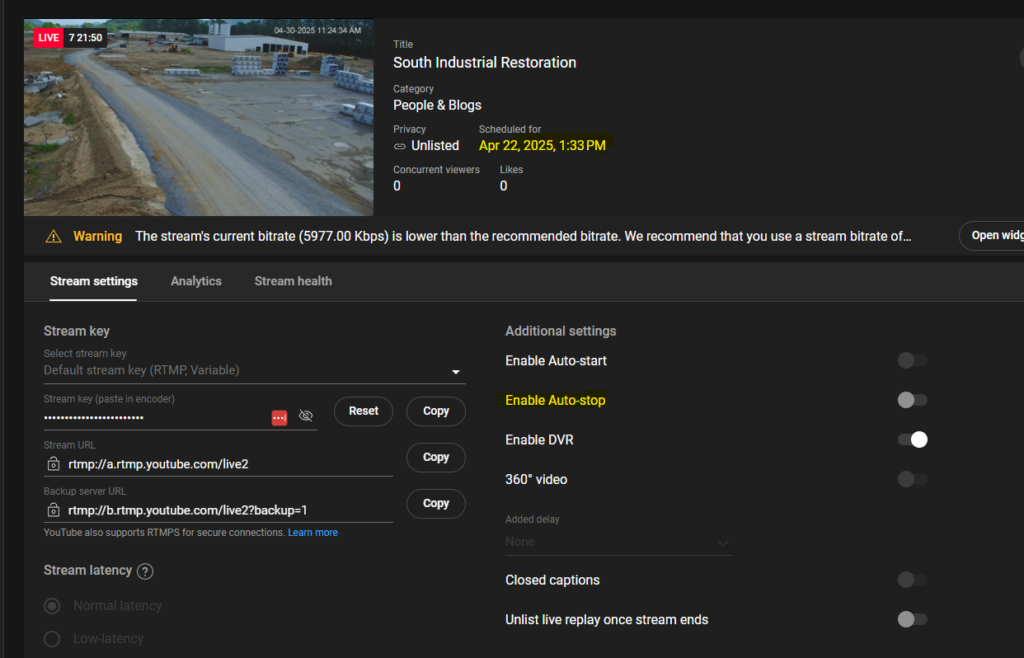
- Begin by navigating to your Livestream dashboard and selecting the “Stream Settings” tab. We’ll be concentrating on the “Stream Key” section within these settings.
- “Default stream key (RTMP, Variable)” should be the default selection. If it isn't, use the drop-down menu to establish a new RTMP stream key with default configurations. If the default is already chosen, you can ignore the “Select stream key” options.
- Now's a good time to launch the Notepad application or another text editing software on Windows. Alternatively, for those who prefer traditional methods, grab a pen and a sheet of paper.
- Copy the “Stream URL” (it might look something like “rtmp://a.rtmp.youtube.com/live2”) and paste it into your text editor.Do note that the “Stream URL” is unique for every user, so always use the one provided in your Stream settings rather than relying on the example given here.
- Append a single forward slash (/) to the end of the Stream URL, making it “...youtube.com/live2/”.
- The next step can be done in two ways:
- Click the Copy button adjacent to “Stream key (paste in encoder)”.
- Reveal your stream key by clicking the crossed eyeball icon, then highlight and copy it.
- At the end of the “Stream URL”, paste the 16-digit stream key, which will be divided by dashes.
OR
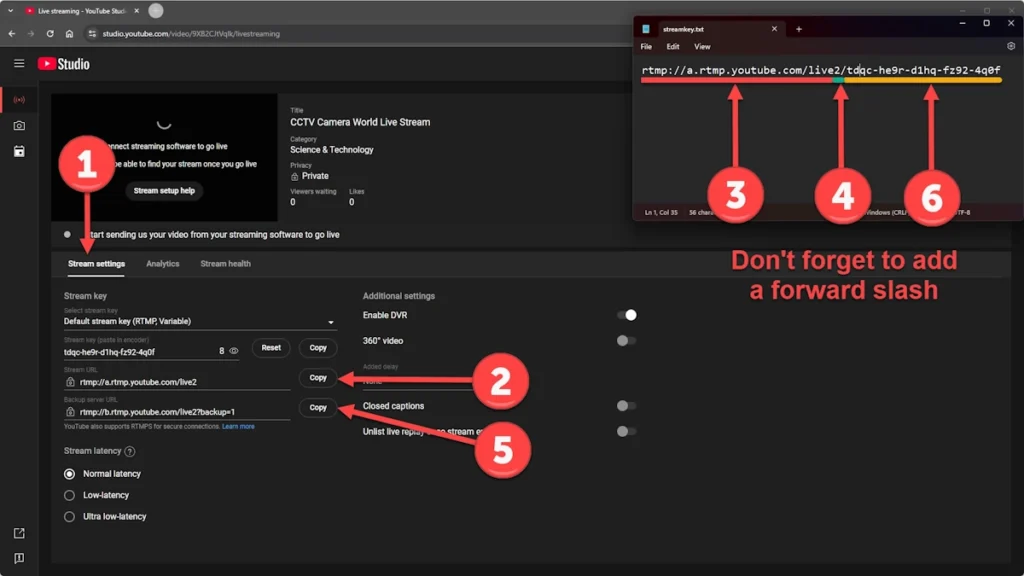
In your text editor, your Stream Key URL should resemble the following example:
rtmp://a.rtmp.youtube.com/live2/xxxx-xxxx-xxxx-xxxx
Step 3: Connect the Camera to the Internet

After verifying your account and creating a stream, connect the camera to your PoE injector or switch physically, and then link your PoE device to your router or modem. This process will power the camera and provide it with an internet connection.
- Connect one Ethernet cable from the Power and Data (P+D) port on your injector or the PoE ports on your switch.
- Then, connect another Ethernet cable from the Data (D) port on your injector or the Uplink Port on the switch to your router or modem.
Step 4: Access the Camera Using a Web Browser
The next step is accessing the camera's web interface, allowing you to become familiar with the camera and its settings. You have two options for this: you can access the camera directly using its local IP address within your network or, as previously mentioned in this article, use the PC software's "Link to Web" feature.
Option A: Using a Web Browser and the local IP Address (Windows or Mac)
- Before proceeding with this option, it's essential to understand the distinction between IP addresses. The IP address mentioned here is not the one your service provider provided. Instead, we refer to the local IP address that the camera uses within your network. Either your router or modem will automatically assign this address via DHCP or it will come pre-configured before shipping.
- Identify the IP address of your camera.If we have pre-configured it for you, it will be listed alongside the login credentials on a label our shipping department attaches to the top of your camera's box.OR
If the IP address was not pre-configured by us, you'd need to download and familiarize yourself with our camera configuration software. This software will help you locate your camera within your network. An added benefit is the software's ability to grant direct access to the camera's web interface with a single click, which is also explained within the guide.
- Launch your preferred web browser (e.g., Chrome, Safari, Edge, or Firefox).
- Type the camera’s local IP address into the browser's address bar.
- Hit Enter on your keyboard or click your browser's “Go” button. The browser should navigate to your camera's web interface.
- If you encounter any issues or face difficulties at this step, consider using the ConfigTool software mentioned above or opting for Option A: "Link to Web", described earlier.
- Proceed to log in using the camera’s credentials, which can be found on the label attached to the camera’s box.
Option B: Using the PC Software “Link to Web” Feature (Windows Only)

- Download and install the PC software named SmartPSS from the following guide. Note that while a Mac version of the software exists, it doesn't support the "Link to Web" feature. How to use the Camera Monitoring Software Guide
- Refer to the same guide and watch the video titled "How to Add a Device." Here, you'll learn how to add your camera to the software using "Method 3: P2P/Serial Number." Ensure you have the login credentials found on the label attached to your camera's box.
- Once the software successfully logs into your camera and displays a green "Online" status, you'll be ready to view, manage, and utilize the "Link to Web" feature within the software.
- Access the "Link to Web" feature by clicking the "+" button atop the software, leading you to the "New" tab interface. If a "New" tab is already visible, simply click on it.
- Press the "Device CFG" button at the bottom of the “New” page, which will redirect you to the "Device CFG" page.
- Click the name you assigned to your camera from the list on the left side of the page.
- Give the software a few moments to establish a connection with your camera.
- Your device information will be visible at the top of the page. Locate the "Link to Web" button on the right side of this information and click on it.
- Your computer will promptly open a web browser, directing you to access the camera. Proceed to log in using the credentials that helped you add the camera to the software.
Step 5: Enter the Stream Key into the Camera and Start Streaming
Almost there! Now, transfer the Stream Key URL you've created into the camera's streaming RTMP settings page.
- Navigate back to the browser window/tab where you have the camera interface. If necessary, refresh and re-log into the camera.
- Select the “Settings” tab located at the upper right of the camera's interface.
- On the left, click on the “Network” option, revealing a submenu.
- In this submenu, click on “Access Platform”.
- Make sure the “P2P” option is active and displays an “Online” status. If you can't get it to show "Online", refer to our troubleshooting section.
- Proceed to the “RTMP” section within the Access Platform page by clicking the tab at the top.
- Activate the “Enable” option, which will appear gray with a white checkmark.
- Keep the “Stream Type” as “Main Stream”. However, if you're working with a limited internet upload speed, you might want to opt for “Sub Stream 1” for a lower resolution.
- Choose the “Custom” option for “Address Type”. This will allow you to input your Stream Key URL.
- Paste your Stream Key URL from step 4 into the “Custom Address” box.
- Confirm by clicking the “Save” button.
- A notification will pop up: “After enabling RTMP, video and audio data will be sent to third-party servers. Confirm that the address can be trusted. Proceed?”
- Agree by selecting “OK”. Your stream should start on YouTube within a few moments!
- Double-check your YouTube channel's Live streaming dashboard to ensure your stream has started without hitches.

Using a newer Avalonix LiveCam interface? If your camera menu looks a little different than the screenshots above, watch the quick update video below. It shows the exact path on newer models: Settings > Network > Platform Access > RTMP, where you paste your Stream Key URL under the custom RTMP address, enable RTMP, and apply the settings. It also covers one of the most common "why is YouTube rejecting my stream" issues: making sure your main stream encoding is set to H.264 and your resolution / bitrate are reasonable for your upload speed.

Now for the most exciting part: Share your YouTube stream link with friends, family, or colleagues! Remember, always keep the Stream Key URL you created confidential.
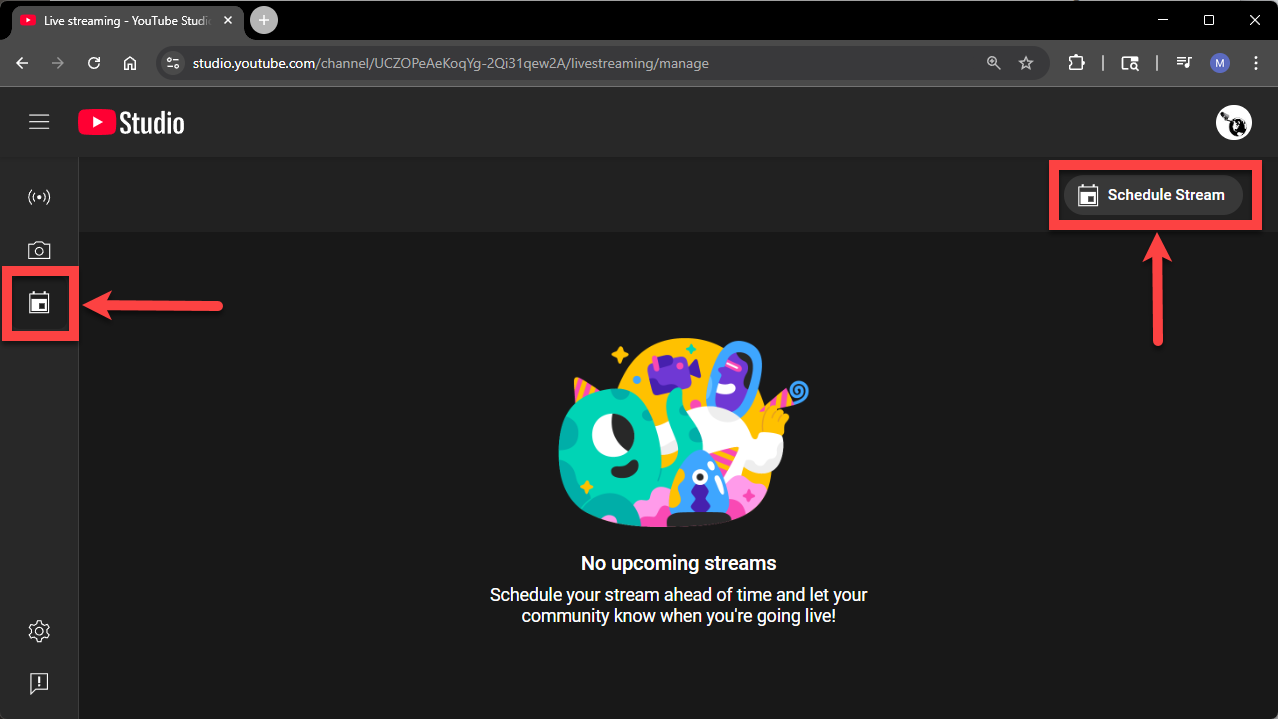
Step 6: Improve Reliability with the Schedule Stream Option
YouTube’s Schedule a Stream feature can also help if your internet connection is unstable or your upload speed is too low for reliable streaming. Instead of creating a brand-new stream each time your camera disconnects, scheduling a stream lets you reuse the same stream link, even if the feed is down for an extended period. This way, your audience doesn’t need to hunt for a new link, and you avoid the hassle of logging into YouTube Studio every time to restart the stream.
You will want to make sure that you do not enable the 'Auto Stop' feature, as that is what causes the stream to stop if the connection is unstable or the camera goes offline temporarily.
Showcase Your Stream on a Website
Instead of only sharing a YouTube Live link, you can embed your live stream directly on your website for easier access. This makes it simple for friends, family, or site visitors to tune in without navigating away from your page. Follow our embedding guide here to learn how to add the live video player to your site.
Troubleshooting
Occasionally, things might not go as planned. In such situations, you might need to do some additional troubleshooting to get your camera online and streaming.
If you're short on time or feeling overwhelmed, we offer a paid networking support service. With this, one of our technicians can remotely access your PC and guide you over the phone, helping get your stream up and running in no time.
Note: CCTV Camera World can only offer support for products purchased directly from CCTV Camera World. For assistance, we require verification of purchase. If you have not bought your product from CCTV Camera World, please reach out to the company you purchased from to obtain help with your product.
Tip: If your stream goes down frequently due to unstable internet, using YouTube’s Scheduled stream option ensures you can keep the same link active without having to create a new stream every time.
1) Managing the camera while away
The Central Monitor Software used for setup in Step 4 Option B also allows you to remotely manage and maintain your camera and stream. The “Link to Web” feature offers global remote access to your camera as long as you have an internet connection and your camera's location has power and internet connectivity.

2) Check the P2P Status (Must Say Online)
Our live streaming cameras utilize the P2P (Peer-to-Peer) internet protocol. However, corporate, educational, strict small business, or home firewalls occasionally restrict or completely block P2P connections.
Occasionally, an ISP may block P2P server connectivity, or your network setup may block it due to a Double NAT situation. A Double NAT happens when there is another internal network ahead of the current one. For example, there may be an additional router in front of the current network connection. This is common if you're using a mesh network.
To successfully connect your camera to YouTube or another streaming platform over the internet, P2P access must be allowed.

Other than external restrictions, certain misconfigurations might prevent your camera from displaying an “Online” P2P status. If you are uncertain about how to achieve an online status, continue onto the next troubleshooting step or consider purchasing a networking support session.
3) Check Network Settings (IP Address and DNS Server)
For an “Online” status, your camera requires an active internet connection, a compatible local IP address, and a functioning DNS (Domain Name Server). As noted above, the P2P protocol must also be unrestricted on your network.
Ensure that the camera’s local IP address, subnet, and gateway are correctly configured. We recommend using reliable DNS servers like Google’s (8.8.8.8 and 8.8.4.4) or Cloudflare's (1.1.1.1 and 1.0.0.1). However, remember that some networks might require specific DNS servers for devices to reach the internet. Check with your IT department for any potential restrictions.
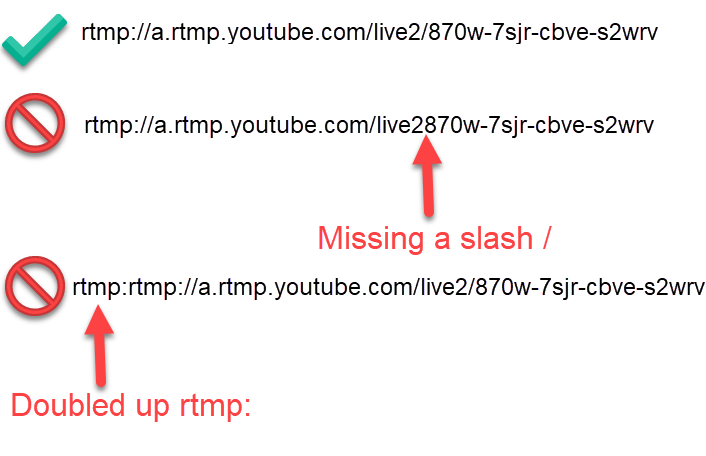
4) Verify that the RTMP URL has no Errors
One of the most common issues stems from mistakes in the stream key (aka RTMP) URL. People who are unfamiliar with reading and writing URLs can make errors such as adding redundant punctuation, repeating words, or incorrectly pasting the stream key. Compare your RTMP URL to the examples provided below to ensure accuracy.
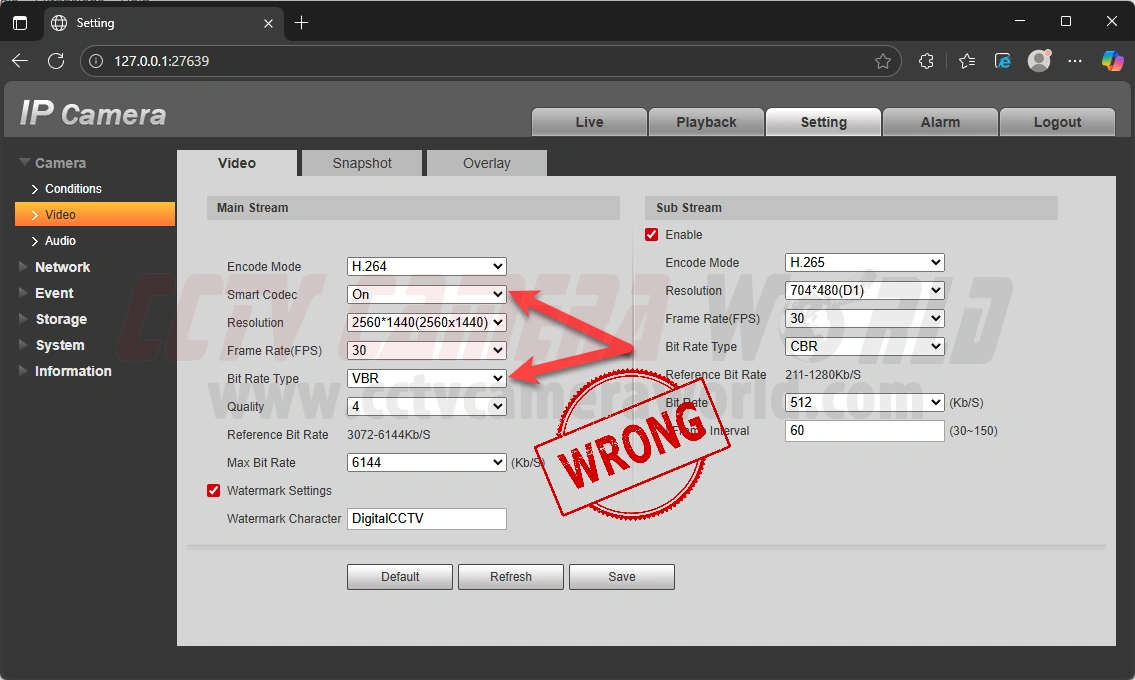
5) Check and Tune the Video Encode Settings
Livestream platforms typically have specific requirements. For example, most require H.264 video encoding. Ensure your camera is set to H.264 encode mode within the “Camera” and “Encode” web interface settings.
Also, do not change the encoding type or enable Smart Codec unless we recommend you do through support. If you adjust encoding settings and see warnings or errors in your YouTube Studio stream page, revert to the default settings and make sure H.264 is selected.
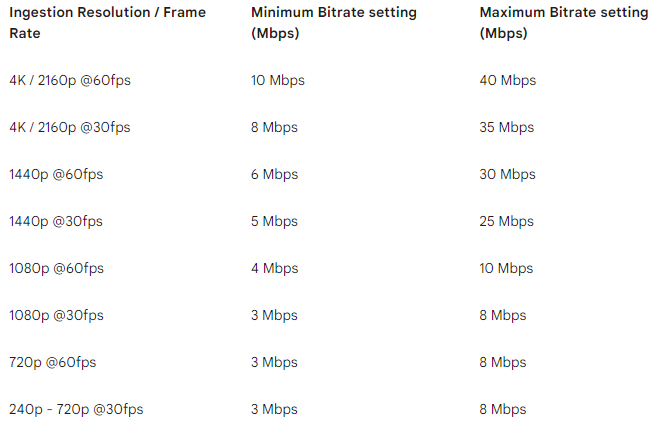
If your stream faces issues like lag or dropped frames, first make sure you have sufficient upload internet bandwidth to support the required stream bitrate. These issues often arise due to slow internet upload speeds or unreliable service. Consider adjusting settings like resolution, framerate, and bitrate. Decreasing the resolution, framerate, and bitrate are all ways to optimize your streaming experience. Finding an optimal balance between the three will require some trial and error. Note that lowering encoding settings will affect how your stream looks.
You can refer to YouTube’s encoding guidelines or the table we created below that shows some common optimal encoding settings:
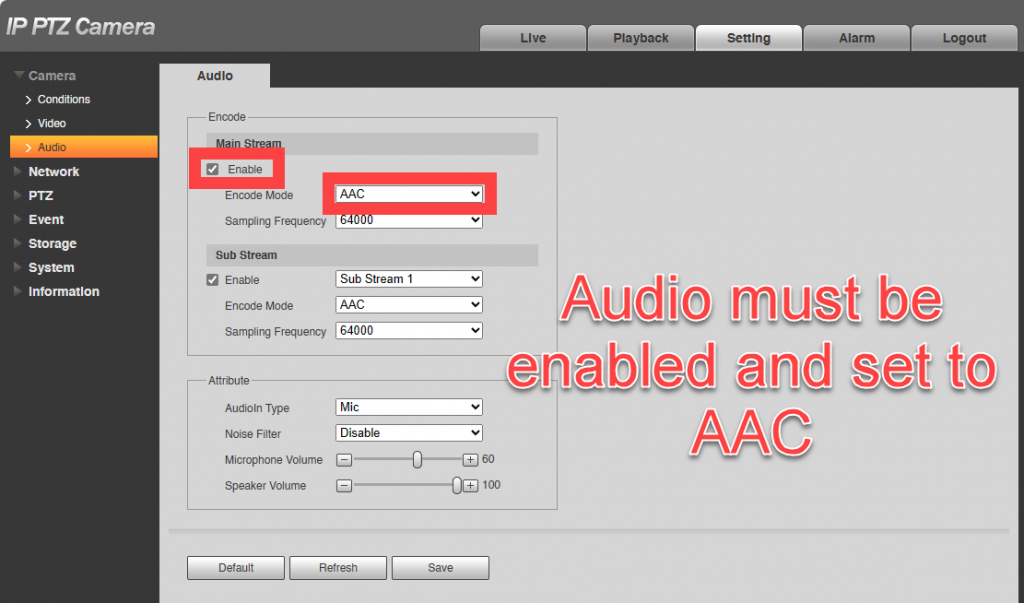
6) Enable Audio Encoding for YouTube and Facebook Live
Both YouTube and Facebook require an AAC-codec audio stream. If your audio encoding is disabled or set to a different codec, adjust the settings in your camera’s “Camera” and “Audio” web interface settings. If you prefer that your stream have no audio, you can set the microphone volume to 0 or 1, ensuring the stream is silent.
7) How to Reset your YouTube Stream Key
Although rare, you may need to reset your YouTube Stream Key to fix any issues on YouTube’s end that are preventing the camera from uploading video to their servers. In the following steps, we show how you can easily reset the key. You can also update the key and restart your stream remotely from a Windows computer by following our video above in the “Managing the camera while away” section.
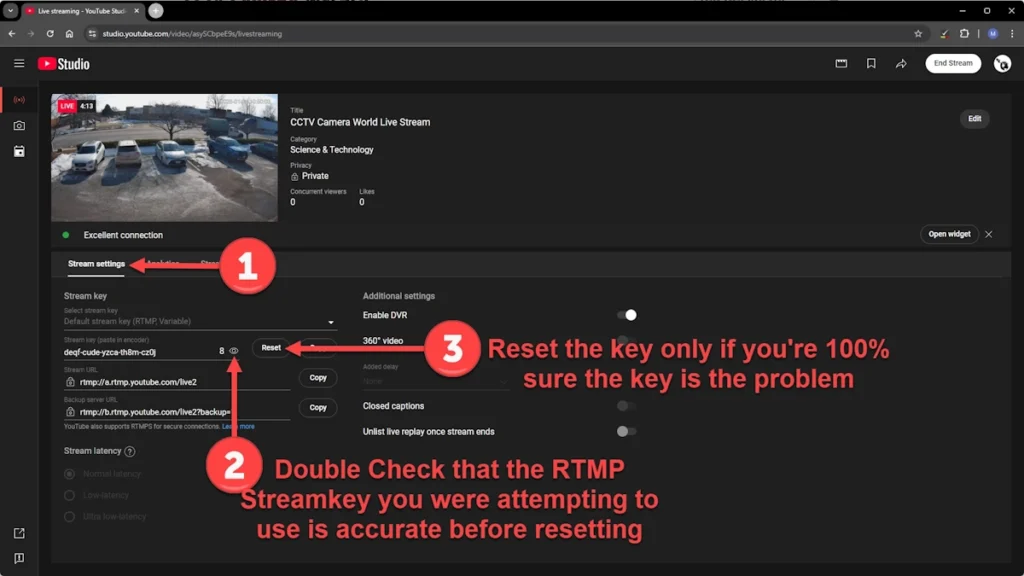
- To get started with resetting the key, follow the steps in Step 1 of this article to get back to your account’s YouTube Studio livestreaming page. Make sure you are in the Stream settings tab.
- Click the eyeball icon to reveal the streamkey and double check you were using the correct one to begin with.
It is not uncommon for customers to accidentally add a character or space to their streaming RTMP URL, as discussed in Troubleshooting section 4.
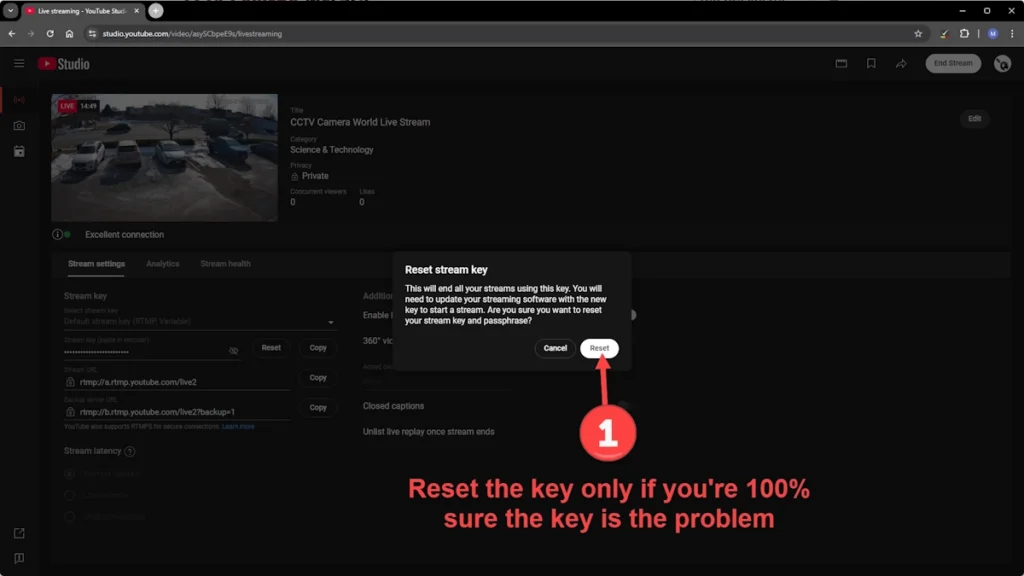
- If you are confident your original RTMP stream is correct and suspect there is an issue with your existing key, click the reset button next to the Stream key field.
- Click the Reset button in the confirmation popup.
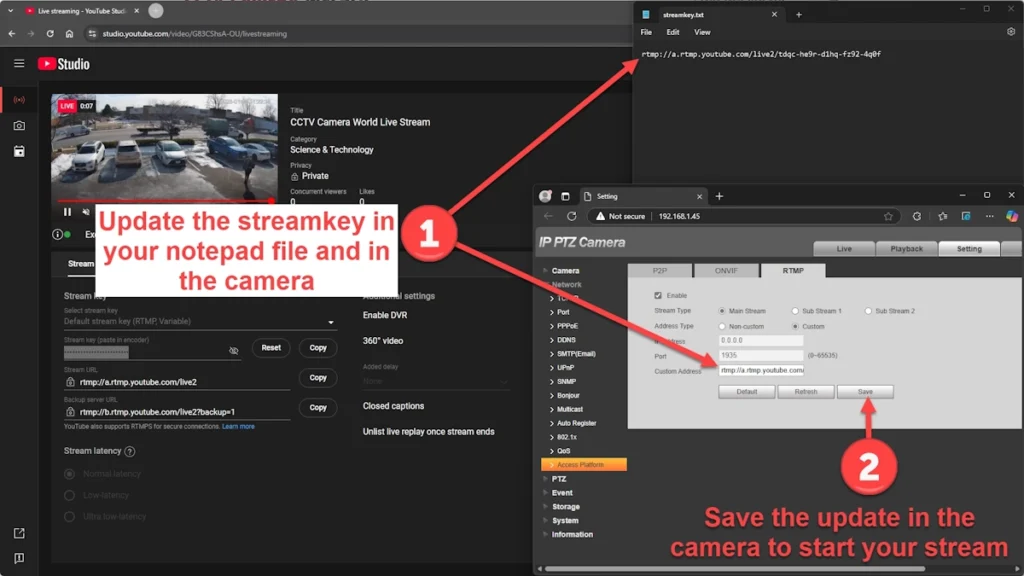
- Update the stream key you have saved in your notepad file and within the camera’s livestream settings. Be sure to click the Save button in your camera to start the stream with the new key.
- Note: If the camera is still unable to stream to YouTube, there is likely a setting or step you missed in the tutorial and in the Troubleshooting section. Please consider purchasing a networking support session for our techs to assist you remotely.