

Professional Video Doorbell Setup
Consumer based doorbell intercoms are available everywhere these days promising easy remote viewing and cloud storage. All of them are promoted based on remote viewing, notifications, and cloud storage which might be great if you are going to be using the cloud based doorbell intercom as the sole security camera on the property. There are shortcomings with all those systems that cannot be ignored when trying to integrate into a complete security camera system for your home or business.
After user feedback from customers who have tried cloud based intercoms, we have compiled the list below of their shortcomings that users are searching a replacement for:
- Monthly cloud storage fee for each camera
- Delay in accessing the camera feed or video recording over the web
- Inability to integrate the intercom in to a NVR camera system for recording video over 30 days
- Poor technical support provided by agents located outside the USA
- Lacking the ability to connect a dedicated LCD monitor to interact with the person at the door.
All of the consumer oriented doorbells rely on using an iOS or Android mobile device, which makes it impossible to use the doorbell in a business or home setting. You would have to give your babysitter or employee a mobile device to answer the door. That's price prohibitive and impractical, hence we find customers looking for alternatives that can function as a traditional intercom without relying only on a mobile device to answer the door.
Solution: Professional Doorbell Intercom System
For a professional intercom solution with a dedicated answering device we recommend the following two items:
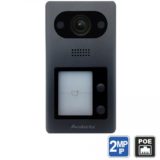
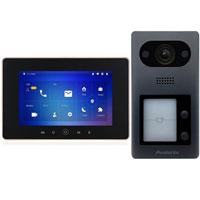
Professional Video Doorbell
- Item IC1080POE
- PoE Connectivity
- Use as dedicated intercom at entry way
- PoE Connectivity
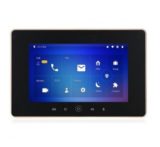
Video Door Phone Home Station
- Item ICM7
- 7 inch Touch Screen LCD
- Use to monitor who is at the door without needing a mobile device
- Two-way talk with multiple video doorbells one at a time (item IC1080POE)
- PoE Connectivity
Both the intercom outside and the home station are easy to wire using a 4 port PoE switch as shown in the video below. PoE connectivity makes it easy to send video + power + data all over a single network cable. An NVR can also be added to the setup to allow video and audio heard by the doorbell intercom to be recorded just like any other PoE camera we offer.

The video intercom and home station ship pre-configured with settings to work together on a network that has a router IP address of 192.168.1.1. Here is a quick tutorial on how to check what your router's IP address. If your router's IP address is something different, continue following the Advanced Setup section on how to change the IP addresses on the intercom and home station yourself.
Advanced Video Doorbell Setup
If your router's IP address scheme does not match 192.168.1.1, the pre-configured settings on the intercom and home station will not work on your network. Secondly, if the default IP addresses of 192.168.1.110 and 192.168.1.111 are already being used on your network by other devices, you will need to change the settings on the intercom and home station.
In order to fix this you will need to modify the IP address that is set on the devices.
Reconfiguring the Intercom
To access the video intercom directly from a different network you will need to follow our guide How to Connect an IP Camera to a Computer. To decide what your IP address scheme is for your network we recommend reading this guide in full.
It is recommended that you change the IP address on the intercom first. Watch the video below to learn how to change the IP address for the intercom. The correct IP address needs to be set under Network settings in the Basic tab and also under SIP Server tab. Do not change any username or password information.
Note: the gateway must be set to your router’s IP Address for the intercom and home station to connect.

Reconfiguring the Home Station
The Home Station will also need to have it’s IP address changed to match your computer network. The quick video below shows you how to change the IP address on the home station using its touch screen LCD.

Connecting the Intercom to the Home Station
After the Home Station and intercom have updated IP addresses you will need to add the intercom back to the home station. Watch the video carefully as you will need to change the IP address in several places. If you are unable to connect to the intercom check these settings:
- IP address of the intercom
- IP address that is set for the SIP Server in the intercom web interface
- IP address of the Home Station
- Gateway IP address matches your router’s IP address on both devices
- Password of the intercom under the VTO entry on the Home Station
