


Free DDNS Setup for IP Cameras and NVR DVR Recorders

So you're having trouble viewing your security camera system remotely, and you've already read our articles on forwarding your ports. Unless you pay your ISP (Internet Service Provider) for a static IP address you will need to set up Dynamic DNS (DDNS) in order to access your home network remotely. This article will explain what DDNS is, how to get free DDNS service, and configure it on your security cameras and security DVR recorders purchased from CCTV Camera World. That's right, you can even create DDNS entries on our IP Cameras.
What is DNS?
DNS stands for Domain Name System. Every site that you access on the web has an IP address, but generally, you don't enter the IP address to go to a site. Instead, you enter a hostname or domain name such as www.cctvcameraworld.com. When you enter the hostname in your web browser it gets sent to DNS servers through the internet to find a matching IP address for that hostname. You are then routed to that matching IP address to view the web page.
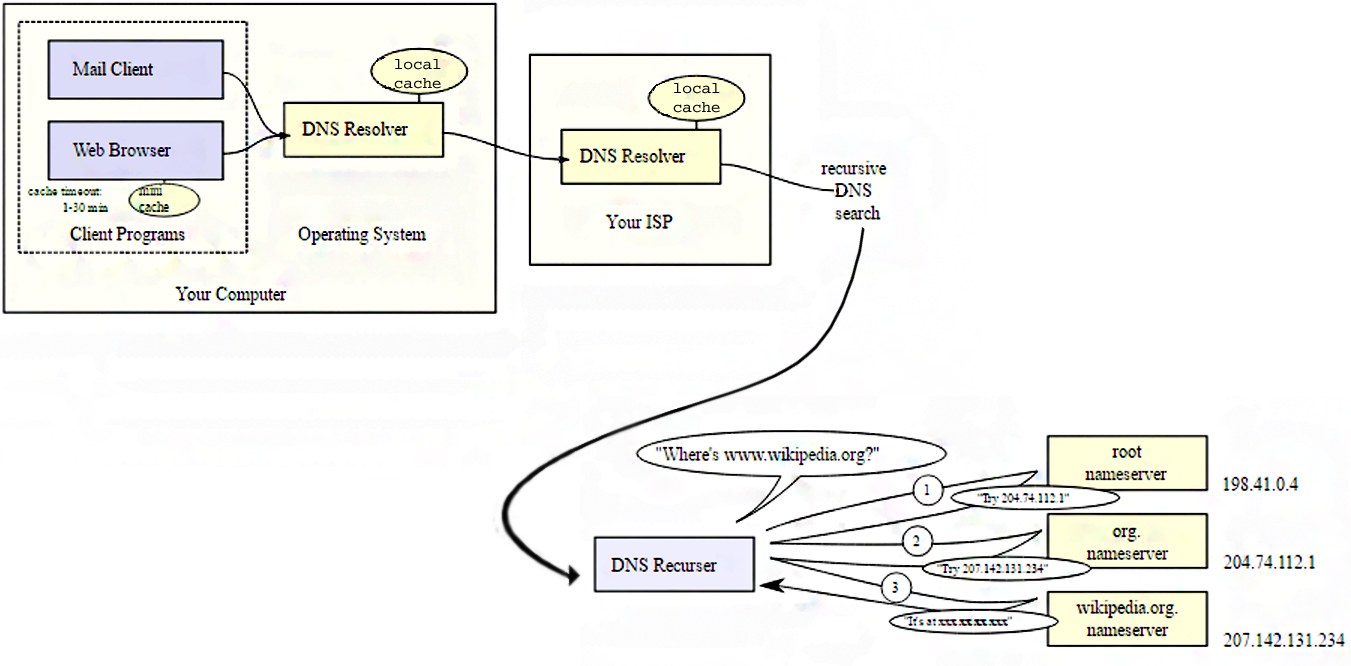
[+] Click Image to Enlarge
Dynamic DNS is a way of updating a DNS name server with your changing IP address assigned to you by your internet service provider (ISP). A changing IP address is called a Dynamic IP Address. Unless you subscribe to a static IP address with your internet service, your ISP uses DHCP to assign addresses to its customers. Eventually, the lease on that address runs out. Sometimes you may get the same address again, other times it will change. When your external IP address does change, the DDNS service will update the record of your hostname to correspond to the new IP address.
Why Use DDNS?
In order to have a consistent way of remotely accessing your NVR to view your surveillance feed remotely, you need to have a constant pointer to your home/office network. If you don't have a static ip address on your internet connection, then configuring DDNS is an efficient way to ensure that you can reach your device over the internet when away from its location. If your IP changes while you're away, you'll be pointing to someone else's network. You can't access the cameras if you're not pointing to your own network. With this configuration, you won't have to worry about your property while you're away.
How to set up DDNS for Free using NO-IP
One of the simplest ways of setting up DDNS for yourself is through NO-IP. They provide a free DDNS service that's really easy to get running. Click the link above to get started.
Step 1: Register a Free Account
In order to use NO-IP's service, you'll need to register with them. It's quick easy and free. Provide the information required and create a hostname. After that finished click on "Free Signup."
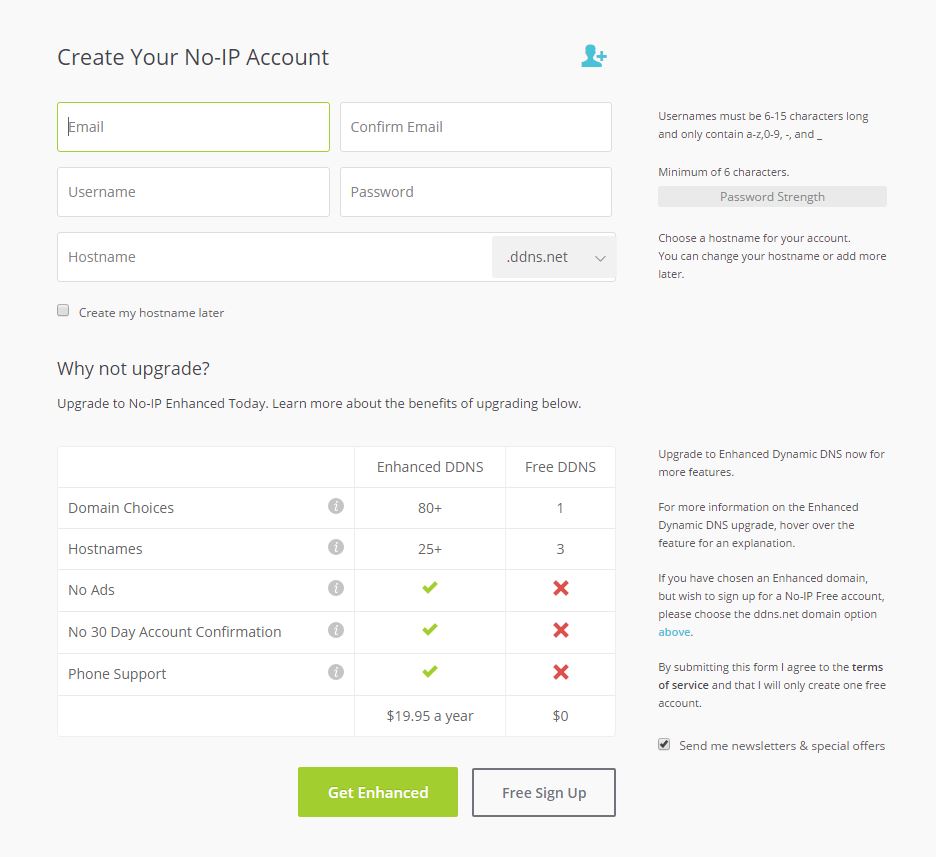
[+] Click Image to Enlarge
Be sure to keep a look out for confirmation emails from them every 30 days if you opted for their free service. They want to verify that you're still using the DDNS service. Without responding they will disable the account. If you don't want to be bothered, they do have a low annual rate.
Step 2: Configure DDNS on Your DVR or NVR
To make DDNS effective you will need to have a way of contacting the servers to update your IP address if it's changed. You could do this by leaving a computer on constantly using their DUC software, but there's no reason to waste electricity just to view your HD security cameras with DDNS. Our security video recorders and IP cameras are capable of synchronizing with various DDNS providers on their own. Once your account is established and confirmed via email you'll have everything you need to create an entry on the camera, DVR or NVR. There are two methods you can use to input the settings for your DDNS account on your device. You can login to the camera's or recorder's built-in Web Service using a web browser as discussed in Step 2a, or you could login directly in to our DVR or NVR and use their GUI interface as described in Step 2b.
a) Using the Web Service
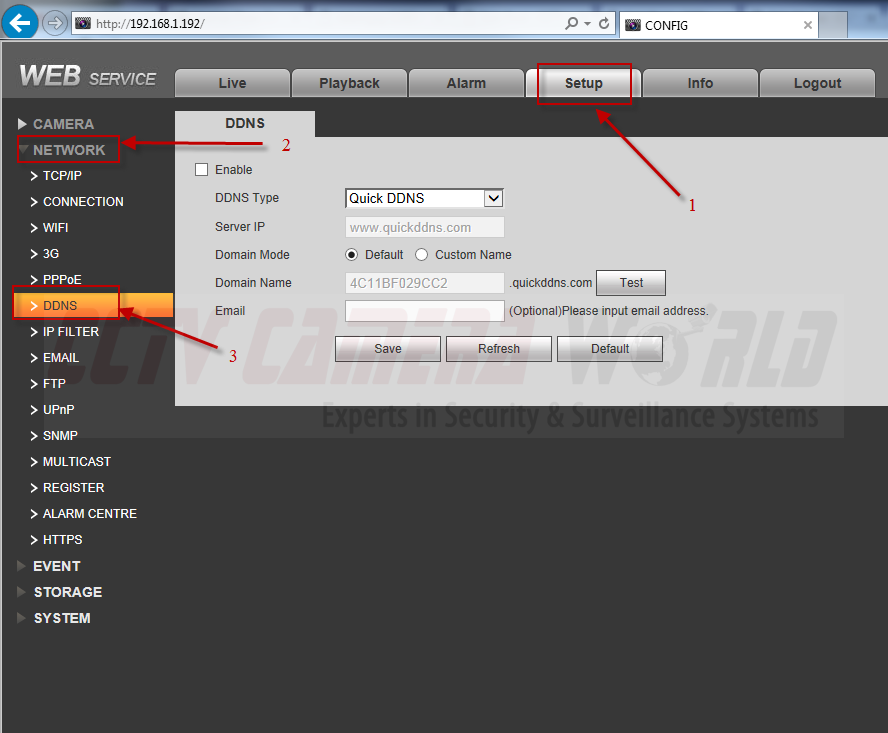
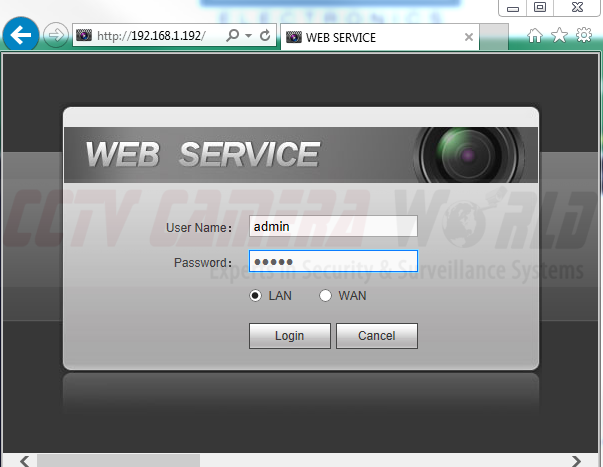
The next step is to configure DDNS settings on your camera or recorder. Make sure that you use Internet Explorer 11 and it is configured to work with the ActiveX controls used by our equipment by following this configuration guide.
- Open Internet Explorer 11 and navigate to the IP address of your device to login. The default username and password are admin.
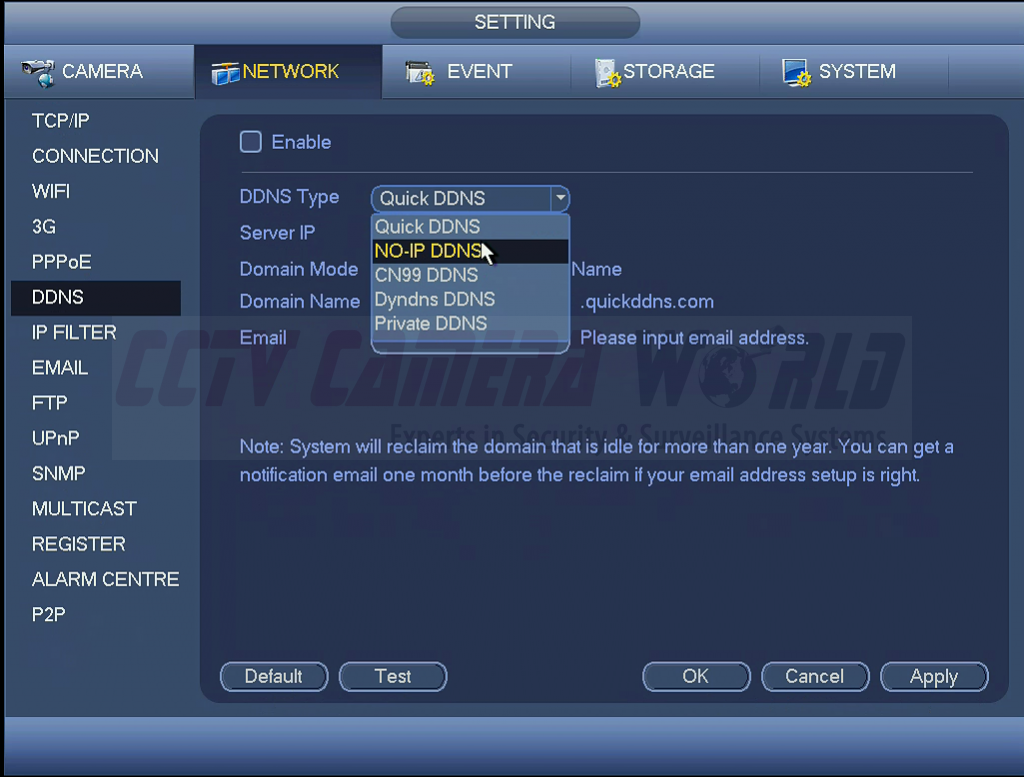
- Navigate to Setting > Network > DDNS
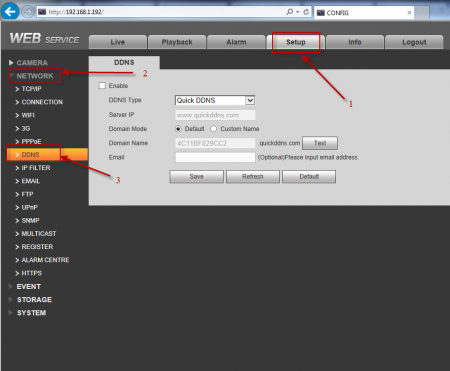
[+] Click Image to Enlarge
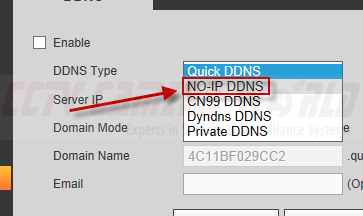
- Click on the drop-down box for DDNS Type and select No-IP
- If you are using a DVR or NVR, then you should see a screen like the one below. Click on the box marked Enable and enter your information then click Save.
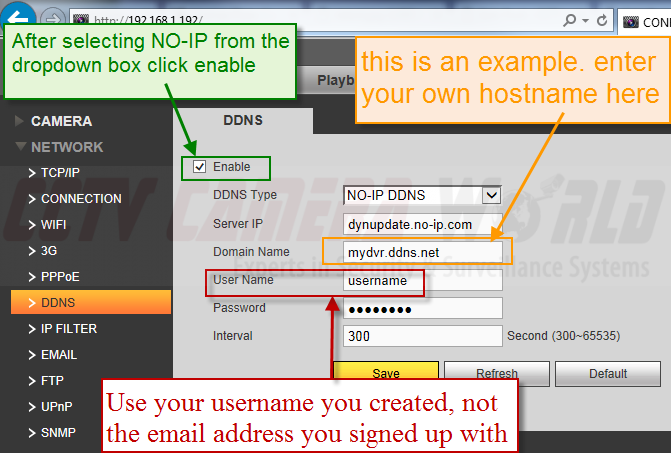
Entering DDNS settings in to your DVR
If you are using a IP camera, then you should see a screen like the one below. Click on the box named Server Type and enter your information then click Save.
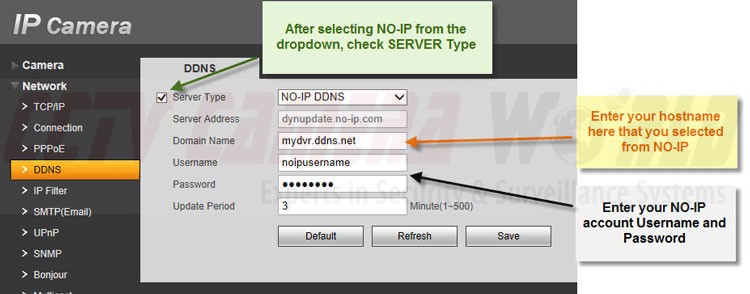
Enabling DDNS on your IP Camera
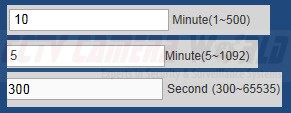
NOTE: Pay attention to the modifier to the right of the last value (Update Period or Interval). Some are in minutes, others are in seconds. You'll want your DVR/NVR/IPC to ping back to the DDNS servers more than once every 5 hours. Personally I prefer them to ping back every 5 or 10 minutes, or 300 seconds. Here is what your Update Period field should look like:
b) Using the DVR or NVR Interface
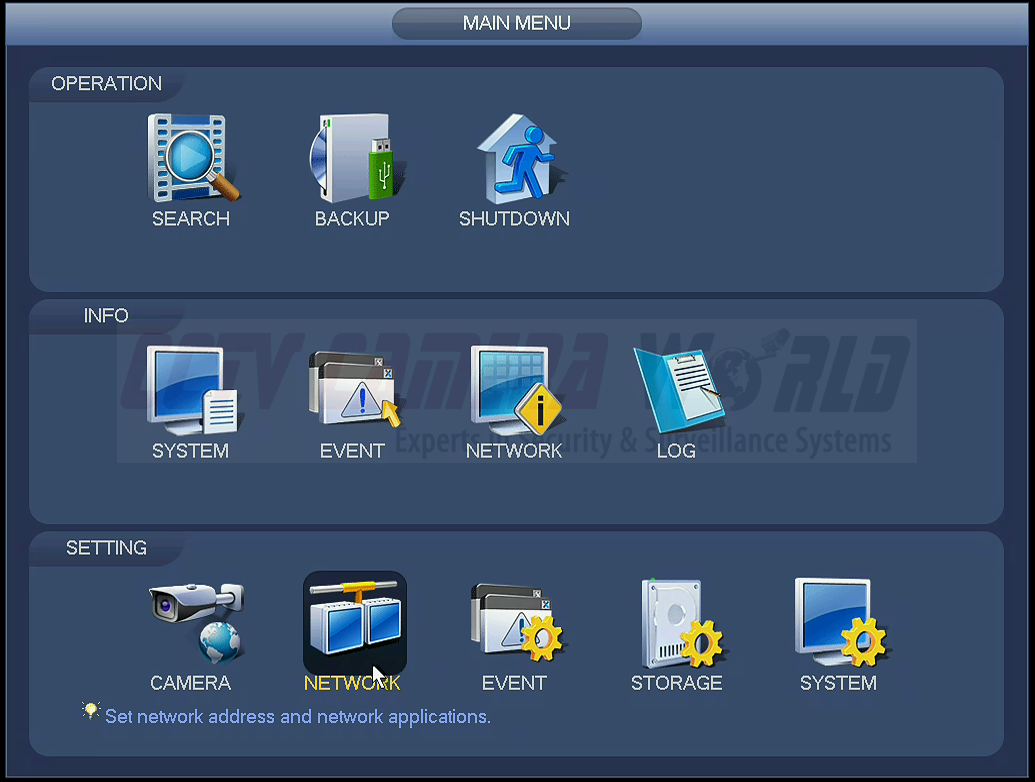
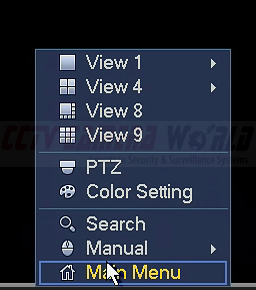
- Login at your DVR and right-click on the screen to begin navigating, and select Main Menu
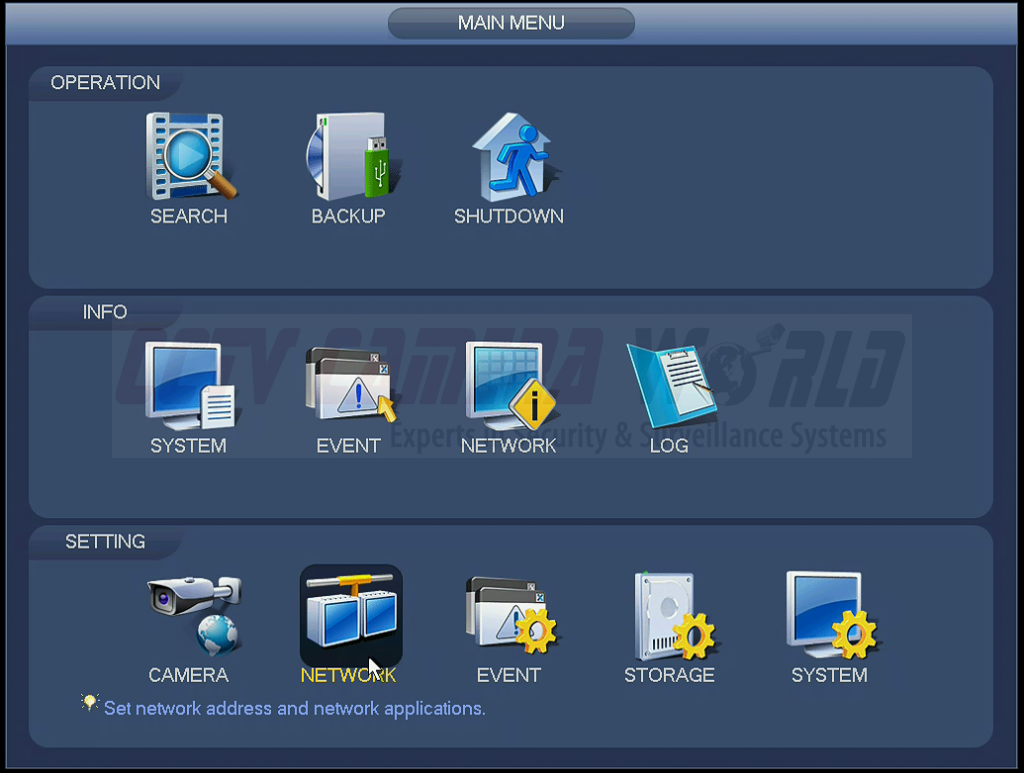
- From the Main Menu under Settings select Networking
[+] Click Image to Enlarge
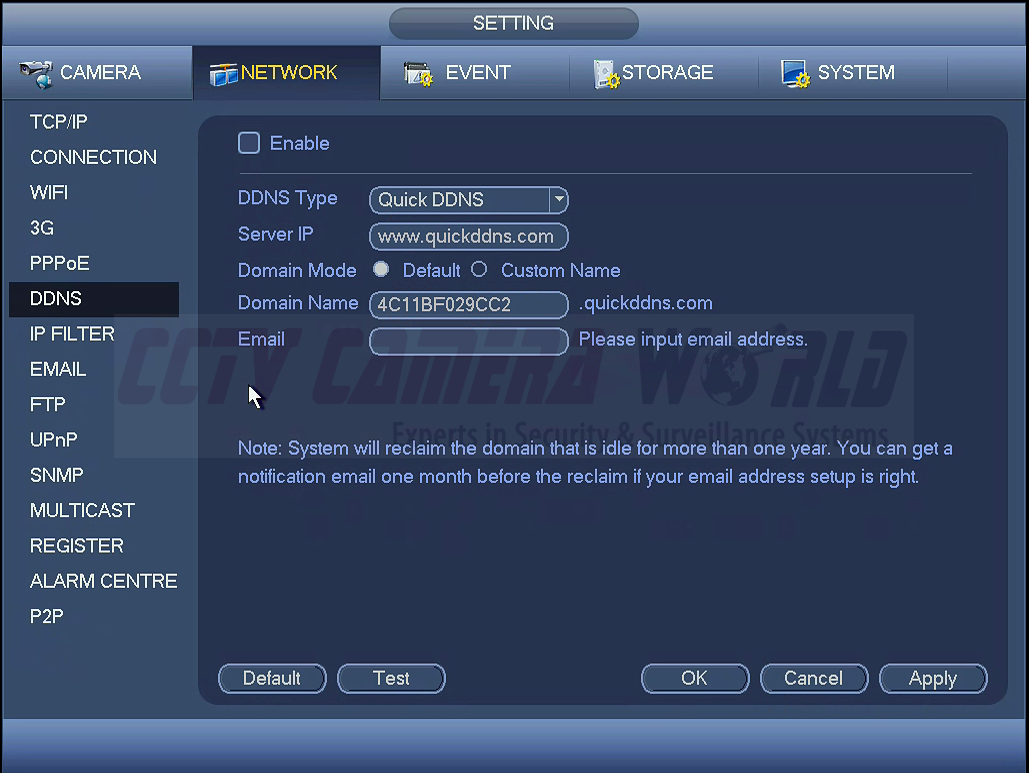
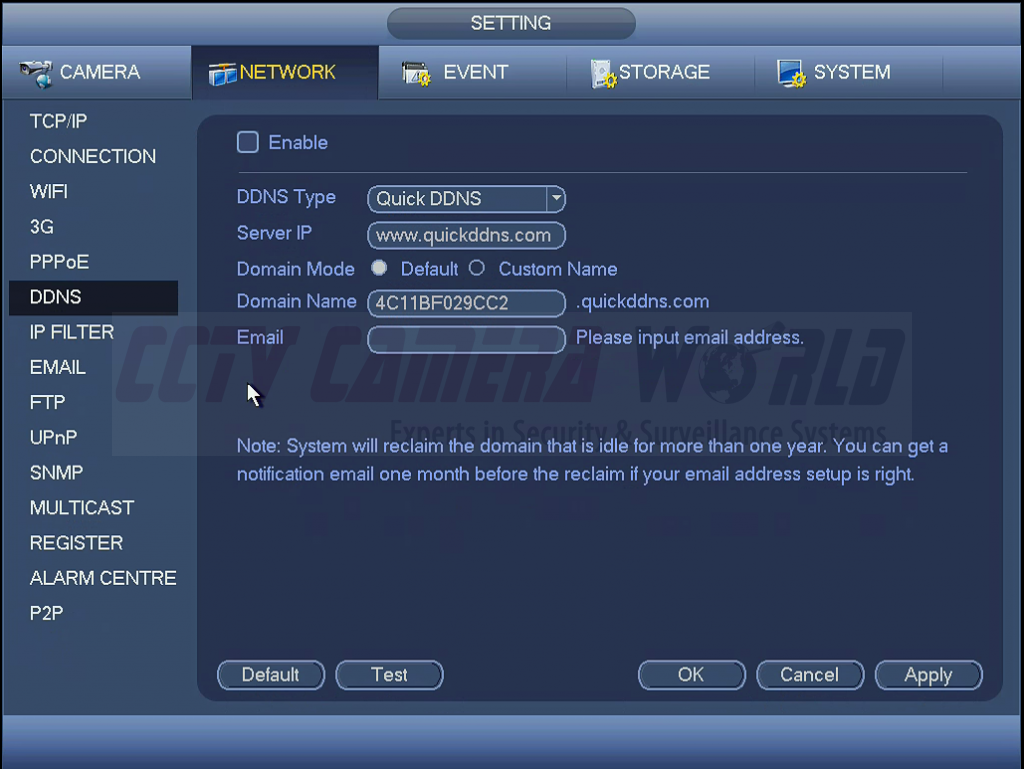
- On the left select DDNS, you'll be brought to this landing page
[+] Click Image to Enlarge
- In the drop-down box select No-IP
[+] Click Image to Enlarge
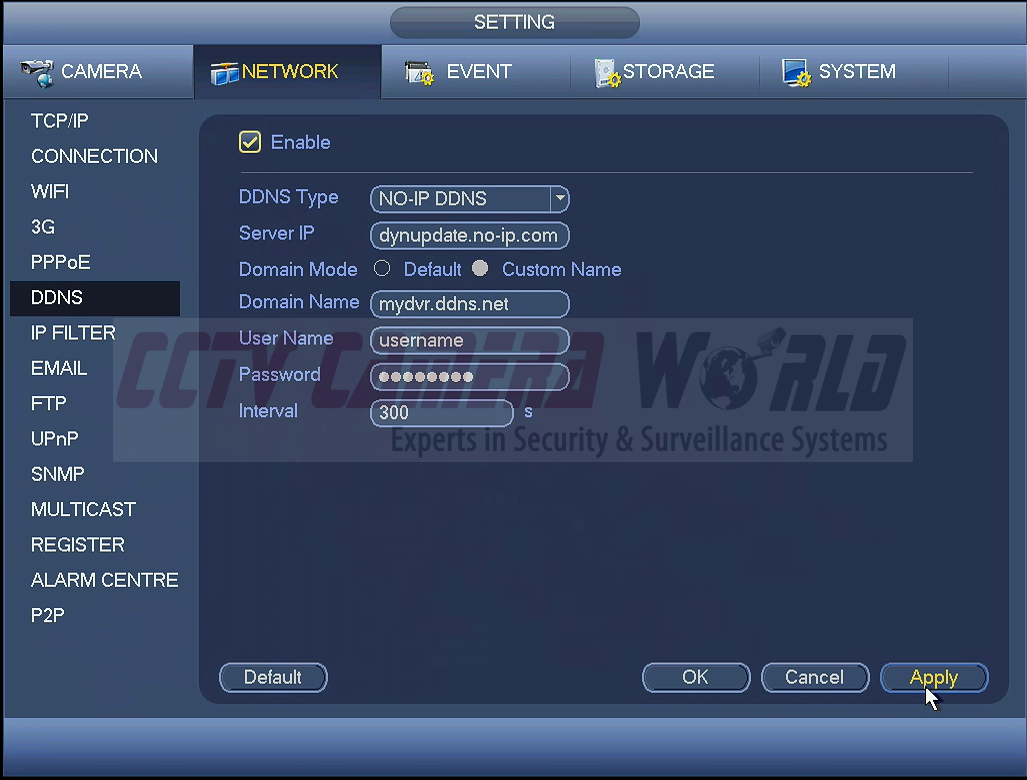
- Check the box labeled Enable and input your No-IP account information then click Apply
It's important that you use the username you created with No-IP, not the email address you signed up with.
[+] Click Image to Enlarge
Now that you've completed the configuration you're all set. Just keep an eye out for those emails they'll be sending you every 30 days if you chose the free version. If you rely on a pointer to direct you to your IP address you wouldn't want to lose it.
Step 3: Using your Hostname to Access your Security Cameras
There are a few methods to accessing your system remotely. If you've followed this guide, and your required ports are open on your router you can use your smartphone, tablet, web browser (Internet Explorer 11 or Firefox), or SmartPSS to access the system.
Important Note About Hostname Use
One thing to keep in mind while using DDNS is that while you are connected to the same network as the DVR/NVR/IPC using the hostname will not direct you to the device. While you are on your internal network (LAN side) do not try to connect from the WAN side. Just enter the device's local IP address where the hostname would go. The default IP address of most of our devices is 192.168.1.108.
Using a Hostname with IE11
To view your system remotely using IE11 open the web browser and type in the hostname for the location and press [Enter].

Provided you've forwarded your ports your router will direct the traffic to the DVR/NVR/IPC and you will be able to login via the web service.
If you have more than one device on the same network, with separate HTTP ports forwarded to the systems you will enter the hostname followed by a colon followed by the port number.

Using a Hostname with SmartPSS
If you're going to be using SmartPSS to access one or more systems remotely the set-up is straight forward. Open SmartPSS and login as an admin. Select Devices on the bottom left corner of the interface.
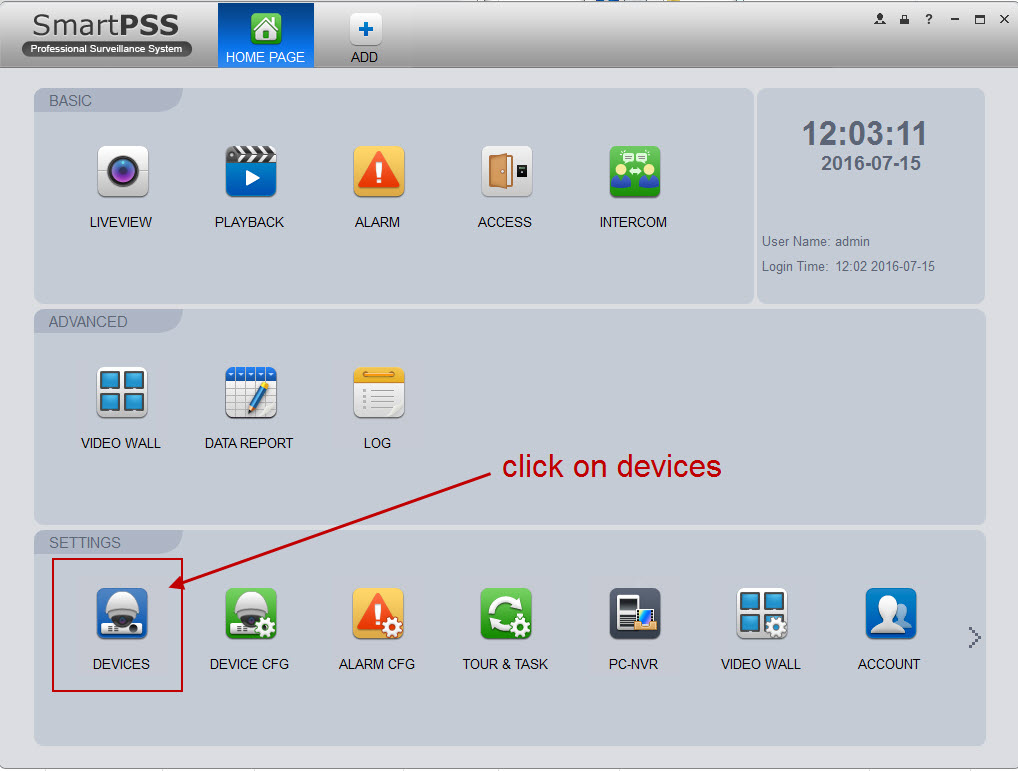
[+] Click Image to Enlarge
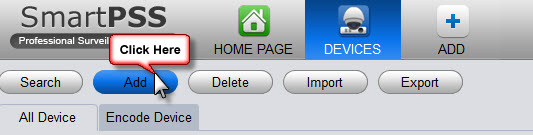
Now click Add at the top
Now you are given a partially filled out form. Complete the form by giving your device a name, entering the hostname in the section for IP/Domain, and filling out the credentials to login to the unit. If you've changed the default data port enter that here where 37777 is. If you want to add multiple devices that are on the same remote network use the hostname and change the data port to the appropriate value.
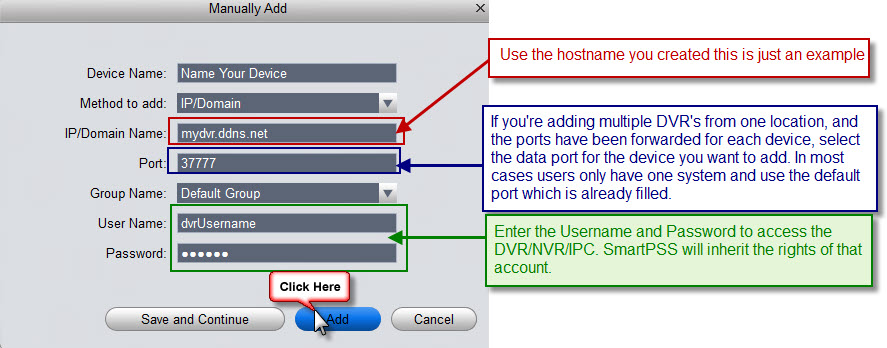
[+] Click Image to Enlarge. Manually adding your camera or NVR in SmartPSS with a DDNS entry.
Using a Hostname with a Smartphone
If you're using the iPhone or Android app, using a hostname to access your system is the same configuration across both platforms. Go to the device manager and click the [+] symbol in the top right corner. From here select IP/Domain. Then fill out the login form the same way as it's described above in the SmartPSS instructions.
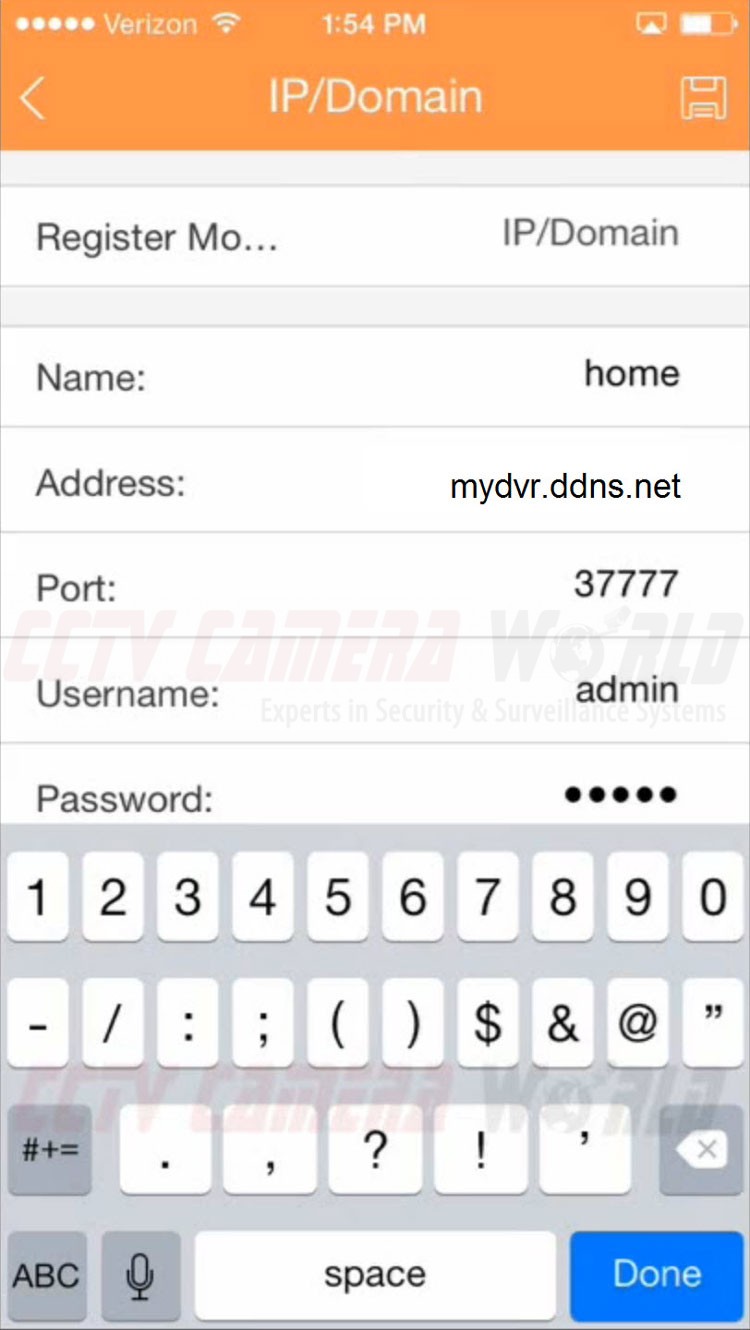
Once again, if you're connected to the network that contains the camera or recorder using the hostname will time you out. Disconnect from WiFi and use your 4G LTE connection to view the device. If you want to view while on the same local network create a second entry that points to the device's private IP address, such as 192.168.1.108 in the Address field.
DDNS is a very useful tool. The internet wouldn't function as we know it without it. Having to configure DDNS on your device can be avoided if you're willing to pay the monthly fee to your ISP for a static IP address. Since account creation and setup is easy, using a DDNS service allows you to avoid paying that monthly fee, and the end result is the same.
When you use P2P networking such as scanning a QR code in to your mobile app to connect to your DVR, you are relying on a cloud server that's being shared by several customers. While P2P makes things simpler there are potential privacy and security risks. Purchasing a networking support session for remote support allows our knowledgable technicians to set up port forwarding for you. Port forwarding provides a secure direct connection from your phone to your DVR and is highly recommended.
For security purposes, after you have done networking, change the password on your device. Our devices accept passwords up to 6 alphanumeric characters long.