

How to stream a security camera to YouTube Live

There are many reasons you may need a security camera to broadcast to YouTube. These include animal cams at a zoo such as a PandaCam, or an EarthCam located in Time Square to show what's happening at your favorite vacation spot. Live streaming is also frequently used in streaming any live event such as a First Robotics Competition or a Diving Event. Even for commercial applications, a builder may want to showcase progress of their famous building project to the community or their investors. All of these scenarios require a camera to stream to a website where multiple users can watch live video.
While one may think it is as simple as purchasing a security camera and "putting it on the internet" but it is far more complicated and involves a lot of steps which are outlined below and demonstrated in the video below. By following the instructions provided in the guide below you will be able to stream your security camera to YouTube Live for free.
Note: CCTV Camera World can only provide support for products purchased from CCTV Camera World. To provide support we require purchase verification. If you didn't purchase from CCTV Camera World, please contact the company you purchased from for assistance with your product.
IMPORTANT: For your YouTube account you will have to wait for an activation period before you can stream to their services. YouTube makes you wait for 24 hours before attempting to start streaming via their Live service. This helps them weed out people trying to host pirated movies, music, and other illegal content. Please make sure you activate your account for use with this service before following the guide below.
If you want a standalone IP camera to stream to YouTube without needing a computer then be sure to check out our Live Stream an Outdoor Camera to YouTube Live guide.
Please be sure to read this guide in its entirety and watch the video below. For the process described in this post to work properly, please make sure you do not have a firewall that is conflicting with OBS and preventing it from transmitting data to YouTube.

What do you need to stream a security camera to YouTube Live?
Here is a brief summary of what you need with further explanations below.
- Windows computer with Core i5 or i7 and at least 4GB of RAM
- Internet connection with 3-5 Mbps upload speed
- A single IP Camera or NVR Camera system
- Software you will need: Open Broadcasting Software, and a web browser
- YouTube account with YouTube Live activated
How powerful is your computer?
Streaming your security camera to YouTube Live is a relatively simple task if you follow our guide. You will need a computer to stay on while converting the video stream from your security camera to send to YouTube Live. The computer you intend to use needs to be able to run the required software while also taking the video stream from your camera and transcoding it to steam to YouTube Live. We recommend that the computer has an Intel Core i5 or i7 processor (a Ryzen 5 or 7 for AMD users) and at least 4GB of RAM. Please note if you attempt to use a PC with lesser hardware then you will experience dropped frames and slow performance on your livestream.
How fast is your internet upload speed?
The second most important requirement is your internet upload speed. A slow upload speed limits the quality and quantity of video streams you can send to YouTube Live. To stream one camera at 1080P resolution we recommend an upload speed of 3 to 5 megabits per second (Mbps). It is important to note that surveillance cameras require 4Mbps using H.264 video encoding.
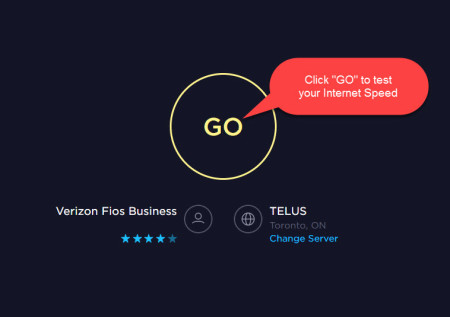
To check if your broadband upload speed is adequate, you can run a speedtest by visiting www.speedtest.net and pressing the GO button.
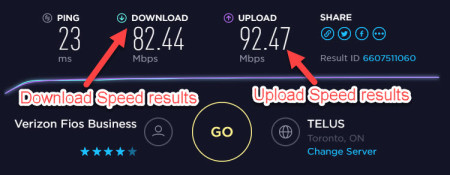
Below is an example of speed test results we ran on our internet connection. We have a business fiber line, hence our download and upload speeds are above 80mbps. and you may have vastly slower upload speeds if you have a cable modem or dsl.
What kind of camera should you use?
We recommend you read our Security Camera Buying Guide to select the camera which will be suitable for your usage scenario. Briefly, to choose the best camera for your use you have to consider the resolution, lens, and infrared distance needed for your application. For most applications for a general 80 degree view, a 4MP 2K camera will suffice. If you are looking for 4K video then we suggest our 4K security cameras. We discourage the use of PTZ cameras because you might be under the impression that you will be able to control it through the Youtube Live stream, which you cannot do.
It is important to note that if you are looking to stream only one or two cameras without any on-site recording, then an IP camera will be best as it is the most economical choice. However, if you need on-site recording and multiple cameras then a complete security camera system with recorder would work best for you. Our recorders have a built-in web server from which a RTSP stream can be fetched for any of the cameras connected to it.
How to setup a security camera to broadcast to YouTube Live
If you believe you are ready to broadcast your camera after completing the necessary preparation outlined above, then you can follow the guide below. We have a video guide that shows the entire process outlined below from start to finish on how to use Open Broadcaster. Keep in mind that this video was made for broadcasting only one camera. You can even stream video from any of our DVR recorders to YouTube Live following the same process.
Step 1) Connect and configure the camera to work on your network
First you need to ensure that your security camera or DVR/NVR is able to communicate on your network. This will allow your computer to access the video stream you intend to broadcast. If you are unfamiliar with computer networking principles, then we suggest following our guide how to connect security cameras to the internet to configure the camera or DVR to work on your network. In the end you will have a local network IP address assigned to the device.
In Step 3a, when you construct the link to your camera, you will need to use the IP address that you configured your camera to.
Step 2) Installing Open Broadcaster
The program we will be using in this guide is an open-source, free to use software called Open Broadcaster Software, otherwise known as OBS. We are recommending this software because it is easy to use and more importantly free. There are no licensing, hosting, or restrictions on using OBS to stream to YouTube Live. Once you have it configured and streaming all you have to do is start it and stop it.
To install OBS you will first download and install the setup file from the following link: https://obsproject.com/download/.
Select the large Windows Icon and then click Download Installer. Run the downloaded file.
You may be prompted to install the Visual C++ 2017 Redistributable, download and install this before trying to open up the OBS-Studio-xx.x.x-Full-Installer.exe again (note: this is shown in the video that supplements this article).
After you have installed the Visual C++ 2017 Redistributable, locate or redownload the OBS Studio install file again and run it. Leave all of the defaults while running through the install wizard.
On the first run of the program you will be shown an initial configuration wizard after accepting the License Agreement. Do not run through this wizard.
Step 3) Configure OBS to capture your video stream
To begin the process of streaming to YouTube you need to capture your security camera’s video stream over your local network. To do so, you need to use a URL (link) to capture the stream.
3a) Construct the URL or link to your IP Camera
You will first have to construct the RTSP URL or link to your IP camera. You can accomplish this by gathering what the IP address of your camera is. In our example the IP address of our camera is 192.168.1.131.
The general form of the URL is:
rtsp://username:password@IPAddress:544/cam/realmonitor?channel=1&subtype=0
Here is what each component of the URL means.
- rtsp:// is the protocol for the camera stream.
- The username and password will be replaced by the login credentials of your camera
- The IP address will be for your specific camera or DVR
- /cam/realmonitor? allows you to access the correct page on the camera or DVR
- channel=1 refers to one of the parameters being sent in the URL. Channel is the camera number. If you are accessing the stream from one IP camera, then channel can be 1. IF you are trying to access one of several cameras from a recorder, it would be equal to the channel number of the camera on the DVR/NVR.
- &subtype=0 is the video stream subtype parameter. 0 is used to access the Main Stream from your camera, and 1 is used to access a Sub Stream from the camera.
In our example our RTSP URL is:
rtsp://admin:[ourpassword]@192.168.1.131:544/cam/realmonitor?channel=1&subtype=1
Make sure that this information is correct or your stream will not work.
3b) Add video source to OBS
Commanding OBS to capture something is relatively simple. For this you will want to press the + button underneath the section labeled Sources.
This will bring up a menu where you will select Media Source. Here you can rename the source you are capturing, in our example we are calling it IP Camera Stream.
Make sure that the checkbox next to Make source visible is checked and press OK.
Another interface will appear where you can configure the media source we have just created. For this project you will uncheck all of the options.
3c) Using your constructed link inside of OBS
Once you have all of the options unchecked you will see a blank Input and Input Format field. We can ignore Input Format and focus on the Input.
This is where you are going to paste the URL you constructed in step 3a.
Open the notepad where you have placed the link. Highlight the entire link making sure that you do not have any spaces, at the front or the end of the link.
Right click and click copy on the link, this will copy it to your clipboard.
Navigate back to the Open Broadcaster Software window and right click in the space next to Input. Click paste and your link will be copied from your clipboard to the input textbox.
Press OK. Your camera's stream should appear in a small window inside of the Open Broadcaster Software. If it does not then you have something wrong in your link or your camera is inaccessible from your computer.
3d) Scaling your video stream inside of OBS
If you were successful in accessing your stream inside the OBS software then you may find that it has been scaled down or is not the size you want it to be. You can remedy this very quickly.
In our example we hover over the stream and right click it. This brings up a menu.
In this menu you will navigate down to and hover over transform, this brings up a sub menu.
Here you can select Fit to screen, Stretch to screen, or Center to screen. For our example we have stretched the stream to the window. You can play around with these settings to fine-tune the picture to your liking.
4) Determining your stream key via the YouTube creator studio
To broadcast video from OBS on your computer to your YouTube account, you need to obtain a stream key from YouTube for Live streaming. The stream key is something that uniquely identifies your data and prevents others from using your YouTube channel to broadcast their media from OBS.
You can find this inside of Creator Studio in your YouTube account by first clicking the icon in the upper right hand corner; this will be your profile picture or the default YouTube head and shoulder photo icon.
It will bring up a small menu with your channel, click the Creator Studio.
Note: You may encounter Creator Studio Beta which does not support Live. You can bypass this by clicking Creator Studio Classic in the bottom left of the screen. Press skip on the prompt.
When you are inside the Creator Studio you will see a menu on the left-hand side, find the Live Streaming option and click it. Note: a camera is listed there but this is referring to a webcam.
Now you should be at the Stream landing page, scroll down until you see Encoder Setup.
There will be a field called Stream name/key with a reveal button to the right.
Click reveal and highlight this key. Copy and paste it into the a notepad document. Make sure you keep this key private so people cannot use it to stream to your channel. Note: it will count down from 10 and then obfuscate it again. You must copy it before the characters are changed back to dots.
5) Entering your stream key into OBS to broadcast Live
Once you have obtained your YouTube stream key and have captured your IP camera's video inside of OBS, you are ready to stream to YouTube Live.
On the right hand side of OBS you will see a column labeled Controls. Click on the settings button located under Controls.
This brings up the General tab but we are only concerned about the Stream tab. Click the Stream tab.
In the Stream tab you will see the Service option and when clicked it will show many services, such as: Twitch, YouTube/YouTube Gaming, Mixer, and etc.
For this select YouTube/Youtube Gaming. You can leave the Server to Primary YouTube ingest server.
For the Stream key you will now copy your Stream Key from the notepad where you pasted it before. Paste your key into the Stream key field inside of OBS and click apply at the bottom right of the window and then OK.
If you have properly captured the video stream into OBS, activated your YouTube Live privileges, and have the correct Stream Key pasted into OBS then you are ready to click Start Streaming.
You will see your Live Stream start and the video feed appear in your Creator Studio. Note: Since it is going over the internet you will experience a delay between live action and the video shown on the Live Stream.
As of 2021, we have a few select models of cameras that allow direct streaming to YouTube Live without needing an intermediary PC to transcode video to RTMP. You can read more about them here.
Note: CCTV Camera World can only provide support for products purchased from CCTV Camera World. To provide support we require purchase verification. If you didn't purchase from CCTV Camera World, please contact the company you purchased from for assistance with your product.