

How to Enable Audio Recording and Streaming on your DVR
Audio recording and streaming capabilities are a standard part of almost all of the security camera DVRs that we sell. For the analog CCTV camera DVR and the HDCVI DVR it is necessary to enable audio recording through the user interface, whereas for IP cameras with built-in mic the NVR auto detects the presence of an audio stream.
The quick guide below demonstrates how to enable audio recording and streaming on your DVR.

Watch the video below for a walk-through of the steps required to enable audio recording on a blue interface DVR.

Enabling audio on your DVR or NVR
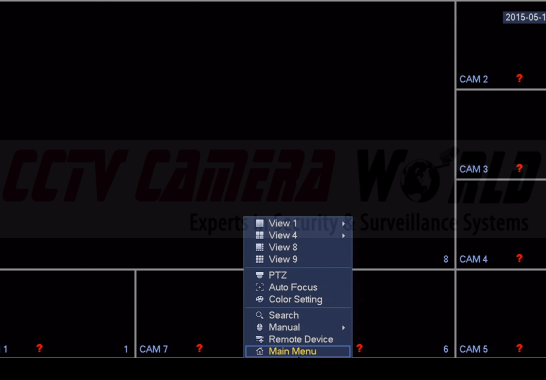
Step 1) Select Main Menu
First, go to the main screen of your DVR showing live feeds when you power it on. Right click anywhere on the screen and go to the bottom of the list and select Main Menu to bring up the main menu options.
Step 2) Select option for Camera
From there, towards the bottom there will be an option for Camera. Choose this to bring up the next menu.

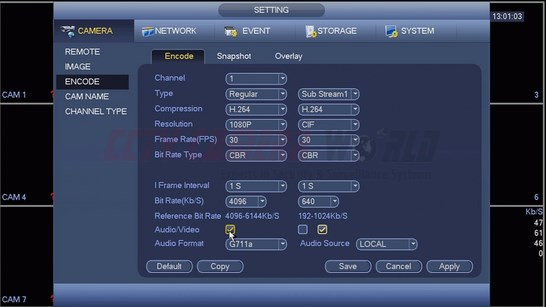
Step 3) Select Encode from the left hand menu, and the top tab
Make sure the Encode tab to the left is selected, and then the Encode tab is selected from the top to bring up the menu we need for altering encoding options for each camera.

Step 4) Select check box for Audio Video for Main Stream
In the left hand column, find the checkbox next to Audio Video and click on it. Make sure it is checked. This will enable audio recording for the Main Stream of the camera that is recorded on the DVR. It will also now allow streaming of Audio with Video for the Main Stream.
Step 5) Select Audio Video Recording checkboxes for Extra Stream
In the right hand column, you will find two checkboxes for the field titled Audio Video. Make sure both are checked. This will allow you to stream audio for the Extra Stream over the internet to SmartPss or our iPhone and Android Apps.
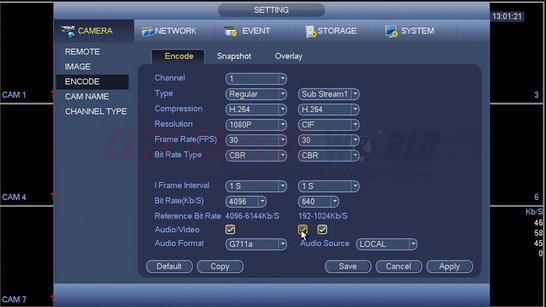
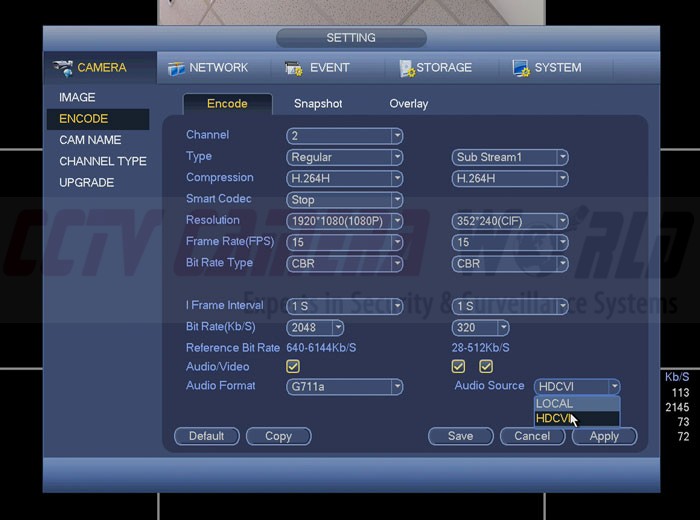
Step 6) Enable Audio Source For HDCVI Cameras
Skip this step if you are not using HDCVI cameras with built-in microphone. HDCVI cameras require the Audio source to be set on the DVR for you to capture the audio stream from the camera's built-in microphone when using a HDCVI DVR. This step is only pertinent for HDCVI cameras being used with HDCVI DVRs that support audio capture over the HDCVI stream.
Step 7) Apply and Save changes
As the last step, click on Apply and Save your settings.
Step 8) Enable Audio
If you have a monitor with speakers and a HDMI output, click the audio icon at the top on screen.
![]()
Now you'll be able to stream and record your video with audio.
If you have any questions, feel free to leave a comment below.