
How to set up a Zoo Cam Live Stream for Free

Using security cameras for purposes other than surveillance is not unheard of and is becoming more popular. Over time more zoos, animal sanctuaries, and even individuals are looking to set up a Livestream over the internet. Live streaming animals and birds can help spread information on conservation efforts, assist caregivers, educate and entertain children, and offer a way to view animals online from around the world. Previously, the process of live streaming zoo cams, animal cams, and bird cams was difficult, involving the use of a dedicated PC. Fortunately there are cameras that come with built-in streaming features to push video to popular live stream platforms such as YouTube Live. In this post we review the equipment that is needed to setup a YouTube Live Stream using one of our IP cameras that features built-in live streaming functionality.

Contents
- What do you need to set up a live stream animal cam or zoo cam?
- How to set up a Live Stream Camera?
- Troubleshooting
Now that some of the IP cameras we carry can stream directly to YouTube Live and Twitch, setting up a live webcam is less complex. All you need is the necessary hardware, and a PC to configure the settings. Once the setup process described in this review is completed, the PC can be removed and the camera functions on its own to stream directly to the web.
The most important benefit of using one of our IP cameras with live streaming capabilities is that there are no recurring costs. We have no recurring charges, and YouTube Live is free for broadcasting one camera feed. You can even embed the video feed in to your website without much difficulty or expense.
Here's What to Expect - Example Livestream
Here is an example stream from Zoo Atlanta in their gorilla habitat that you can view before reading the rest of our guide.

What do you need to set up a live stream animal cam or zoo cam?
If you're interested in setting up your own zoo cam, such as this Panda Cam for your zoo or animal sanctuary, it's fairly easy with the correct camera.
Requirements
Below is a list of what you'll need to get setup:
- Security camera with live streaming capability
- Windows PC for initial setup
- Fast enough internet with IPv4 enabled
- PoE injector to power the camera
- Network cable of appropriate length
- Active user account for live streaming on YouTube or Twitch
- Properly configured computer network - no firewalls, security, or network policies that incorrectly block the webcam
- Maintenance - What to Expect
1. Security camera with live streaming capability
Real-Time Messaging Protocol (RTMP) is a technology that allows video data to be sent over the internet. Just to name a few, RTMP is used by most streaming services like YouTube Live, Vimeo, and Twitch. It allows streaming service providers to receive video and audio data from the camera in a properly encoded format that is suitable for embedding in to a web page.
Prior to 2020, you would have to use a dedicated “encoder” such as a software on a PC to transcode the video stream from your IP camera and convert it to a RTMP-friendly stream. This made live streaming security cameras more difficult and costly by requiring a dedicated PC that had to stay powered on. We covered this older method in our article on how to stream security cameras to YouTube Live.
We designed some of our IP security cameras to include built-in RTMP streaming that is compatible with YouTube live. The inclusion of RTMP streaming in our 4K Camera with Live Streaming reduces the amount of equipment that is needed for live streaming your event, simplifies the process, and eliminates recurring costs.
2. Windows PC for Setup
For the camera to stream to the internet, it needs to be configured to work on your computer network so it can talk to your computer and to the internet. To configure the camera you will need to use a Windows PC. You can use a laptop or desktop computer to access the camera but the PC and camera need to be connected to the same internet router.
If configuring the camera to work on your network sounds difficult, don't worry we can configure the camera for you for Free after you answer a few questions over an email. For complicated setups, there are IT services available at low cost.
3. Is your Internet Connection fast enough?
Since video is made up of several pictures or frames per second, video data is bandwidth intensive. Similar to how watching videos from YouTube requires a fast internet connection, you need a fast enough internet connection to upload the live-stream from the camera.
Each IP camera creates a specific amount of video data per second, also referred to as bitrate. For example a 1080P camera sending video at 30 frames per second has a bitrate of 4 Megabits per second (Mbps). Keep in mind this bitrate is per camera. For example, if you want to stream 2 cameras at 1080P you will need to have 8Mbps upload speed.
We recommended to have even stronger upload speeds so the cameras aren’t hogging the internet connection and leaving no room for other internet traffic.
A quick and easy way to test your internet connection's speed is by running a speed test using a PC on the local network by visiting Speed Test.net.
4. & 5. PoE Injector and network cables
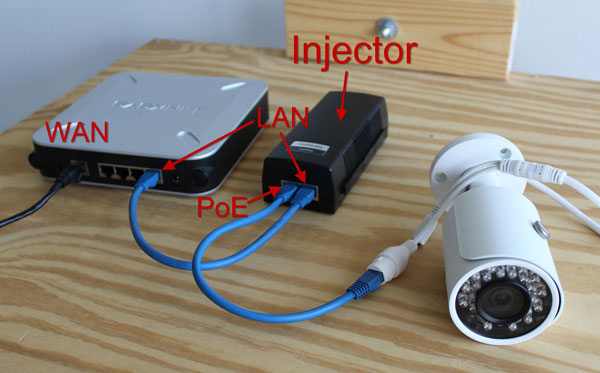
Powering security cameras for a live animal cam is easy by using Power over Ethernet (PoE) technology. All that's needed to get the camera powered and talking is a PoE injector and two network cables of appropriate length. The PoE injector stays indoors next to a network router, connects to a power strip and the router. A second network cable, which is the longer cable, connects the camera to the power injector. If you're unsure of this process be sure to read our guide on How to power a PoE security camera using a PoE injector.
6. Active Live Streaming Account
It is important to note that some streaming platforms make new users wait some amount of time before the user can start a live video feed. The probationary period helps prevent profane, offensive, or stolen content from being broadcast to the world. In this review we are streaming to YouTube Live which requires account verification with a phone number and a 24 hour wait after requesting Livestream access.
7. Properly configured computer network
The process described in this review article works when carried on a local computer network consisting of one internet router with a subnet scheme of 192.168.1.1. If you have a complicated computer network consisting of multiple routers, VLAN, wireless mesh devices, or a corporate firewall then additional configuration of your network devices may be necessary if the process described below does not work.
8. Maintenance - What to Expect
Live stream cameras are extremely easy to set up by following this guide, however, there is some maintenance that must be done if the internet or power goes out where the camera is. Unfortunately when the stream to YouTube stops due to internet or power outages, YouTube sometimes drops the stream entirely. If this happens someone must be on-site to re-enable the stream to YouTube. This can also occur if you have your camera configured to automatically reboot. Re-enabling the stream is easy, you will just need to disable and re-enable the RTMP livestreaming feature that we discuss in the tutorial below.
How to set up a Live Stream Camera?
Once you have all the necessary equipment described above, lets get started. Before installing the camera we suggest testing the described below inside your home or office.
Step 1) Connect the camera to your router
The first and probably most important step in the process is connecting the camera to your router. The camera will require a power source, and network cable connection to your internet router. This can be done in a number of ways which are discussed in detail in our article on How to Connect an IP Camera to a Computer. The simplest method to set up one IP camera for live streaming using a PoE power injector and two network cables. We've pictured a simple setup below of how your wiring should be.
Our IP cameras will usually come configured with an IP address of 192.168.1.109. Please feel free to let our team know if there is an IP address you would like set on the camera when you order. Otherwise you will need to configure the IP address on the camera manually. If you’re unsure how, or what an IP address even is, then you’ll want to follow our guide on How to connect your security cameras to the Internet.
Step 2) Get the stream key from the streaming service website
In this example we’re setting up a stream to YouTube Live so we will need to login to our YouTube account to access our YouTube Studio. For other streaming services they will usually have an online guide or video that shows where the stream key is located. No matter which service you use, there will be a stream URL and stream key that has to be entered in the camera to authenticate the video stream.
To set up a Free YouTube Live Stream, you will first need a YouTube account. This can be an account you already own, or a new account. However, it’s important to keep in mind YouTube requires a 24-hour waiting period before you can stream if you’ve never tried before.
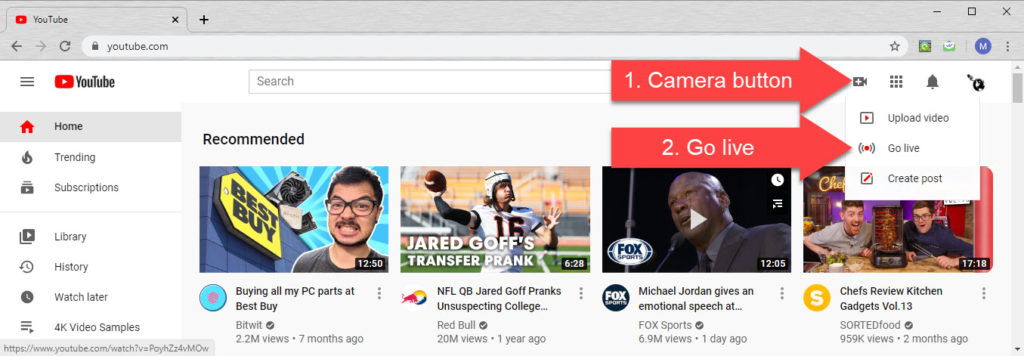
In order to get your stream key you will need to navigate to the Livestream YouTube Studio. The easiest way to get here is by clicking the Camera with a Plus icon at the top of YouTube’s homepage. It will have an option called “Go live.” It will take you to the guided YouTube Live streaming setup.
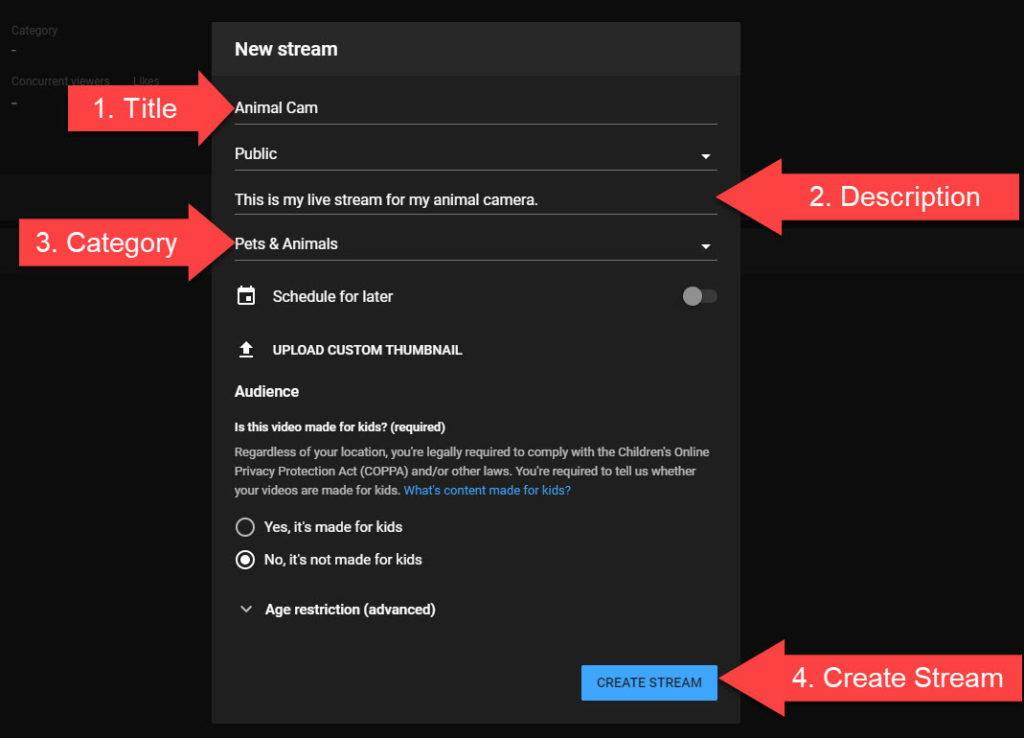
Give your stream a title, description and don’t forget to set the category. This is what viewers will see on YouTube when searching for video streams, or are watching your live stream. You can even upload a custom thumbnail to attract more viewers. When you’re done personalizing your stream, click the Create Stream button at the bottom right.
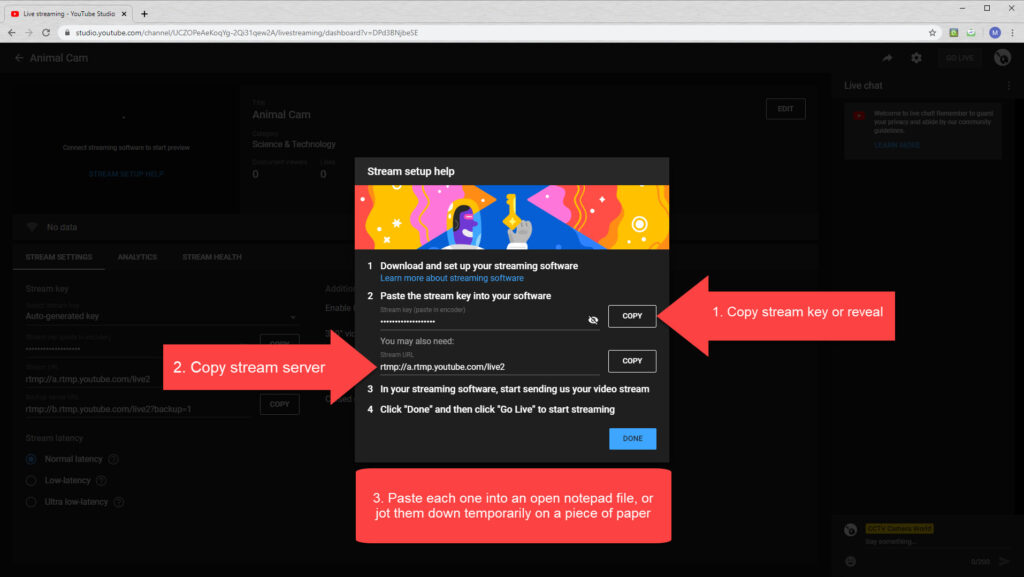
After you’ve personalized your stream you'll be greeted with a “Stream Help Setup” window. This help window will provide a stream key, and stream URL that you will need to jot down. Don’t forget to reveal it first if you are writing it down, or copying it manually. You will need the stream key and URL to enter into the camera settings.
Caution: Do not share your stream key with anyone. Whoever has access to your stream key can broadcast directly to your live stream.
If you don’t see the above screen you can still find your stream key and stream URL in the Livestream Studio window.
Step 3) Connect the camera to the YouTube server
Almost there! Now that we have our stream key and the stream URL we can add them to the camera's settings. This step involves logging into the camera using a web browser. Using a browser will allow you to login to the web interface of the camera and access the camera’s settings.
To access the camera you will need to type the IP address of the camera into Internet Explorer, Chrome, or Firefox.
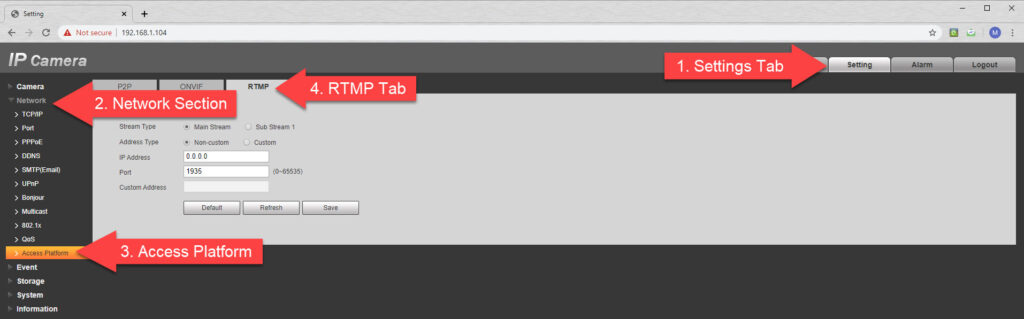
Navigate to the Settings tab at the top of the web-page. The RTMP stream settings are found under the Network section on the left and inside the Access Platform subsection.
Select the RTMP tab in the Access Platform screen.
Once you are in the RTMP settings tab you will need to enable the RTMP stream first. Make sure the Enable button is checked.
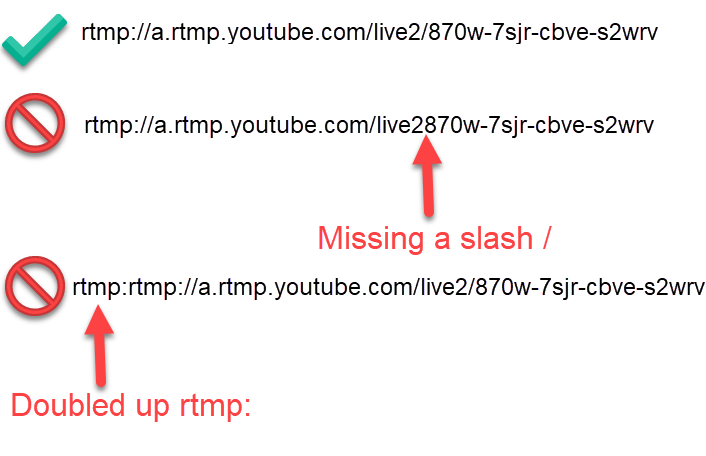
Select Custom for the Address type. The Custom Address text box will be where you need to enter the Stream URL and Stream Key. You will need to join them together with a forward slash. The URL will go first, and your Stream Key goes after the forward slash. Here is an example:
rtmp://a.rtmp.youtube.com/live2/870w-7sjr-cbve-s2wrv
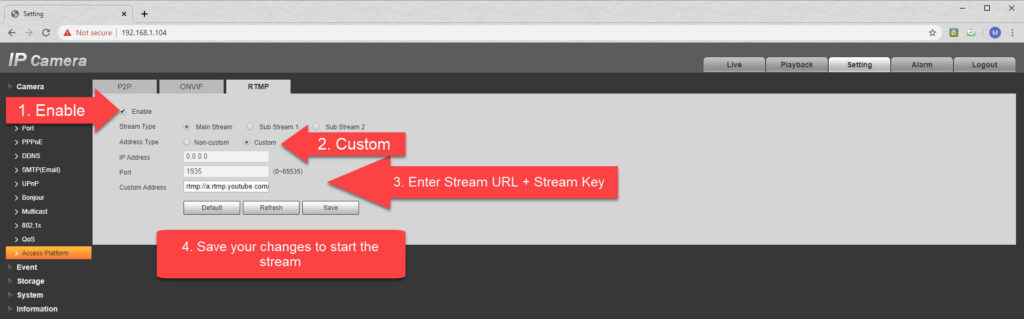
Click Save to start the stream to YouTube. You should see a preview of your stream appear inside of your YouTube Studio. Allow 1-2 minutes for the video preview to start.

Click the Go Live button at the top right of the Live Studio. This button officially starts your live broadcast from your camera for the world to see!
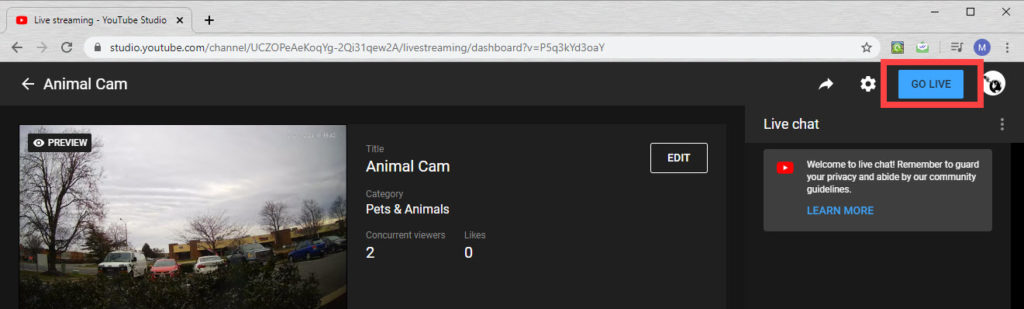
Congratulations! Your YouTube Live stream should now be working and available for you to share with the rest of the world.
Troubleshooting
Note: CCTV Camera World can only provide support for products purchased from CCTV Camera World. To provide support we require purchase verification. If you didn't purchase from CCTV Camera World, please contact the company you purchased from for assistance with your product.
If your stream is not working by following the above steps, we suggest verifying that all of the below mentioned settings are correctly applied to the Live Stream Camera you purchased from us.
Network IP address and DNS Server
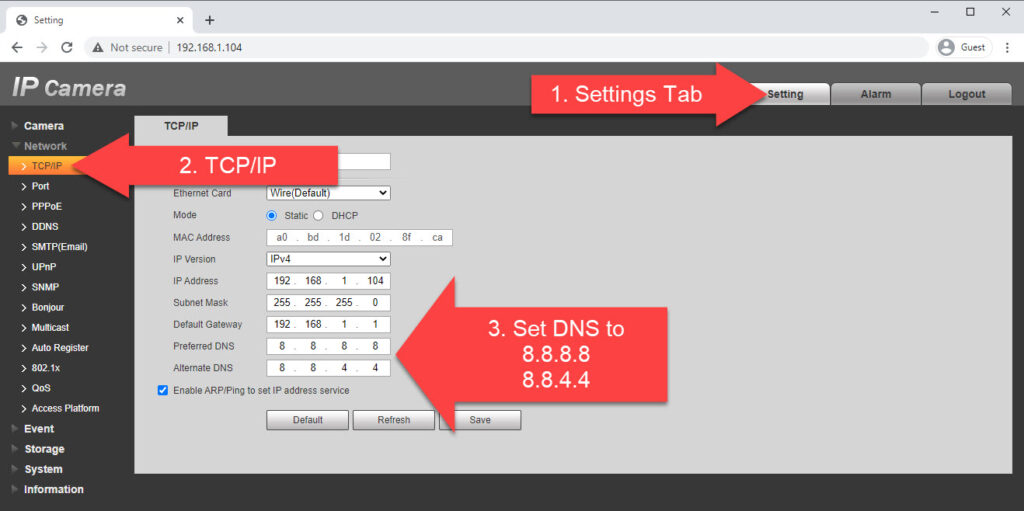
It is essential to have the correct network settings applied to the camera so it can broadcast to the YouTube Server. Login to the camera directly and ensure the settings inside the TCP/IP section under the Network settings page are correctly set to conform to your network environment. These include:
- IP address
- Subnet mask
- Gateway
We usually apply the above during our compatibility check before shipping the camera to make it simple for you to deploy the camera on your network.
We also recommend setting the camera's DNS entries for Preferred DNS and Alternate DNS to 8.8.8.8 and 8.8.4.4. Please see the screenshot below for the location of these fields.
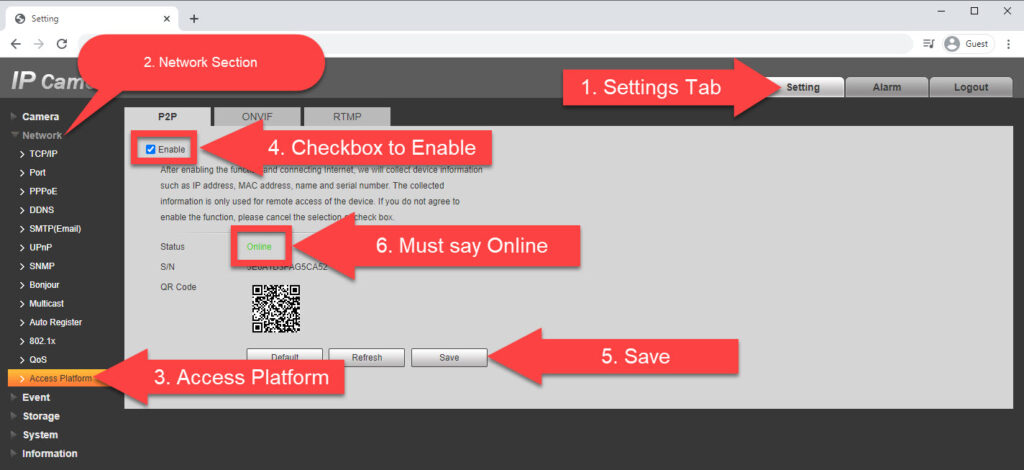
Enable P2P
Confirm the P2P Platform Access setting is enabled. P2P must be enabled and show an "Online" status before the camera can stream to YouTube.
Double Check your RTMP URL
Errors within the RTMP stream URL that you create can prevent the camera from connecting to YouTube Live. It's essential to ensure that the RTMP URL you input into the camera follows the correct structure and doesn't contain any additional slashes or letters. Also, verify the accuracy of the Stream Key. The diagram below illustrates a correctly formatted RTMP URL versus a few with common mistakes.
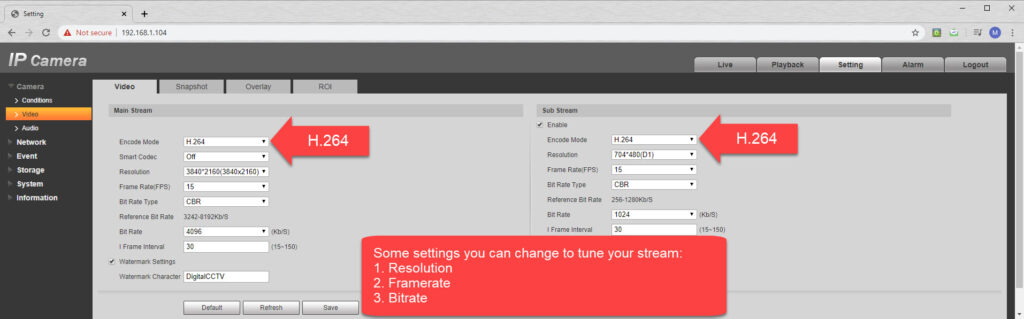
Video Encoding Settings
Since most live stream hosts only accept H.264 video the encoding settings must be set to H.264 and have a bit rate that is within the upload bandwidth limit of your internet connection. Of course, you can tinker and fine-tune these settings after your stream has started. The camera's encoding settings are found under the Camera section and Video subsection inside the web interface. Below is an example of the settings we successfully used for a 4K 15 FPS video stream to YouTube Live using one of our 4K security cameras.
Make sure you check the video stream quality and that it is not skipping or buffering; if it is then double check the encode settings are the same as above. If you're attempting to live stream 4K video, we recommend having at least 5Mbps upload bandwidth reserved on your internet connection for the camera to stream at 15fps. For additional tweaking, here are some of the things that you can do to improve the webcam's live feed:
- Inquire with your Internet Service Provider (ISP) about upgrading your internet upload speed
- Lower the resolution of the camera
- Lower the frame rate of the camera
- Adjust the bitrate of the camera to a lower setting
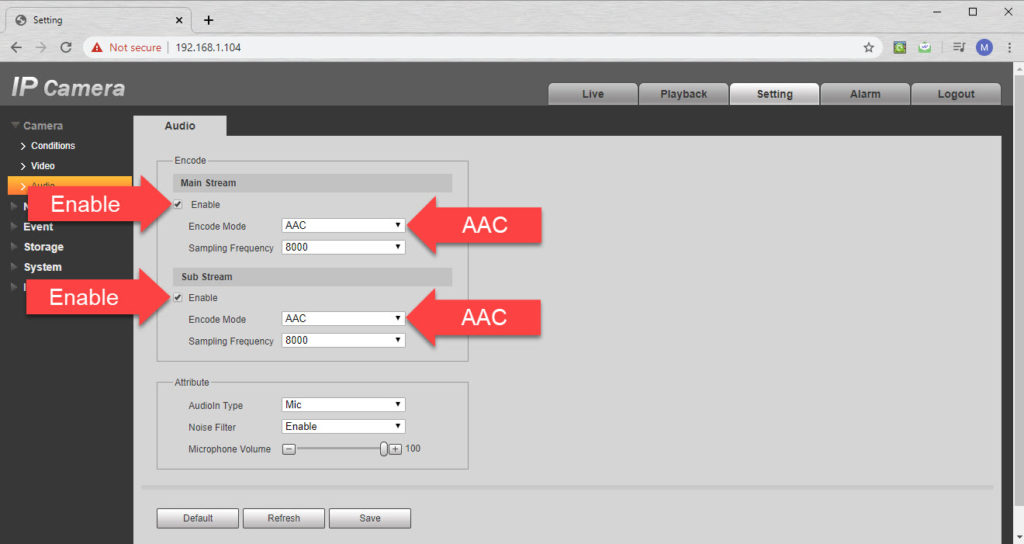
Audio Encoding Settings
You will also need to set the Audio settings to “AAC” encode mode as shown in the screenshot below. Without the Audio channel enabled YouTube Live will not accept the camera's video feed. If you want to stream without audio we recommend setting the Microphone volume to 0. This will allow the camera to stream to YouTube but will not transmit any audio because the microphone is muted.