

Barn Security Camera System

Security camera systems are beneficial not only for urban areas where crime is a known threat, but also for rural areas and farms. Security systems are useful for almost any project, whether it's to monitor livestock or prevent equipment theft. Even without internet access to a barn, it is possible to monitor and manage a farm security camera system. There are a few different ways to get cameras on your barn, and some even allow you to get live video back to your phone or computer at home! Read more to learn how simple it is to setup barn security and animal monitoring.
Contents
- Types of security camera systems for farms and barns
- Standalone security camera system
- WiFi barn security cameras
- Point to point wireless bridge security camera system
- How to set up a farm security camera system?
Types of security camera systems for farms and barns
Since most barns or buildings in a farm are not equipped with network or internet connections there are challenges to remotely managing and viewing a system. The good news is that there are solutions to installing and managing a camera or even a whole system for a remote barn or building. If you only need recording for viewing at a later date then a standalone system without remote management is the easiest and most cost-effective. Below are explanations of the common types of security cameras and systems for farms.
- Standalone security camera system
- WiFi barn security cameras
- Point to point wireless bridge security camera system

Standalone barn security camera system without internet or remote access
A standalone system is the most cost effective and easiest to setup because a standalone system only needs a DVR or NVR, cameras, cable, and a monitor or TV. No internet or WiFi connection is needed and the footage is recorded directly to a hard drive for later review, or exporting to a thumb drive.
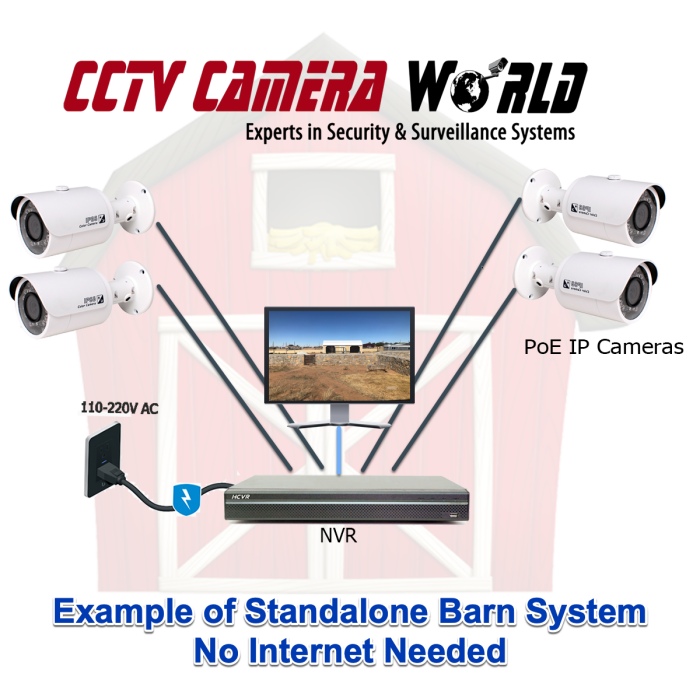
You can use PoE cameras and a PoE NVR, along with some network cable and a monitor to setup a high definition security system for your barn with longterm recording. The above image demonstrates the components you would need. Any of the kits from our security camera systems category can be used for such a system without needing internet access. If you're in to customizing the type of cameras you want to use, we suggest reading our security camera buying guide to learn more so you can pick your own security cameras according to your preferences.
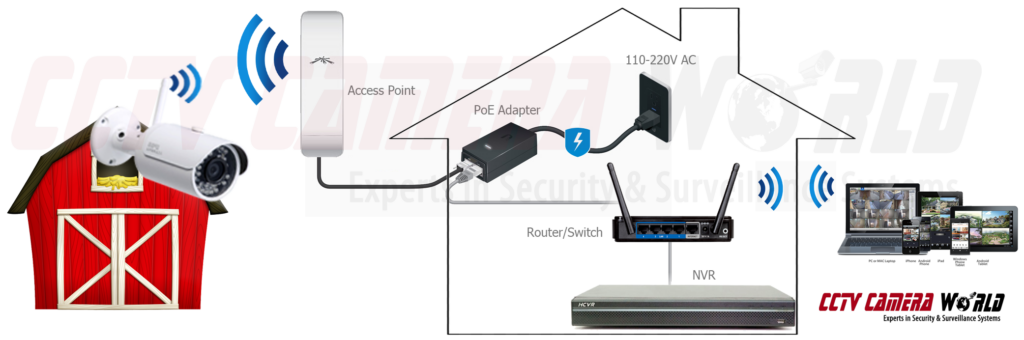
WiFi security cameras that connect to an access point or router
Setting up wireless cameras on a barn is not difficult or too expensive. Wireless security cameras contain built-in WiFi radios and require a power supply as well a receiver radio such as an access point or router in the home that the cameras connect to. The radio supplies a wireless network to the barn for cameras to connect to.
The setup for built-in wireless cameras is easy with our professional configuration and offers a simple barn security camera solution for monitoring animals, or expensive equipment.
Built-in wireless cameras do come with drawbacks however. Built-in wireless is not as reliable as a point to point wireless system. WiFi cameras are better suited for short distances like wireless networks in the same building, small homes, offices, or apartments. However, many customers have used built-in wireless cameras without issues, but there are many variables to consider.
If the transmission distance is within 50 feet and there’s no obstructions then built-in wireless may be the best for your wireless barn security camera system. The recorder sits inside of the farm house and accesses the cameras over the wireless radio.
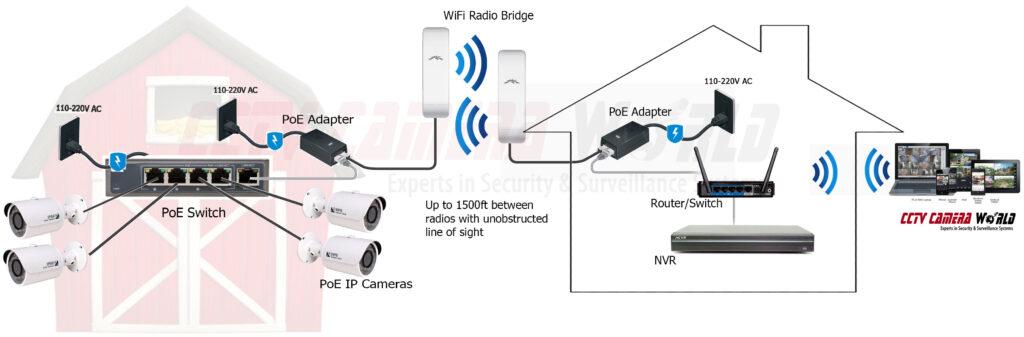
Wireless bridge security camera system
The best way to setup a wireless security camera system from a remote location on a large farm is to use a point to point wireless security system. CCTV Camera World’s professional point to point wireless systems have been deployed all across the United States in various industries. For point to point wireless our number one customers come from agricultural backgrounds.
Point to point wireless offers the best reliability and video data transfer between an animal barn, greenhouse, or stable and the farmhouse. A point to point wireless system can also be used with security cameras on the home to make a mixed system to protect the home and barn or monitor animals while away all in the same convenient system.
Another benefit of a wireless bridge is camera choice. A wireless bridge has the ability to convert a wired signal to wireless from the barn to the home. This means the barn cameras can be any one of our wired IP cameras.
This type of security camera system uses two radios paired together to create a wireless link, also called a wireless bridge, as if there were two Ethernet cables connected between them. Depending on the environment and with no obstructions a WiFi bridge can connect up to a mile between buildings.
How to set up a farm security camera system?
Now that we have outlined what each system is you might be wondering how to install each type of system. Most of the wireless systems we sell are pre-configured and tested in our offices before they are shipped for an easy plug and play farm security camera system. All of the systems are easy to use once they are installed following our security camera system login and use guide.
- Setting up a standalone barn security camera system
- Setting up WiFi barn security cameras
- Setting up a Wireless bridge security camera system for a farm
Setting up a standalone barn security camera system
As we mentioned above there’s not much to installing and using a standalone security camera system for a barn. Closed circuit systems that require no internet connection for remote viewing need cameras, a DVR or NVR, cabling, and a monitor. Here is a brief rundown of how you would install a standalone system.
- Run cable to camera locations - Network Cable for IP cameras or RG59U Coax for HD over Coax cameras
- Set up DVR or NVR with a monitor and mouse
- Mount and install cameras
- Connect cables to cameras
- Connect other end of cables to the DVR or NVR
- Power the equipment on and wait for video to show
For more information check out the following guides that provide more detail on how to install each type of standalone system.
- How to set up an IP security camera system
- How to set up an HD over coax security camera system - Coming Soon
Setting up WiFi barn security cameras
For barns and sheds that are a short distance from the house WiFi cameras provide a convenient solution for animal and equipment monitoring. As long as there are no obstructions like trees, vehicles, or other buildings WiFi cameras are easy to install and manage. Here is how to set up a WiFi barn security camera.
What do you need to set up WiFi cameras for a barn, stable or shed?
The following equipment is necessary to set up WiFi cameras for a barn or shed in a farm.
- Wireless Access Point or Powerful WiFi router
- WiFi or Wireless Security Cameras
- Power - 12V DC Adapter
- Network Video Recorder in the home
- Good internet connection for remote viewing
A wireless or WiFi access point can connect to an existing router using Ethernet cable to provide a WiFi network to a barn. If you have a powerful WiFi router that already provides a WiFi connection to the barn you can use the existing WiFi network from that router.
If the router does not provide at least 4 bars of WiFi on a smartphone we recommend purchasing an Access Point to provide a stronger connection for the cameras.
Wireless or WiFi cameras feature built-in radios that can join most WiFi networks. However, client radios inside of WiFi cameras are not very sensitive and require a strong WiFi connection for the best video transmission. It is possible to increase the signal strength by using external WiFi antennas, but antennas are not always a perfect solution.
WiFi cameras are not wirefree. Wirefree battery or solar powered products add several more points of failure that affect reliability.
WiFi cameras require a wall socket and 12V DC power adapter for power. Make sure that the power connector on cameras is protected when installing cameras to a barn or shed.
A network video recorder or NVR features a hard drive and user interface to record and manage a farm security camera system from the house. NVRs also make it very easy to use PC software on a computer, and smartphone apps to access security cameras. An NVR has the ability to capture video from WiFi security cameras over a local network or from an access point.
Last but not least a good internet connection is necessary in the home for remotely viewing the system’s HD quality video while away. Slow internet speeds cause laggy or low quality video.
Most rural internet providers do not provide fast upload speeds for remote viewing but there is the ability to view substream recording or snapshots over slow internet. For more information read our watching security cameras with a slow internet connection guide.
If you only want to manage and view the system from the house and not remotely then an internet connection is not necessary.
How to install WiFi security cameras to a barn, stable or shed?
Installing WiFi security cameras is easy. As long as there is power nearby and there is a strong enough WiFi network, our WiFi security cameras do not take much effort to install.
If you purchase an access point with configuration to create a WiFi network for the barn, our technicians will connect the cameras before they are shipped.
If you want to use your existing WiFi network that is accessible from the barn or shed we recommend purchasing a Networking Assistance Session for our technicians to join our cameras to your WiFi network.
Step 1: Bench test the equipment indoors
The first and most important step of installing any security camera system is to unpack and test all of the products before installing or mounting anything. This ensures that none of the equipment was damaged in shipping.
If you did not purchase an access point and want to join the camera to your existing WiFi network bench test the camera before installing it and follow our How to use Wireless Security Cameras with a WiFi Router guide.
Step 2: Run power to the location where the cameras will be installed
WiFi security cameras require 12V DC power from an adapter connected to a power outlet. A 12V DC 1 Amp power supply provides power up to 30 feet with an 18 gauge wire. For longer distances we recommend using a power supply that provides 2 or more Amps.
Step 3: Install the Access Point to the home
Access points come with a PoE or Power over Ethernet power adapter. Using an Ethernet cable wire the PoE injector going from the Data port on the injector to a port on your network router.
Run another Ethernet cable going from the Power+Data or PoE port on the injector to the access point. Connect the PoE power adapter to a wall power socket.
Mount or install the access point to the home on a wall facing the direction of the barn or shed.
Step 4: Install the cameras, connect and protect the power connector
Install bullet cameras using their feet or mount dome cameras to a junction box or install the cameras to an eaves or soffit. Make sure the power connector will not be exposed to rain, snow or pressure washers.
Step 5: Wait for the camera to power on and join the access point or WiFi network and add the camera to the NVR
The last step is to allow time for the security camera to power on and join the access point. This wireless connection will then allow the NVR to capture the WiFi security cameras stream over the network router.
Most systems from CCTV Camera World will already have the WiFi camera added to the NVR, but when adding new cameras or trying to set the system up yourself you will have to add the IP camera to the NVR by using the Device or Camera Registration screen. For more information read our guide on How to connect an IP Camera to NVR or Tribrid DVR.
Setting up a wireless bridge security camera system for a farm
For buildings that are not close to the home but have a line of sight to the home can use a wireless bridge farm security camera system. Wireless bridges create a connection between the home and barn without running cabling. Wireless bridges are not quite as reliable as running cabling but are way more reliable than using wireless security cameras.
What do you need to set up a wireless bridge system for a farm?
The following equipment is necessary to set up a wireless bridge security camera system for a farm.
- A pair of Wireless Access Points
- Power over Ethernet or PoE switch and Network Cabling
- IP Cameras
- Network Video Recorder in the home
- Internet for remote viewing
Wireless Access Points are used to create the wireless bridge between the home and a barn, stable or shed. The access points require line of sight to one another for the best wireless connection to transmit video data or commands over the bridge.
Obstructions like other buildings, vehicles, or foliage will greatly reduce the distance the wireless bridge can transmit. Make sure that you are able to mount the access points above, or out of the way of any possible obstruction.
A power over ethernet switch provides power to the wired cameras that are going to be installed on or inside the farm building. PoE switches feature network ports that connect to the transmitting access point radio to send the data back to the home. The PoE ports should be reserved for cameras.
Ethernet cabling is used to wire the cameras back to the PoE switch, and wire the access point to its own power supply and the PoE switch.
As we mentioned in our overview of this type of system an added benefit over using WiFi cameras is the wide range of cameras you can use over a wireless bridge.
It is possible to transmit up to 4-8 cameras over one pair of radios depending on each camera's video resolution and how much data they require.
A network video recorder or NVR in the home will provide a central location for the cameras to record to. An NVR is also used for managing the cameras when connected to a monitor. NVRs feature the software that is necessary for remote viewing as well. These recorders can capture the camera streams over a local network router, or directly from the access points depending on the setup.
If remote access to the farm security camera system is necessary then an internet connection is required. We understand that internet speeds in rural areas are not always the fastest. For slower internet connections there are options such as substream, or snapshot remote viewing. Read more about remote viewing with slow internet.
How to install a wireless bridge security camera system for a farm?
A wireless bridge system is not as easy as the first two systems but it’s still straightforward with our directions below. Our wireless bridge systems are configured before they are shipped by our professional network support technicians so all you have to do is physically install the equipment. There are some very important things to consider when installing a wireless bridge, however. In the video below we provide an overview of how this type of system is connected and works to provide a connection between your home and farm buildings. Keep reading below the video for a detailed explanation.

Step 1: Bench test before installing any of the equipment
If you read a lot of our setup guides we constantly recommend bench testing equipment. Bench testing allows customers to determine if their system is working before installing anything. It also gives people a chance to familiarize themselves with the system.
Connect the NVR to a monitor and mouse where you would like it in the home and bench test there so you do not have to move it.
Our equipment is configured and tested before it's shipped but a bench test can rule out any confusion. Feel free to contact our support team to ask any questions about issues that arise during the bench testing process.
Step 2: Run Ethernet network cabling in the farm building and home
Ethernet cabling is the veins of the security camera system that transmit data between the cameras, PoE switch, and radios. Running Ethernet cable throughout the farm building to provide power and a data connection to the cameras is one of the first things to be done.
Each camera will require an Ethernet cable run between the PoE switch and camera. Pick a good protected spot for the PoE switch to go and run the cables from the PoE switch.
Ethernet cabling is also required between the router and NVR, router and home access point, and PoE switch and barn access point. Now is a good time to install the power adapters for the access points, and find a spot for the PoE switch in the barn.
Step 3: Install the cameras and connect the PoE switch
Install cameras around the barn in locations where you feel they are necessary. Some common places include stables where animals live, equipment rooms, and entrances.
Bullet cameras have a foot that allows for easy installation to almost any structure, if a bullet camera is going to be mounted outdoors we recommend using a junction box so you do not have to drill a large hole in your barn.
Dome cameras are easy to mount directly to a ceiling, or eaves on a building. For wall or pole installations, dome cameras require optional junction boxes.
After installing the cameras, connect their pigtail connector to the Ethernet cable that was run in the last step. Connect the other end of the Ethernet cables to the PoE switch if you have not done so already.
Step 4: Install the Access Points
Installing access points is probably the most difficult step in the process. Access points are sensitive to their placement, height, and how they are aimed. Make sure the access points are pointed at one another and preferably at the same elevation to ensure the best wireless bridge connection. Small differences in how access points are aimed and their height make a huge difference in signal strength between the radios. The signal strength determines how much video data can be transmitted.
Obstructions add an additional challenge when installing access points. If there are any obstructions you can expect a 70-90% decrease in transmission strength. That much of a drop in transmission strength makes it so the wireless bridge will not work. If possible, install the access points above any obstructions.
Step 5: Power on the equipment and check connections
Start plugging the PoE switch and power injectors into power sockets to begin the bootup process, if you have not already. Power the NVR back on if it was turned off. Give all of the equipment up to 5 minutes to fully boot up and start connecting.
Check the lights on the access points to make sure that they pair, the lights look like WiFi bars on the back of the access points. If the lights are not a full 4 or 5 bars after powering on and connecting, reposition and aim the access points again.
Check the lights on the PoE switch to ensure that the cameras are receiving power and connecting.
Step 6: Wait for the NVR to see the cameras and enjoy peace of mind
Our Point-to-Point wireless bridge systems are configured and tested before they are shipped for ease of use and installation for our customers. After installing the physical connections, mounting the cameras, powering the equipment on, and waiting for them to connect you will be up and running with a farm security camera system that is manageable from home.
After initial setup and installation is a good time to set up remote viewing if you have good enough internet, and to start learning how to use the system by reading our Security Camera System guide.