

Frontier Netgear B90-75502 Router Port Forwarding for DVR Camera System
Frontier Netgear router port forwarding is also called Enable Applications. Using this port forwarding feature you can instruct the router firewall to allow select traffic from the internet to access a device on your local network. In security camera systems this is very important, without it you cannot see your security cameras when away from home. This article is dedicated to configuring port forwarding with the Frontier Netgear B90-75502. If you have this router follow the steps in this article below to setup port forwarding for your surveillance system.
This guide can be used to configure port forwarding rules for any device on the Frontier Netgear B90-75502 router. As example we will use port numbers for our Security DVRs. Two rules must be made, one for Port 80 and one for Port 37777.
The first thing you should do is gather the necessary networking information about your system, which you should already have done. If not you can follow the guide here: https://www.cctvcameraworld.com/port-forwarding-router/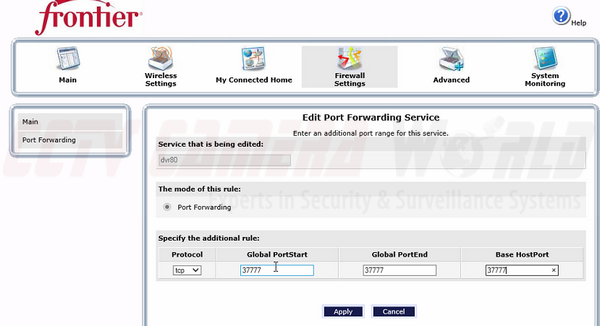
1) Access Router
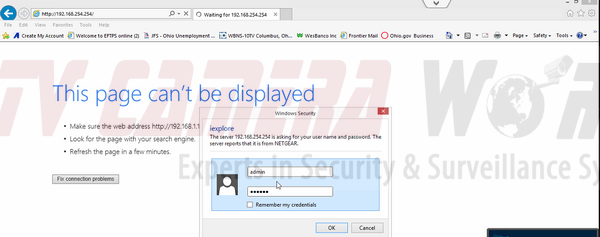
First you must access your router to make any port rules. To do this you go to your internet browser and type in the Default Gateway (Router IP Address). For Frontier users this should be something like 192.168.254.254, depending on your home network. You can also read this article on how to find your router's ip address. Once you bring up this page you should then be prompted for your login credentials. If you do not know this you can check the manufacturer's default login, or call your internet service provider.
![]()
2) Navigate to Port Forwarding Section
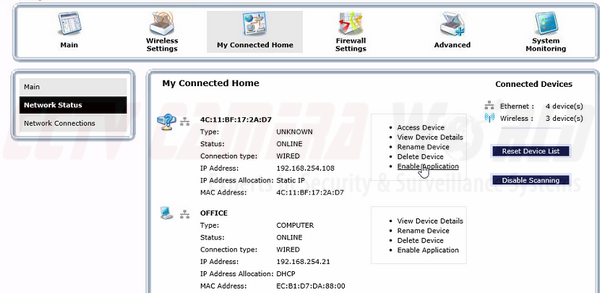
On the top bar of this particular router there should be choices for different sections. For this router, select the option "My Connected Home." If you added your DVR to your network as you should have in the previous guide, then it should be listed as an option under Connected Devices. If you don't see your DVR's IP address, then double check the following:
- Your DVR is on
- There is a good network cable connected between the DVR and the router
- You configured an IP address on the DVR that is on the same network as the DVR
Once you have found the option with the IP address of the DVR, look to the right of this and choose the option "Enable Application." This will bring up the menu we need for Port Forwarding.
3) Create Port Forwarding Rules
At this menu you should see an option for Add. Click this option to begin to make a port rule.

The next menu will have an option Create, select this. From here, you will see 3 steps to making the port rule.
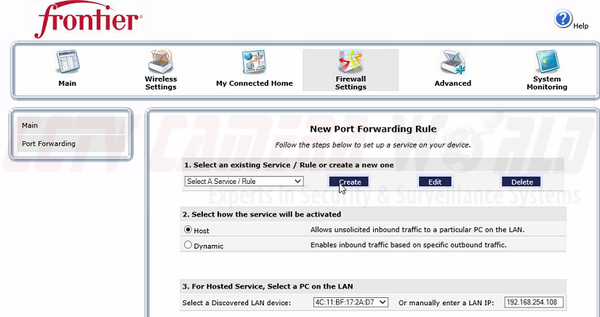
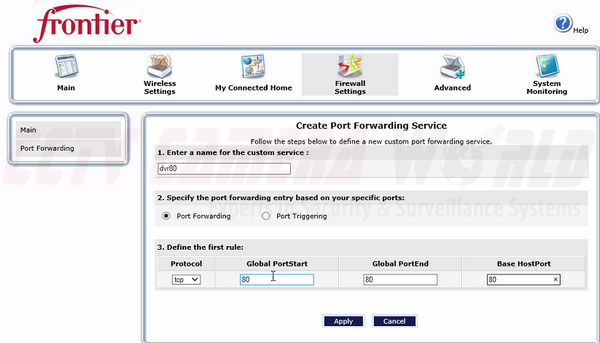
3.1) You will be prompted for a name for your new port rule. Keep it simple to make it easy to find again, something like "DVR 80".
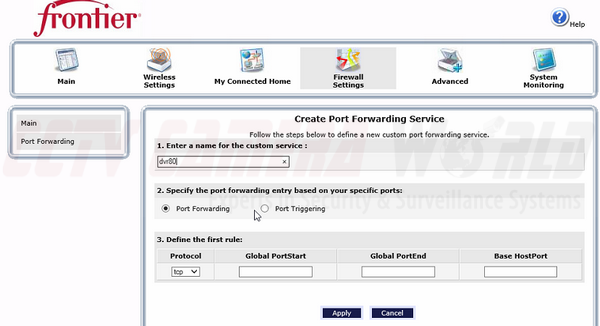
3.2) Specify the type of port rule, keep "Port Forwarding" selected.
3.3) Define the first rule: Keep "tcp" selected, and from here you will add the port number you are creating the rule for in "Global PortStart", "Global PortEnd", and "Base HostPort." All of these should have 80 in the selection. Click Apply when finished.
You will then be brought to the menu "Service Details" where you will see the rule you just created. Click Add to make a new rule for port 37777. Follow steps 3.1 - 3.3 again and this time use number 37777. If followed correctly, you should have 2 port rules configured under the set "DVR 80," you should be ready to go from here.
4) Scan Ports
Last, you want to make sure that the rules you configured are applied to your router and active, meaning that these ports are now open for use. You can check if your ports are open by scanning the ports.
Go to GRC.com to scan for open ports on your internet connection. This must be done from the same internet connection as to which the DVR is connected.

Click Proceed to begin, and wait for the next page to load.
When the page reloads, you will then type just the two port numbers in the search bar separated by a comma such as "80, 37777" not "port 80, port 37777." Click "User Specified Custom Port Probe" to check for open ports on your router.
Look only at the status next to each port after the scan is complete If the status next to the ports is "Open", then the port rules should be applied correctly and you are done. If they say "Closed" then the rules were not created properly or there is some other issue happening. If they say "Stealth" however, this points to an issue with your internet service provider (ISP). Your ISP is blocking these or all ports from being used for whatever reason and you will have to contact them to resolve this issue.

More Possible Issues:
It is important to check to see what port rules might already be present on your router before you make new rules. Port 80 is commonly used for any device acting as a Web Server and it will interfere with you using this port for your DVR. If this port is already being used or is blocked, you will have to use another port like 8080, in place of port 80. Just make sure in your DVR's networking menu, the HTTP port is changed from port 80 to the new port number such as port 8080, otherwise your configuration will not work.