

How to setup a security camera system on the network

What are IP security camera systems?
IP camera systems comprise of one or more IP cameras that are connected over a computer network to a Network Video Recorder (NVR) or Digital Video Recorder (DVR). The IP camera sends video and other data in digital format over a network cable to the NVR. The NVR records the video stream from he cameras for playback and other functions like motion alerts. IP camera systems are also commonly referred to as NVR camera systems since they are commonly used with a network recorder at the heart of the system.
Table of Contents
- Do I need internet for an IP camera system?
- Who should setup an IP Camera system over a network?
- What is needed to setup an IP camera system?
- How to connect an IP security camera system?
- How to set up a security camera recorder on the network?
- How to configure an IP camera on the network?
- How do I access my IP camera system over the Internet?
- Commonly Asked Questions
Do I need internet for an IP camera system?
No, you do not need internet for an IP camera system. A computer network required by an IP system is called a Local Area Network (LAN), which is basically a PoE switch connected to the cameras and the NVR. Internet is only needed if you would like to have remote viewing capabilities to watch your IP surveillance system over the internet when you are away.
Who should setup an IP Camera system over a network?
There are many reasons to understand how to setup an IP camera system over a network. Prior to 2012, there was no such thing as a PoE NVR that came with built-in Power over Ethernet (PoE) Ports. In this time people had to know how to connect and configure IP cameras to work over a network for the recorder to store surveillance footage. These types of installations are still common for home users or businesses who purchase and have the following situations:
- Purchased an NVR system without a built-in PoE switch, which is common with 32 channel or larger NVRs. It is impossible to squeeze in 32 or more network ports on the back of a recorder while trying to keep its size and weight compact.
- You have a 32 channel NVR that has 16 built-in PoE ports and you would like to add more cameras.
- Purchased a Tribrid DVR, which is a DVR recorder that supports IP cameras over a network.
- Have IP cameras that cannot connect directly to the back of the NVR. If the distance is beyond 300ft or if a closer network port is available from your company's computer network or home.
- Have wireless security cameras that require connection to a WiFi network, and are manually added to an NVR. Deploying wireless cameras over a network is much more complicated and beyond the scope of this guide. It requires prior knowledge or a skilled IT technician to properly deploy a WiFi camera system over the network. For easy to setup wireless systems, we recommend these plug and play wireless camera systems.
What is needed to setup an IP camera system over the network?
The following 5 components comprise an IP based camera system that is setup over a network.
1. PoE Switch that is 802.3af/at Compliant
At the heart of the whole network that pumps data between cameras and recorder is the PoE switch. Powering and transmitting data from IP cameras requires networking equipment to do so. IP cameras can be powered near the installation point with 12V DC adaptors, or can utilize PoE technology in the PoE switch that provides power and data from one convenient device and over one cable.
It is very important to use PoE equipment that is compliant with 802.3af or 802.3at standards, which ensures correct power delivery to the cameras. PoE switches and injectors meant for wireless access points are Passive in their power delivery, meaning they do not negotiate the correct power required for the camera. Passive PoE equipment will damage any IP camera and void its warranty. For more information on why it is so important to use an Active PoE Switch or Active PoE Injector, refer to our guide on understanding the Difference Between Active vs. Passive PoE.
2. Security Camera Recorder
The surveillance camera recorder is the brains of a surveillance system if you are looking for a central location to manage, record, playback, and download recorded video. The recorder in an IP camera system can be any one of our DVRs or NVRs.
If you are setting up a system composed solely of PoE IP cameras, then we recommend using a NVR as it provides the greater compatibility with the video analytics offered by these security cameras. Our recorders range from 4-channels all the way up to 128-channels. All of these NVRs can be networked and configured to capture the video stream from an IP camera from CCTV Camera World, which are tested to be compatible with all of our NVRs and DVRs.
When using third party ONVIF cameras purchased elsewhere, we recommend the user test the cameras with the NVR to assess compatibility. The ONVIF compatibility claimed on a camera is not a guarantee that it will connect to the NVR or work flawlessly as explained in this guide.
3. IP Security Cameras
Of course you will need IP security cameras as they are the eyes of a camera system. IP cameras capture video and send it to the NVR as digital data through the PoE switch.
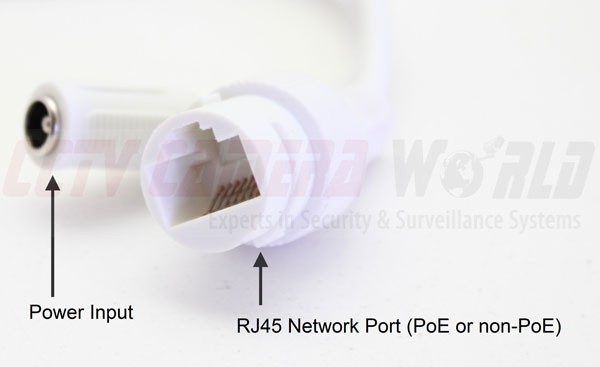
As pictured above, IP cameras and PoE cameras have a pigtail with at least one RJ45 connector for PoE connectivity and one 12V DC connector. If a PoE switch is being used to power the cameras, the 12V DC connector can be ignored because it is only used in installations where PoE power is unavailable.
When installing an IP camera it is important to protect the pigtail from the elements. All of our IP cameras come with a weather boot that should be used to protect the RJ45 connector from corrosion as demonstrated in the video below.

Before making a camera system purchase we recommend giving our security camera buying guide a read to understand the difference in clarity between various security camera resolutions. Our IP security cameras range in resolution from 1080P to 4K. We even have some 12MP security cameras for users looking for more clarity than what 4K security cameras offer. Fixed lens, motorized zoom, PTZ, two-way audio, cameras with built-in mic, wireless, license plate and fisheye cameras are the different types of IP cameras available on our website.
4. CAT5e or CAT6 Network Cable
Good quality network cable is crucial for proper power and data transmission between the cameras, PoE switch, and NVR. As explained in our network cable page there are a variety of cable grades available. For runs over 150ft we always recommend using a full copper CAT5e cable at the least which usually comes in a role.
Most importantly, if you are crimping your own network cables, be sure to use the T568B standard for RJ45 crimping and use a cable tester to confirm that the cable is crimped properly. Too often we see the latter being skipped and leading to the misconception that a camera is faulty. To learn how to correctly crimp your network cable, please watch this video.
It is also important to note for the novice user that network cabling has a transmission limit of 328ft. For longer wire runs, a PoE extender is required. A PoE extender borrows a small amount of power to amplify the data signal and send it down further. Here are a few tips for proper PoE Extender use:
- Use CAT6 full copper cable for all wire runs involved in the use of a PoE extender to provide the best possible power transmission
- Do not use PoE extenders for cameras requiring more than 15W of power, which includes PTZ IP cameras, and long range night vision security cameras.
5. Internet Service Provider Modem/Router for Remote Viewing
While not required to setup an IP camera system, the last component is an internet router. Often times a customer will already have an internet router, modem, or a combination of the two provided by the Internet Service Provider (ISP). A router ties together the whole network and routes data between switches, recorders, and computers on the local network.
A router also enables a camera system to communicate through the internet for remote viewing. We advise our customers to purchase their own router that is separate from what an ISP provides. ISPs often sell or lease low-quality routers that are not designed to handle the large amounts of video data involved in an IP camera system, which creates a bottleneck for the cameras and recorder to communicate.
How to connect an IP cameras system?
Preparation
Before you install any cameras it is extremely important to bench test all equipment to avoid the hassle of troubleshooting after installation. Bench testing is also a good time to learn how to configure the cameras to record. Many times improper cable crimping can lead to a lot of confusion. For proper network cable crimping technique, please refer to the section above.
For installing an IP cameras system there is no "one size fits all" solution. It is a good idea to plan the system ahead of time noting where each camera will be installed. Label each camera and wire so that you do not confuse cameras when connecting them to the NVR.
Planning
In the section below, we've made it simple to understand the different ways that components of a NVR camera system or IP camera system can be connected to each other. Please spend some time watching the videos to understand the common methods to connect a NVR and PoE switch together. The way all components are connected together depends on the following factors:
- The number of uplink (LAN) ports present on the PoE switch
- The number of LAN ports present on the NVR
- Whether a strong router is present on the network that is capable of handling the large amount of continuous data traffic required for surveillance cameras on the network
- Whether it is more convenient to run a cable directly from the PoE switch to the NVR or router
Method 1: PoE Switch with 1 Uplink Port to Router
Our first method diagram shows how a PoE switch with one uplink should be setup to connect network cameras to the network. The PoE switch is connected to a router using its uplink port, and the NVR is connected to the router directly as well. Cameras communicate through the PoE switch and the router. Since everything is on the same network, the NVR or DVR recorder is able to communicate with the cameras through the router.
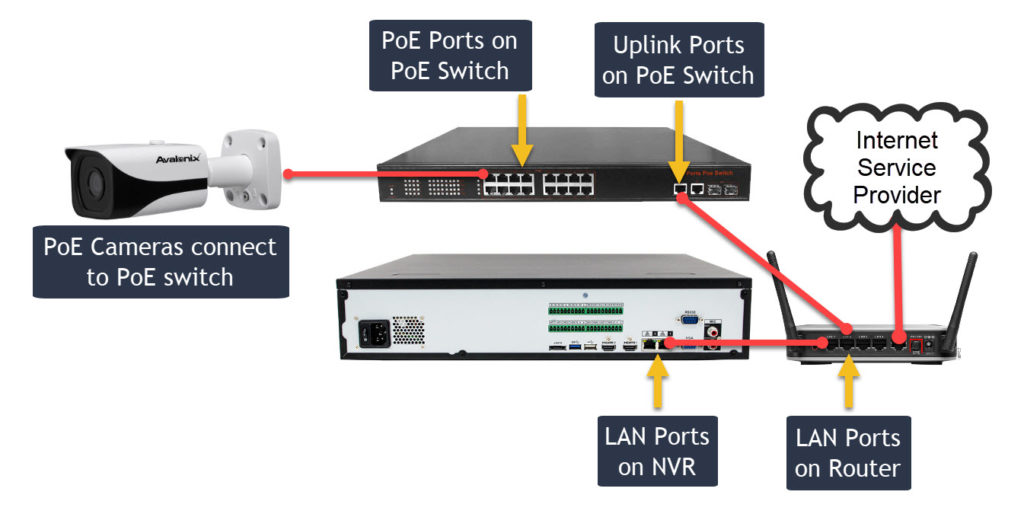
If you prefer watching videos, below we show how to put everything together for this simple setup. Birefly, here is a list of simple steps:
- First connect the NVR's LAN port to a LAN (numbered port) port on the router.
- Connect the uplink port of the PoE switch to a different LAN (numbered port) port on the router.
- Connect a PoE camera to one of the PoE ports of the PoE switch.
The router "networks" the switch and NVR together, meaning it creates a flow of camera data from the PoE switch to the NVR.

Method 2: PoE Switch with 2 Uplink Ports to connect Router and NVR
In this section we discuss how to setup an IP system using a PoE switch that has 2 uplink ports. This approach is advantageous as it allows the NVR to be connected directly to the switch and fetch data from the cameras without having data bog down the router. The below diagram illustrates this setup.
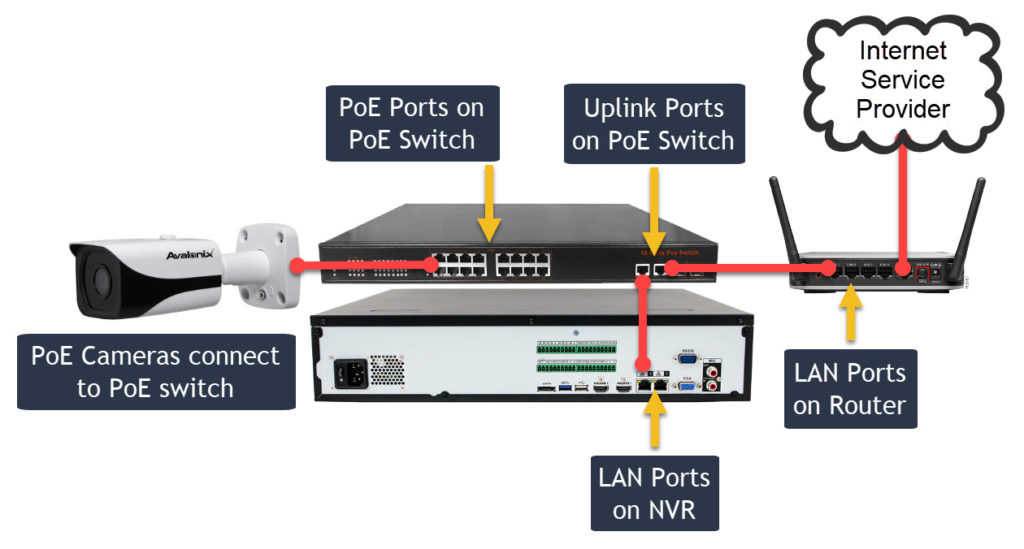
In the video below we demonstrate how to set up the required components. It is also an easy process, involving the following 3 steps:
- First connect the NVR's LAN port to the uplink port on the switch.
- Connect the second uplink port of the PoE switch to a LAN (numbered port) port on the router.
- Connect a PoE camera to one of the PoE ports on the PoE switch.
While we have the NVR located close to the switch in our example, it can be placed up to 300ft away from a network switch.

Method 3: PoE Switch with 2 uplink ports to add Additional cameras
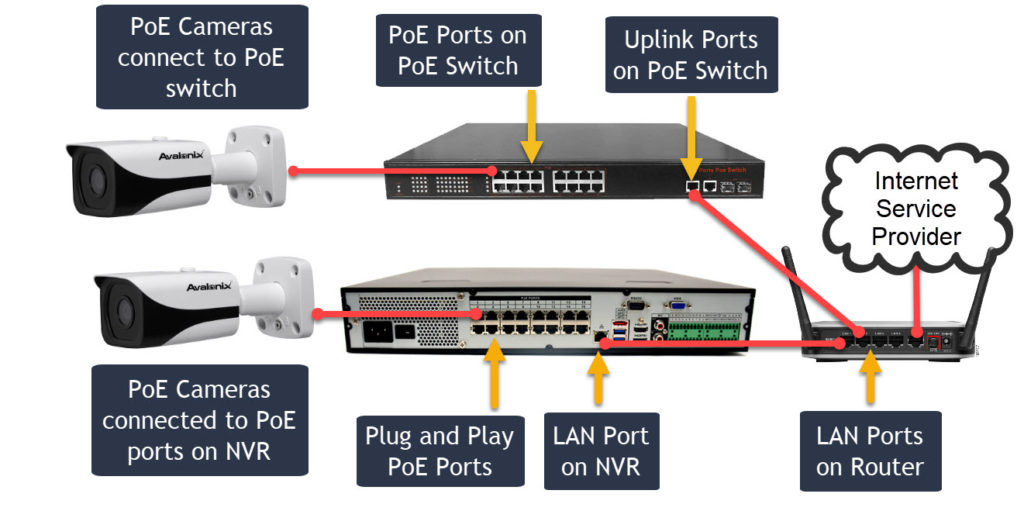
This method is applicable if you purchased a PoE NVR and are trying to add IP cameras over the network. The LAN port on a PoE NVR is the network port that is separate from the grouped PoE ports on the back of the NVR. Connect the LAN port to an uplink port on the PoE switch as shown below, or you can even connect it directly to the router. Connect the other uplink port on the PoE switch to the router. The cameras connect to the PoE switch.
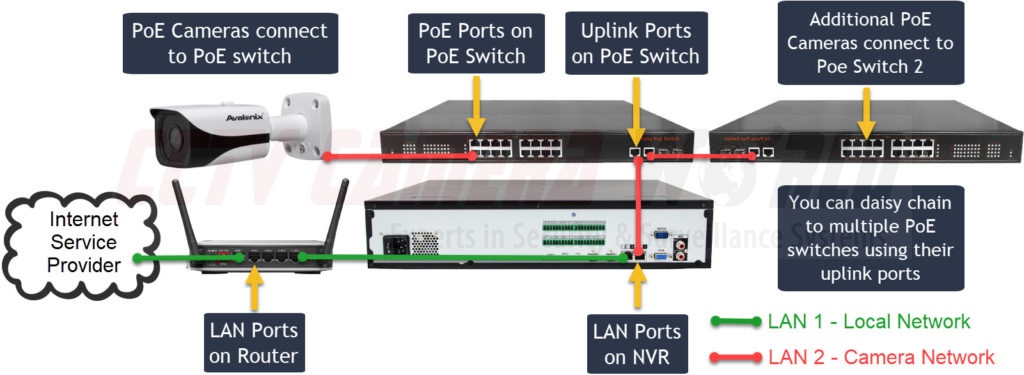
Method 4: Using Multiple PoE Switches - Advanced Difficulty
This method works by utilizing the uplink ports on the NVR to bridge two networks together. The networks are your local network and the camera network also known as LAN1 and LAN2. These networks can be the same network scheme, or different depending on how you want to configure the system. For example, your home or office network might be 10.1.1.xxx if you have a Comcast modem, but your camera network can be a seperate 192.168.1.xxx network.
For the rest of our guide you will need to remember to set your cameras up on your camera network and not your home or office network unless you intend for them to be the same.
This method can be complex and difficult to set up. If you would like to set your system up this way but are having trouble configuring the equipment feel free to check out our paid Networking Support services.
You can configure each network port to connect to the network it is wired to. In our example below LAN1 is a local network for internet and computers, and LAN2 is the network for our cameras. Make sure you do not set either LAN to 192.168.1.108 if you’re initializing cameras.
How to configure a security camera recorder on the network?
After physically connecting the security camera recorder to the network, the first thing to do is to set its IP address that conforms to your network. You'll want to set the recorder to a static IP address that matches your network scheme. If you would like to learn what's an IP address and how to properly set devices on a network, we suggest you give this guide a read. For this guide we are going to take a shortcut with the help of the NVR or DVR as shown in the videos below.
1. Change the recorder's IP address to match the network
All of our IP cameras, NVRs and DVRs ship with a default address of 192.168.1.108. A duplicate IP address conflict is going to happen if you try to connect multiple cameras and recorder without setting each to a distinct IP address.
As a first step it is important to change the IP address on the recorder before attempting to connect any cameras. The new IP address cannot be used for any other devices or cameras. The new address must match the existing network scheme or range.
In the video below we show how to modify the IP address on a recorder to set it to a static IP address that conforms to the network. We set our NVR to 192.168.1.80.

If you are unsure what IP address to set your camera recorder to then let's use the DHCP function on the recorder to determine what is a correct IP. For this to work, it is important that you have a router on the network that has DHCP enabled. This is an advanced step for some. Make sure that you restart the NVR after setting it to DHCP so that the recorder can retrieve an IP address from the router.

2. Verify the NVR is communicating on the network
To verify that the NVR is properly configured to communicate on the network run the Ping command on a PC that is connected to the same router as the NVR. The video below demonstrates how to verify that the NVR is communicating with a router. This process can also be used to find out what IP addresses are open on the network for IP cameras.

3. Initialize and connect an IP Security Camera
Initializing the camera on a 192.168.1.1 network
After the equipment is physically connected it is easy to configure and start recording each camera. CCTV Camera World's NVR and DVRs support initializing and configuring an IP address on a camera from the Camera Registration menu in the user interface of the NVR or DVR. We show this process in the video below. We set our NVR to 192.168.1.80 and initialize our first camera to have an address of 192.168.1.81.
Initializing the camera on a network other than 192.168.1.1
After the NVR is configured to communicate on the non-192.168.1.xxx network you must initialize and configure the cameras to be on the same network. Conveniently our recorders support initialization and configuration even if the camera is on a different network. The video below explains and demonstrates this process.

Once you have cameras connected and viewable from the NVR you are all set. Repeat the process for each camera that you plan to deploy. Be sure to set each camera to a different IP address.
Tips and tricks for adding cameras to an IP security camera system
Here are some preparation tips you should read before connecting any cameras:
- It is very important to connect only one camera at a time when initializing and configuring their IP addresses. Having multiple cameras with the same IP address causes a conflict on the network and prevents the NVR from successfully modifying configurations.
- Ping the network to find an available IP address range. If you are unsure how to check if an IP address is available, please refer to Step 2 above.
- Planning the system out before configuration is a great idea as well. Make a list of IP addresses for each camera that will be connected to the system. This helps avoid duplicate IP addresses being assigned. The table below can be used as a good framework to document each camera and its IP address in your surveillance system.
| Camera Number | Camera Name | IP Address | Location | Username | Password |
|---|---|---|---|---|---|
| 1 | Front | 192.168.1.81 | Front | assigned by NVR | assigned by NVR |
| 2 | Back | 192.168.1.82 | Back | assigned by NVR | assigned by NVR |
How do I access my IP camera system over the internet?
After the cameras and NVR are connected and working connecting the next step is to setup remote viewing. The biggest requirements for remote viewing are connecting the recorder to the router, port forwarding and internet speed. If you have made it this far into the guide, the recorder should be connected to the router whether directly, or through a PoE switch. This does not automatically mean that it can communicate to the internet and to your smartphone.
Port Forwarding - Allowing your recorder to reach the Internet
The first step to remotely viewing a security camera system is allowing it to communicate to the internet. The firewall inside a router blocks security camera recorders and other devices from being accessed over the internet. To allow access to your system from the internet, you have to configure the firewall inside your router to allow requests for access from the internet to flow through to the DVR or NVR. This process is called port forwarding and requires some advanced networking know-how. We have a guide on port forwarding that is available to our customers who feel confident configuring remote viewing. Each router will have its own method for port forwarding and we recommend checking PortForward.com for your specific model.
For anyone who is not as confident, or gets stuck we offer a $50 per half hour Networking Support, CCTV Troubleshooting Service. This service allows our experienced technical support team to remotely connect to your computer and configure port forwarding on your router. The techs also ensure the rules work, and give you the required information to connect using the PC software, and cellphone apps.
Remote viewing using a Smartphone
The iPhone and Android App that works with our systems is called IPTecno Pegaso. The app can connect to the system and display live feeds, playback stored footage, and even send push notifications. It also allows for one-way and two-way audio interaction, PTZ camera control, and motorized camera control. To learn how to connect to your system from CCTV Camera World please follow our guide on How To View Security Cameras from an iPhone or Android.
Remote viewing using a Windows or Mac PC
If you'd like to watch your system from a computer, our free Central Monitoring Software allows for user intuitive viewing, playback, and download capabilities for use with our security camera systems. Click here to read more on how to connect to your system using our free CMS software.
Commonly Asked Questions
Are there any recurring or monthly fees to run my security camera system?
No. That is the biggest benefit of owning your own security camera system. Unlike most retail, big box, or cloud based companies there are no monthly recording, storage, or monitoring fees associated with our products. When you purchase the system you own it.
Can I Use any IP cameras with any NVR?
The short answer is no. Each manufacturer of IP security cameras has their own programmers and engineers. It is impossible for companies to create products that work universally. Motion detection, image settings, and PTZ control are just some of the features that can be lost when mixing and matching surveillance products.
With the IP address and RTSP stream you can add most IP cameras to professional NVRs. Since the camera is not supported by the NVRs software you will only receive video, and sometimes audio through the RTSP protocol. However most cameras have their own web interface which will allow you to adjust the image settings, set the correct time, and adjust PTZ or zoom control on cameras that support it. Using compatible equipment allows you to control all of these functions from the NVR.
For further reading about IP camera compatibility check out our article on Understanding ONVIF and its limitations.
Can an IP Camera System be hacked?
No! Especially if the system is used as a standalone system without being connected to the internet. There are security protocols and protections in place so that the system is not vulnerable on the internet. The only way for someone to access a system is for them to know the IP address, username, and password. In other words, if a system does get "hacked" it is usually the result of a weak password.