

Recording Security Camera to an SD Card

Some of our IP security cameras have a microSD slot as a secondary storage method to record video. This is an economical way to keep backup video recordings in case the NVR is stolen during a home invasion. Getting the backup video recording operational requires little setup within the camera's web interface, so make sure to have a way to power the camera besides a NVR with built-in PoE. The easiest route is to use a PoE injector as we'll describe later in this article.
This guide can be used to configure your IP camera to record video to its internal SD card, even if you are currently using the camera with a PoE NVR. If you are seeking information on recording still pictures to the SD card on your camera, please read our guide how to record snapshots with your security camera.
-
-
-
 Ultimate 4K IP Camera Dome H.265, Starlight 4K, Smart Motion DetectionSKU: IPC4K19D$299.99 $499.99 40% off
 -
Step 1: Prerequisites
Insert Your SD Card
Insert the SD card you want to use into the SD slot on your security camera. The SD form factor and accepted capacity will vary depending on the model of the camera.
Power the Camera
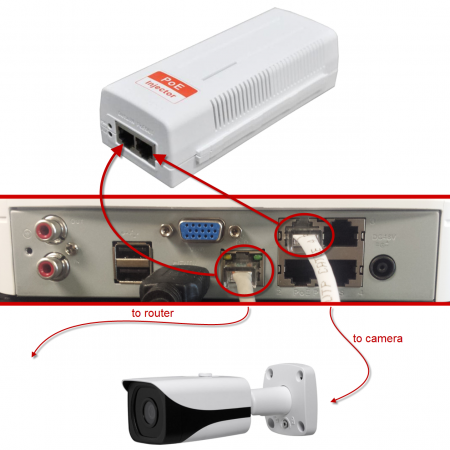
Power your camera using a PoE injector. Please note the required IEEE standard for the camera you are powering vs the PoE injector you are using. A camera requiring IEEE 802.3at (PoE+) will not be powered by an IEEE 802.3af PoE injector. Do not use a passive PoE power injector that is commonly used for wireless access points; it will damage the camera.
If you are using the camera without an NVR, please read How to connect an IP camera to a computer to power and access the camera.
If you are currently using the camera with a PoE NVR, follow the steps below to disconnect the camera from the NVR and connect it to a PoE injector:
- Bring the PoE injector to your NVR and plug it into a surge protector
- Disconnect the LAN cable from your NVR and connect it to the LAN port on your PoE injector
- Disconnect the camera you wish to configure or view from the PoE switch on the back of the NVR and connect it to the PoE port on the PoE injector
Access the Camera at its IP Address
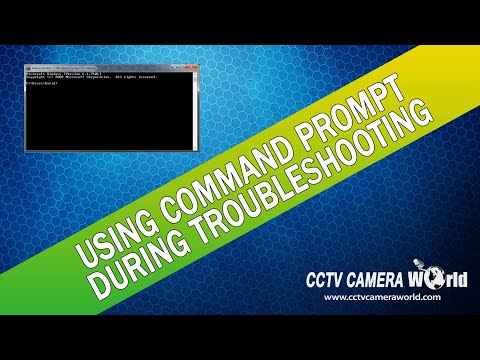
- Using a computer on your local network open command prompt
- Find the scope of your network by typing
ipconfigthen press [Enter]- Watch the video below on using the command prompt. You will need to gather 2 pieces of data:
- Default Gateway
- Subnet Mask
- Download and install our IP config tool
- Open the config tool and search for the camera on your network.
- Change the camera's IP address to match the scope of your network using our guide on how to find IP cameras on the network
- Using Chrome or Internet Explorer go to the cameras IP address
Login
To log in using your web browser, follow the guides below. All of our IP security cameras are compatible with Internet Explorer and some also support Chrome and Firefox.
Set Date & Time

[+] Click Image to Enlarge
Navigate to SETUP > SYSTEM > GENERAL > DATE&TIME
1) Configure your time zone from the drop-down box
2) Sync the current time with your PC
3) Configure DST
4) Synchronize with an NTP server
5) Save your settings
Step 2: Navigate to Local Storage
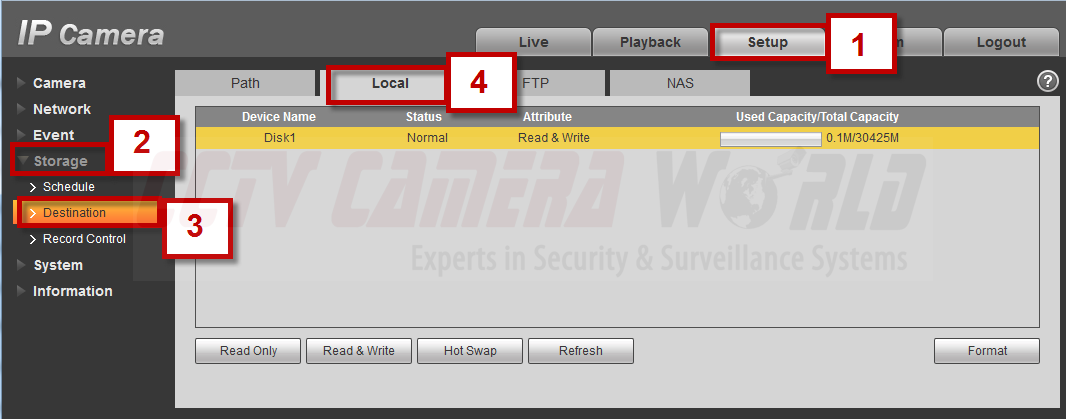
[+] Click Image to Enlarge
1) Click the SETUP tab at the top of the page
2) Click STORAGE on the side menu
3) Click Destination under the STORAGE dropdown
4) Click the LOCAL tab
Step 3: Format the SD Card
Please check the camera specifications to determine the maximum SD card storage capacity supported. For the steps below you will need to have the microSD card inserted in the camera's microSD slot.
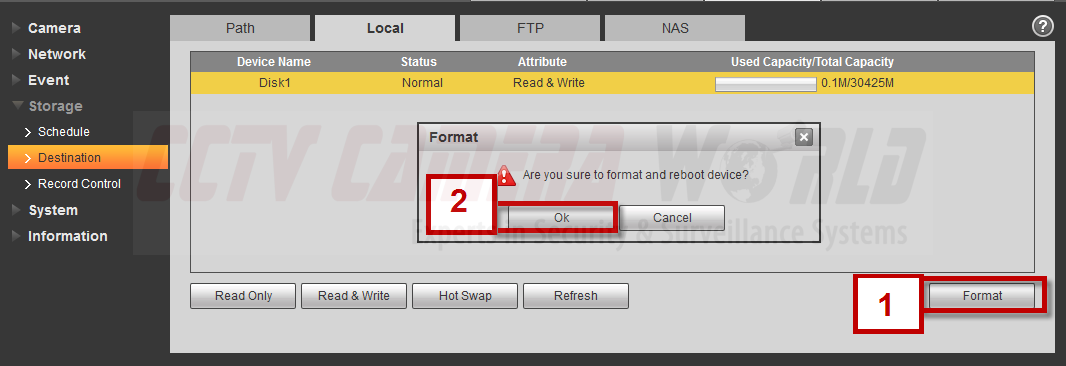
[+] Click Image to Enlarge
1) Click FORMAT to format the card
2) Click OK
![[+] Click Image to Enlarge](https://cdn01.capitolcam.net/cms/wp-content/uploads/format-successfull.png)
[+] Click Image to Enlarge
The device will format and reboot. Log in again and navigate back to STORAGE.
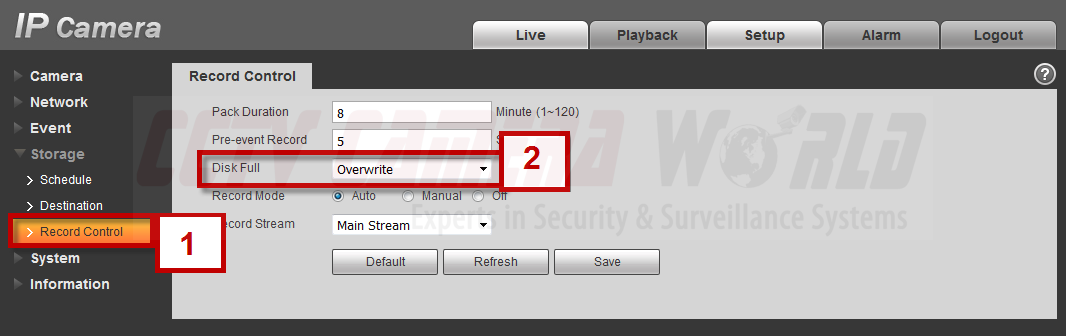
Step 4: Verify Overwrite on Disc Full
[+] Click Image to Enlarge
2) Verify the dropdown next to DISK FULL is set to OVERWRITE
If you made any changes click SAVE.
It is important to note that setting overwrite will erase older video. The amount of recording stored on the SD card depends on the bit rate of the video being recorded, the amount of motion in the scene, and the capacity of the SD card. Time would be of the essence to get to the camera shortly after the main NVR is stolen, so that footage of interest is not lost.
Step 5: Configure the Recording Schedule
![[+] Click Image to Enlarge](https://cdn01.capitolcam.net/cms/wp-content/uploads/step-5a-configure-schedule.png)
[+] Click Image to Enlarge
a2) Select the record types that you would like to configure
a3) Click SETUP next to a day you would like on the schedule
![[+] Click Image to Enlarge](https://cdn01.capitolcam.net/cms/wp-content/uploads/step-5b-configure-schedule.png)
[+] Click Image to Enlarge
b2) Configure the times and types of recording
b3) Click SAVE
![[+] Click Image to Enlarge](https://cdn01.capitolcam.net/cms/wp-content/uploads/step-5c-configure-schedule.png)
[+] Click Image to Enlarge
Step 6: Configure Motion Detection
![[+] Click Image to Enlarge](https://cdn01.capitolcam.net/cms/wp-content/uploads/step-6a-configure-motion-detection.png)
[+] Click Image to Enlarge
a2) Click ENABLE
a3) Click SETUP next to WORKING PERIOD
![[+] Click Image to Enlarge](https://cdn01.capitolcam.net/cms/wp-content/uploads/step-6b-configure-motion-detection.png)
[+] Click Image to Enlarge
b2) Configure the time periods
b3) Click SAVE
![[+] Click Image to Enlarge](https://cdn01.capitolcam.net/cms/wp-content/uploads/step-6c-configure-motion-detection.png)
[+] Click Image to Enlarge
c2) Click SAVE
Step 7: Playback
Now that the IP Camera is configured, go create a motion event in front of the camera to test its functionality. I went to the camera and waved my arms around for a few seconds.
![[+] Click Image to Enlarge](https://cdn01.capitolcam.net/cms/wp-content/uploads/step-7a-create-motion-event.png)
[+] Click Image to Enlarge
a2) Select DESTINATION under the STORAGE dropdown
a3) Select the LOCAL tab
You should notice some storage space >.1M being used by your SD card. If you don't go back and check your configuration settings again by following this guide.
Here's how to playback recorded video from the camera's SD card:
b1) Click on the PLAYBACK tab on the top of the page
Here you'll see the motion event in yellow on the timeline at the bottom of the page.
![[+] Click Image to Enlarge](https://cdn01.capitolcam.net/cms/wp-content/uploads/step-7b-create-motion-event.png)
[+] Click Image to Enlarge
![[+] Click Image to Enlarge](https://cdn01.capitolcam.net/cms/wp-content/uploads/step-7c-create-motion-event.png)
[+] Click Image to Enlarge