

How to connect your security camera to the Internet

Security cameras that can be connected to the internet directly are called IP cameras or PoE cameras. They are digital cameras that allow the camera to be connected to an internet connection without the need for a recorder or a computer to allow internet connectivity. In this guide we demonstrate how to configure a new uninitialized camera and connect it to the internet for remote viewing.
Step 1. How to power and wire an IP security camera
The first step, as with any electronics, is to provide power to them. IP cameras also need a network connection so they can be configured from a computer. Cameras may be connected directly to a desktop or laptop computer if a network router is unavailable. These methods are covered in more detail in our guide to connecting a security camera to a computer.
1a. Using Power over Ethernet or PoE
Using Power over Ethernet, or PoE technology has greatly increased the flexibility of IP camera systems over their coaxial counterpart. PoE also simplifies power requirements and is much easier to troubleshoot. The two primary ways to connect via PoE are:
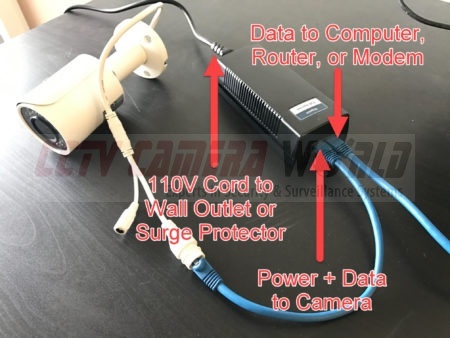
PoE Injector
A PoE injector has two Ethernet ports to connect an IP camera to a local network or computer. One port provides power and data connectivity to the camera. The other port simply forwards data to a computer or network. On the back of a PoE injector it requires a 110V-220V AC cord to a wall outlet, or surge protector.
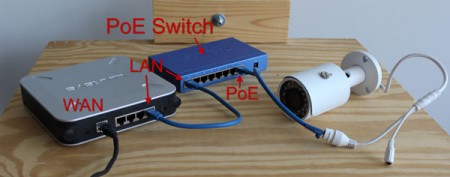
PoE Switch
A PoE Switch works similarly to a PoE injector, however, it includes additional ports for more devices, and usually includes 2 additional“uplink” ports for daisy chaining or networking infrastructure purposes.
In our picture below the PoE switch is connected to the LAN or local network of the router. The WAN connection is the connection to the Internet, usually a cable modem. If you have a modem router combo connect the PoE switch to the modem router device.
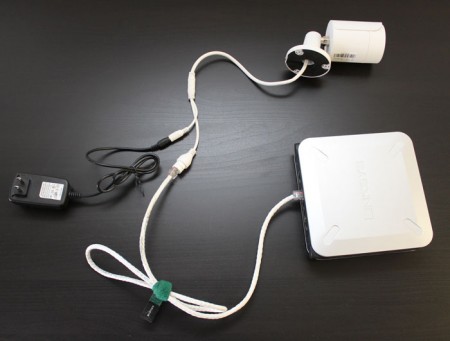
1b. Using a 12V DC power adapter
Most, if not all, PoE IP security cameras also include a standard 2.1mm 12VDC power connector for local power. A 12VDC adapter requires a 110VAC socket to be near the installation location of the camera.
Depending on the camera’s power requirements you will need to use an appropriate power supply. For smaller cameras with no IR or moving parts, a 12VDC 1 Amp power supply is sufficient. For larger cameras like PTZ IP Cameras or Motorized Zoom Security Cameras check the spec sheet for power requirements. We always recommend providing more amperage than is necessary to lengthen the lifetime of the power supply and avoid power delivery issues.
Step 2. How to set up an IP security camera on a local network
After providing power to the camera and connecting it to the network or a computer the next step is configuring it. This guide approaches the setup using a camera that is fresh out of the box from the factory in an unconfigured or “uninitialized state.”
If your camera arrives pre-configured you will want to hop on over to our Standalone Security Camera guide for further instruction.
Step 2a. What is a local network and how do you determine what your local network is?
A LAN, or Local Area Network, is a system of devices that are connected to one another using a network router usually contained in a single building or complex.
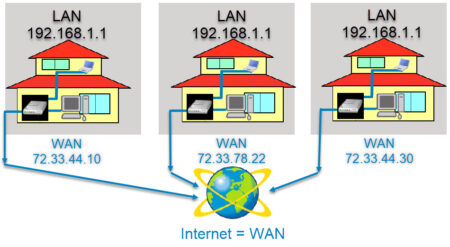
On the other hand a WAN, or Wide Area Network, is a network that spans across and connects multiple LANs together. The Internet can be considered a type of WAN. In the picture below we show the difference between a WAN and a LAN. Notice how each home can have the same network scheme but use a different IP address to communicate on the internet. The WAN IP address is provided by an Internet Service Provider (ISP) like Comcast, Spectrum or Verizon.
Determining what your local network is
Computer networks, whether it’s a LAN or the Internet, all rely on IP addresses to direct information between devices.
An IP address for a device is like a mailing address for a home or business. IP Addresses tell routers where to send the mail or in this case digital information. IP cameras send data to the router, and the router directs the information over the internet to a smartphone or computer. Routers also handle local network traffic like mentioned above. Below is an example of a LAN with a phone, computers, a TV, and an IP camera. Each device has its own unique IP address on the local network.
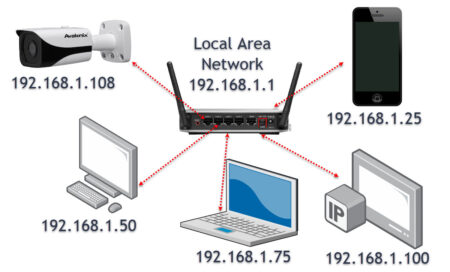
It is important to know and understand what your Local Area Network IP address scheme or schema is. The most common and widely used scheme is a 192.168.1.x network. In order to figure out what your local network scheme is, login to a Windows computer that is connected to your router and follow our video below.

Write down the IP address scheme, or save it in a Notepad file like suggested in the video.
Step 2b. What is the ConfigTool and how do you use it?
The ConfigTool is a program that can search your Local Area Network for IP cameras and NVR devices from CCTV Camera World. It also allows a person to change the IP address, update firmware and access the camera using Internet Explorer after the camera has been initialized. In this article we’re going to use the ConfigTool to quickly access and initialize a camera. You can download the ConfigTool by clicking here. If you need assistance installing the program check out our article for the IP Camera Configuration Tool.
Step 2c. What an uninitialized IP camera is and why we suggest using a 192.168.1.xxx network
When a camera arrives from the factory it comes in an “uninitialized” state with no administrator password. Initializing a camera allows a user to configure their camera with a strong password, recovery questions and recovery email. This initialization process allows you to configure the camera for use as a standalone recording or stream device, or add it to a network video recorder.
Since cameras are shipped with a default IP address of 192.168.1.108 it is important to use a 192.168.1.xxx network to access an IP camera.
What to do if your network is not a 192.168.1.xxx network
If you discover your network is not 192.168.1.xxx like our example above then you will first connect the camera directly into your computer instead of a router. You will need a desktop or laptop Windows computer with a hardwired network port for this step. After connecting the camera you will need to change the IP address on your computer's network port as shown in the video below.

After you finish configuring the camera for your network don’t forget to set your computer’s network port settings back to normal or you won’t be able to access the Internet from your computer.
How to initialize an IP camera after you have established connectivity
Provided you are on a 192.168.1.xxx network, or have set your computer up to directly connect to the camera the next step is initializing the camera. In the video below we demonstrate how you would use the ConfigTool program to easily open Internet Explorer and access the IP camera. The video also shows how to quickly initialize the camera.

Step 3. Accessing the web interface of your IP security camera
After initializing the camera you can access the web interface to start configuring the cameras settings, or view the camera’s video stream. In the video below we show how to open Internet Explorer and access a camera.

Using Chrome, Firefox, or Edge to access an IP camera
Cameras with newer firmware can also support the HTML5 player that modern browsers use. However, to playback stored footage from a camera's internal SD card, and for some settings you will be required to use the Internet Explorer plug-in on a Windows computer.

Step 4. How to Port Forward an IP Camera through a Router
The final step to getting a camera to communicate over the internet without using intermediary P2P services is to port forward the camera through your router.
Routers have security features built into them to prevent unwarranted traffic or hackers from reaching your local network. In order for a security camera to be able to communicate with the internet you have to allow it to “talk” through a router’s firewall.
It is impossible for us to explain and show how to port forward with every router since there are thousands of models out there, and each model has a different menu interface. PortForward.com does a good job at providing guides on several router models. You may find yours there.
In our video below we Port Forward using the ASUS RT-ACRH13.

Step 5. Setting up DDNS if you do not have a Static IP address from your ISP
To access an IP camera from the internet you need to know the IP address that is provided for your home or business by your ISP. DDNS or Dynamic Domain Name Services offer customers a free or inexpensive alternative to purchasing a static IP address from an Internet Service Provider. A static IP address is one that remains static, meaning it doesn't change.
Most ISPs provide a dynamic address that changes when the power goes out, the modem reboots, or they do maintenance on their network. A dynamic address will prevent you from accessing your security camera system until you find out what the new IP address is for your internet connection. The new IP address will change again when any of the aforementioned happen.
DDNS works by automatically updating a domain name or URL to the current IP address provided by your ISP.
DDNS is often provided by third-party websites like No-IP or by modern routers that have the feature included. In the video below we show how to set up a DDNS service on the ASUS RT-ACRH13. You can use routers from companies like Asus as an inexpensive way to keep up with dynamic IP address changes on your internet connection.

Step 6. Remotely accessing an IP Camera from anywhere in the world
The hard part is over. Once the camera is set up on the local network, and is port forwarded to the Internet the last step is to finally enjoy the fruits of your labor. Below we cover some of the ways that you can access your IP camera remotely.
Accessing a camera using a DDNS address in a web browser
If you’ve properly setup and tested your DDNS settings, you can now use the DDNS URL instead of typing the IP address.
Accessing a camera using the smartphone apps
Using the DDNS address in the smartphone app is a similar process to adding a device to our software or other apps using an IP address. The convenience of a DDNS address is you will never need to update the IP address in your phone, and it also reduces the need to create separate entries for local and away.
You can use the same DDNS address when you’re at home or away. Make sure your WiFi is on when you’re at the same location as the camera to avoid unnecessary data charges. We cover adding a device to the smartphone app in detail in our How To View Security Cameras from an iPhone or Android guide.
Accessing a camera using the PC software
Last but not least the most convenient way to view an IP camera without using the web browsers is the PC software. The camera monitoring software can connect to full systems and individual cameras alike.
After installing the software you can add the camera to the software by manually entering the DDNS address, username, and password. The software will point to the information you provided and login to the camera. The software offers a stable live viewing and cleaner interface when compared to the web interface. It also requires no additional plugins which simplifies the setup for less tech savvy customers.
You can learn more about using our camera monitoring software in our How To Use Our Central Monitoring Software guide.
Further Reading
Feel free to check out our other guides that explain some of the great things you can do with a standalone IP camera: