

How to Setup Alarm Activated Snapshots on your Security Camera

Security cameras are not strictly for standard video surveillance. A customer had a request for his employees to capture a number on a gift card he was shipping to his customers. Doing so would allow him to capture the gift card number that was shipped and go back to it if the card was lost or damaged in the mail. This guide discusses the best method to capture footage for such an application.
The customer expected recording that would allow him to quickly retrieve a card number based on the date and time the order was completed. He did not want to record continuous video of the order process, or motion activated video because it would require too much storage space and be time consuming to retrieve the video of interest.
CCTV Camera World proposed a snapshot based recording solution for this use case scenario to capture detail on orders being shipped. It requires less storage to create snapshots of the gift cards compared to video data. Keeping data storage, picture quality, and other limitations in mind is important when trying to use security cameras for purposes other than security. Below is a guide that demonstrates how to setup alarm activated snapshots on your security camera system.

What do you need to setup alarm activated snapshots?
- A PoE camera that supports alarm based input. Our IP box camera, IP PTZ cameras, and some high-end IP cameras have alarm inputs available. Please check the specifications or description of the camera before purchasing. In this guide we use the IP box camera.
- A way to store the snapshots such as a microSD card installed in the camera or FTP storage. In our example, our box camera has a microSD slot which simplifies the setup.
- An alarm sensor or button that supports a 2-lead wire. In our example we use a simple household light switch with a pair of wires to trigger the alarm input.
- A Windows PC on the same network as the camera. You will need to use Internet Explorer to playback snapshots. Other browsers do not allow for full functionality of the web interface that's demonstrated in the video below.
Note: You cannot use an HDCVI or other HD over coax camera. Alarm activated snapshot recording to a microSD card is only supported by IP security cameras.
How to setup alarm activated snapshots?
1. Mount the camera to capture a good picture of your objective
We used a 2.8-12mm lens with our 4MP IP box camera and mounted it 2.5ft from the target are we want to capture. Since the numbers on a gift card are small font, the camera has to be up close with the correct zoom level on the lens. You can set up your camera however you like as long as the object of interest is visible and the picture is in focus.
If you are having issues focusing the picture with an IP box camera you can watch our video below on how to bring the picture in to focus.

2. Install your alarm input and switch via a 2-lead wire
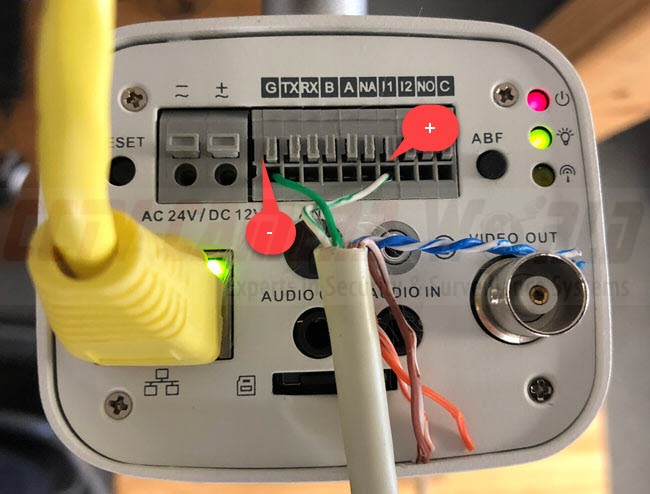
- Take your 2-lead wire and label one wire as a positive. Label the other wire as ground. In our case we used striped green for positive, and solid green for ground.
- Connect the positive wire for alarm input in appropriate terminals on the alarm input block. In our example, the positive is labeled “I1” on the alarm input block shown in the image below.
- Connect the ground wire. Often times this is labelled “G.”
- Connect the wires to your button or switch. Make sure the positive wire is on a seperate terminal than the ground otherwise the alarm will always be active. We used a simple lightswitch.
3. Configure the camera to record snapshots on alarm input
- To access the camera from internet explorer, you need to assign the network camera an IP address to work on your network. Please follow our guide on how to connect security cameras to the internet to learn how to deploy the camera on your network.
- Enable ActiveX permissions on Internet Explorer.
- Login to the camera and go to the Settings.
- Click the Event side menu then click Alarm in the submenu.
- Select Alarm-1 for Relay-in, and check the box next to Enable.
- Enable Record if you would like to record video as well. The record delay is how long the camera will record video for after an alarm is triggered.
- Enable Snapshot to record snapshots when the alarm is triggered.
4. Configure Storage for Snapshots
After you configure your Event settings you must setup the destination.
- Click the Storage side menu, then click Destination in the submenu
- The Destination section allows the user to specify storage location.
- Local is the microSD card
- FTP is a FTP server you may have on your NAS or computer
In our example we are only concerned with Local to record to the microSD card
- Uncheck everything except for the Alarm in the Snapshot section. The left hand Record section is for video. We are only concerned about snapshots in this article so we leave everything under the video section unchecked.
5.Configure Recording Schedule for snapshots
It’s important for the camera to know when to take these snapshots.
- Under the Storage side menu click Schedule.
- Click on the Snapshot tab.
- Click setting for any of the days listed. This brings up a calendar view for the week.
- Click alarm on the right and the checkbox "All" on the top left corner to enable alarm recording for every single day
If your connections and settings are correct the security camera will now record a snapshot when your switch is turned on.
How to view recorded snapshots?
Once snapshots are recorded onto the internal SD card you’re probably left wondering how you can view the snapshots that the camera has taken. This is a simple process that involves the web interface you used to setup the camera. You can also remove the microSD card from the camera and use your PC to view the jpg images. For this guide we are using the web interface served up by the camera.
- Navigate to Playback
- Using Internet Explorer on your Windows PC, log into the web interface of the camera the same way you used to configure the camera.
- Click the Playback tab on the top.
- Select File Type and Data Src
- Use the menu to the right of File Type and select jpg.
- Ensure the Data Src is selected to say SD card.
- Select the day that you wish to pull your snapshots from. Days that contain snapshots will be highlighted blue.
- List the snapshots for the selected day
- Once you have the day selected you can click the button at the bottom right, it looks like a menu button. This brings up a filelist for that day.
- You can click the Down arrow button to preview each snapshot.
- Or you can use the play button on the bottom left to cycle through the snapshots for a given day at 3-5 second interval